
Dan Swan, December 16, 2024
Get the Best Solution for
Your Business Today!
This document provides instructions on how to migrate a Planning Analytics version 11 database to the new Planning Analytics Engine. The process involves preparing the database, downloading and installing a migration utility, and then using the utility to convert the database to the Planning Analytics Engine format. The document also provides guidance on how to upload the migrated data into a new Planning Analytics Engine database.
Table of Contents
Preparing for the Migration
This section details the necessary environmental configurations, including sufficient disk space and RAM It highlights the importance of ensuring the database’s consistency and accessibility. It also emphasizes the need to resolve any conflicts in dimension definitions before migration. We then discuss how to migrate selected Planning Analytics clients and change their names to match the new authentication framework.
Objects not migrated to Planning Analytics Engine
These objects will not be migrated from a version 11 database to Planning Analytics Engine.
- Sandboxes
- Any object whose name is not a valid UTF-8 encoded string
- Cubes, views, dimensions, and subsets with names containing any of these invalid characters; / : * ? ” < > | ‘ ; ,
- Data files in client directories
To prepare a Planning Analytics version 11 database for migration to Planning Analytics Engine, you must perform several steps to ensure a clean migration
1. Disk Space, RAM, and Database Shut Down
- Verify that you have free disk space at least 2.5 times the size of the original version 11 database on the machine that hosts the database. You should also make sure this machine has enough RAM to load the database. This machine is where the TM1® to Planning Analytics Engine Database Migration Utility will be run.
- Shut down the version 11 database before migrating. This will ensure all the cube changes are up-to-date. If you need to migrate while the database is running, perform a SaveDataAll to save in-memory changes to the cube files.
2. Configuration and Data Source Files
- Make sure the database’s Tm1s.cfg configuration file exists and has the correct database directory. The configuration file needs a DatabaseDirectory= line with the path to the data files relative to the Tm1s.cfg file.2
- Ensure that the data source files used in TI Processes can be accessed on the machine where you will run the migration tool. The processes will be migrated even if the migration tool cannot access the data source files. However, a process won’t run during migration if the data source file is inaccessible, and a warning will be issued.
- You can modify the process after the migrated database is loaded into Planning Analytics Engine to allow it to run successfully. The two options include:
- Uploading the data source file via the REST API to ~/Contents(‘Files’)/Contents) and modifying the process data source location accordingly.
- Modifying the process so it uses a valid URL to the data source file’s remote location.
3. Views, Feeders, and Dimensions
- Delete or repair views that reference elements that no longer exist.
- Load the database into a recent Planning Analytics version 11 server and explicitly save the data (run SaveDataAll) to ensure feeders are written out in the most recent format.
- Resolve any conflicting element types for dimensions with multiple hierarchies. Each leaf element should have a consistent element type in all hierarchies. If these conflicts aren’t resolved, the dimension won’t be migrated, and the migration tool will stop when it encounters the first dimension with conflicts.
- For example, if an element in a dimension is defined as a Numeric type in one hierarchy and as a Consolidated type in another hierarchy, this type of conflict must be resolved before migrating.
Failing to resolve dimension conflicts will prevent the successful migration of the database. Therefore, it is crucial to carefully review and resolve any dimension conflicts before initiating the migration process.
4. Migrating Planning Analytics Clients (Users)
You can control which Planning Analytics clients are migrated to Planning Analytics Engine. You can also change their names to align with the new authentication framework.
To control which clients are migrated to Planning Analytics Engine:
a. In the }ClientProperties control dimension, add an element called “CloudID”.
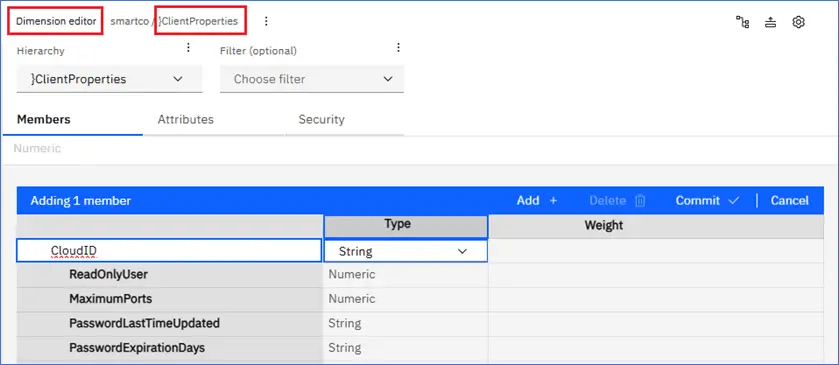
b. For each client you want to migrate, add its new Planning Analytics Engine name to the CloudID cell in the }ClientProperties control cube.
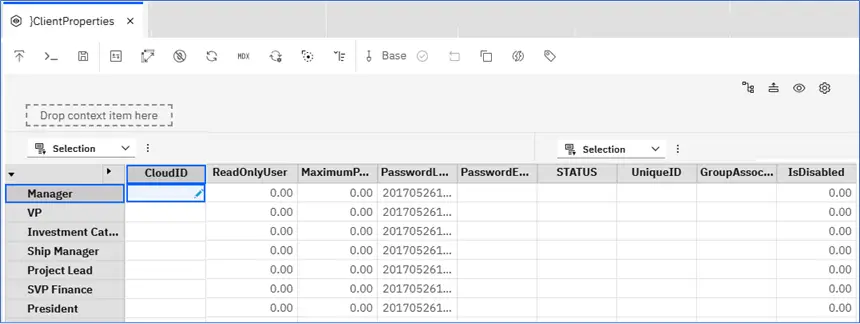
Only the clients with a defined CloudID in the }ClientProperties cube will be migrated, along with their private views and subsets. These will be migrated under the specified CloudID names. Clients without a defined CloudID will not be migrated.
If you don’t add the CloudID element to the }ClientProperties dimension, all clients and their private objects will be migrated with their original names.
If you provide a CloudID name for the Admin client, its private objects are migrated to the new name.
Downloading and installing the TM1 to Planning Analytics Engine Database Migration Utility
The Migration Utility enables users to transfer data from a TM1 database to a Planning Analytics Engine database. The utility is available for both Linux and Windows operating systems.
The utility must be run on the machine hosting the Planning Analytics version 11 database. This is crucial to preserve locale information and to avoid losing model objects.
The migration utility requires a Git installation which is offered for both Linux and Windows. The Git installation is available for download at https://git-scm.com/download/linux for Linux and at https://git-scm.com/download/win for windows.
Users of Planning Analytics for IBM Cloud Pak for Data can download the utility as a .tgz archive from IBM Passport Advantage or IBM Fix Central.
Planning Analytics as a Service users can download it directly from Planning Analytics Workspace.
To download from Workspace:
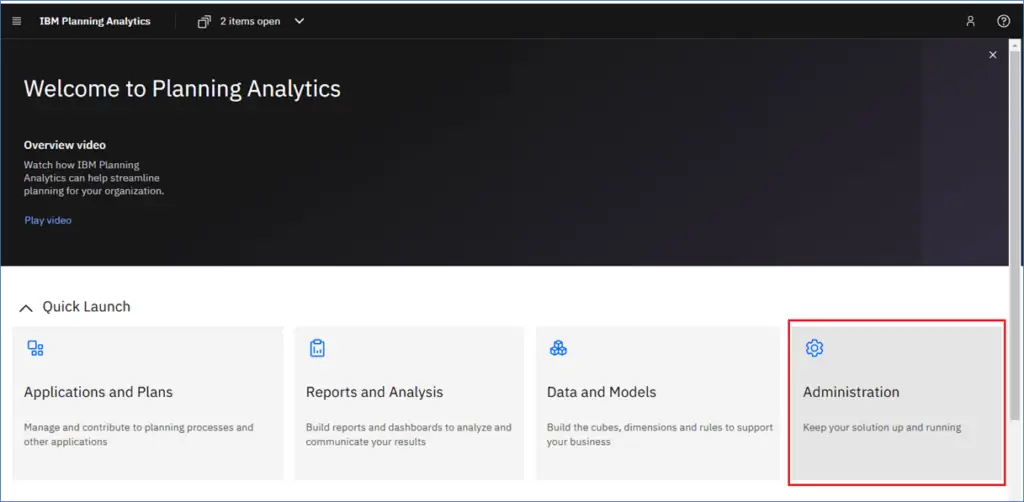
- Click the Administration tile on the Planning Analytics Workspace home page.
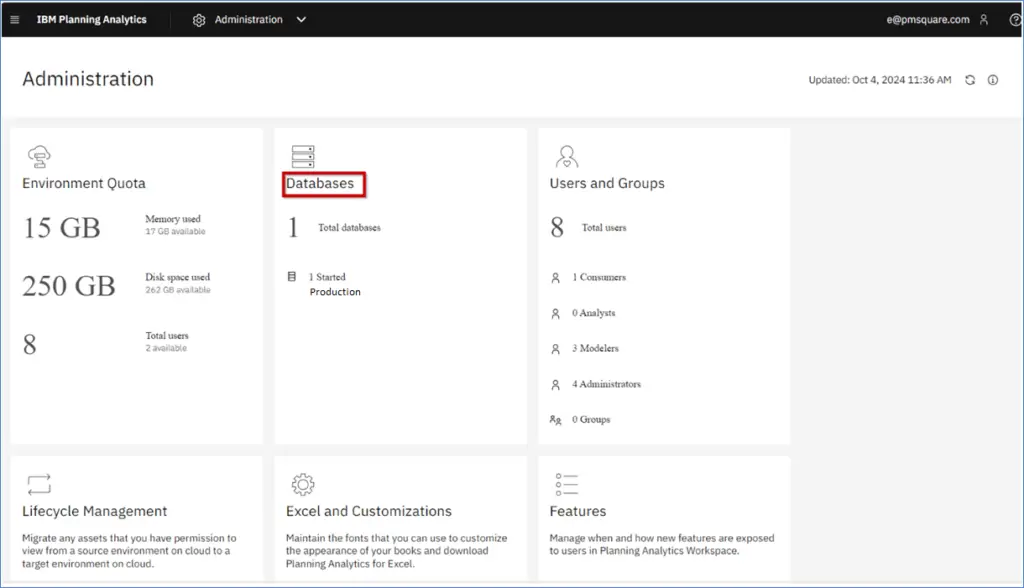
- Click the Databases tile.
- Click on a database. In the example below, we are going to download from the Production database.
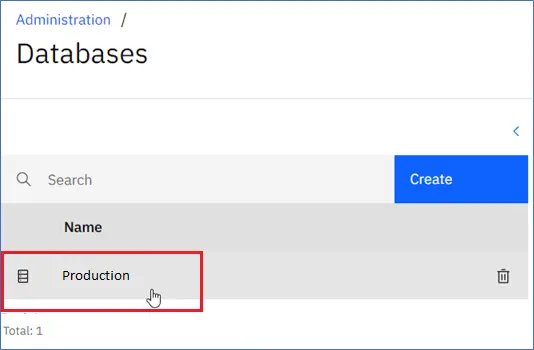
- Click the Download icon and click Database Migration Utility. The utility is downloaded as a .tgz archive.
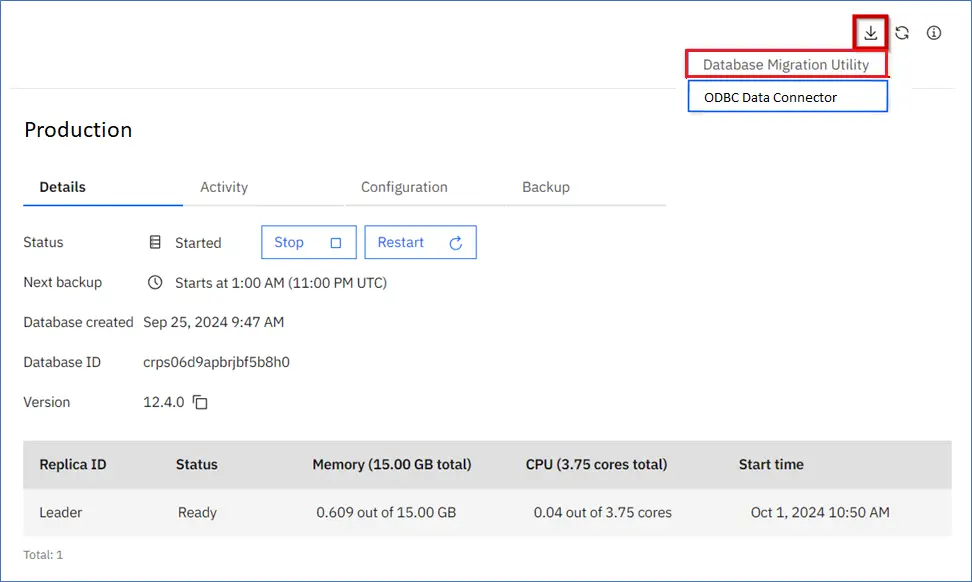
On the machine where you will be running the TM1 to Planning Analytics Engine Database Migration Utility, create a Git Bash session (Windows) or Terminal session (Linux) and unpack the archive with these commands:
cd <directory where you want to install migration tool>tar xf <migration_tool_archive_name>.tgzThis creates a Windows or Linux directory containing the Migration Tool program migrate_tm1.sh.
Migrating your database to Planning Analytics Engine format
As mentioned earlier, you must run the TM1® to Planning Analytics Engine Database Migration Utility on the machine hosting the Planning Analytics version 11 database. This ensures preservation of locale information and prevents any loss of database objects.
Ensure you have enough disk space and RAM before starting the migration. You will need additional free disk space equal to at least 2.5 times the size of the original Planning Analytics version 11 database, along with sufficient RAM to load the database.
Shut down the version 11 database before migrating to ensure all cubes are up-to-date. Also, if you need to migrate while the database is running, perform a SaveDataAll to save in-memory changes to the cube files.
The TM1 to Planning Analytics Engine Database Migration Utility uses the /tmp/tm1-migration directory as its temporary working area, which must have enough space to hold the entire Planning Analytics version 11 database. If this directory lacks sufficient space, use the --temp-dir option to specify a different directory with adequate capacity.
Key parameters of the TM1 to Planning Analytics Engine Database Migration Utility:
- The utility uses the migrate_tm1.sh script, which requires inputting the path to the source Version 11 database
- The output URL for the migrated data set designates the destination where the output data will later be loaded into the Planning Analytics Engine. This URL can point to any external service, such as AWS S3, and supports protocols like HTTPS, HTTP, FTP, and FILE. Local files can be written using a
file://localhost/...URL format.
The TM1 to Planning Analytics Engine Database Migration Utility also provides a --help option, which displays descriptions of additional Migration Tool parameters.
Steps
Using a Linux terminal window or a Git Bash window within Windows, run migrate_tm1.sh and enter the relevant input and output locations.
These are the IBM-recommended input and output locations:
- Linux – migrate_tm1.sh –input /models/X –output file://localhost/xfer/PlanSamp.tar.gz
- Windows – ./migrate_tm1.sh –input “C:ibmmodelsPlanSamp” –output “file://localhost/c:/xfer/PlanSamp.tar.gz”
Actual example Windows commands:
./migrate_tm1.sh --input D:/PA_Models/24Retail/ --output "file://localhost/D:/PA_Models/24Retail/24Retail.tar.gz"
./migrate_tm1.sh –input D:/PA_Models/User/24Retail/ –output D:/PA_Models/User/24Retail/24Retail.tar.gz — note that //localhost/ was removed and the quote marks were removed in this example.
The output log (migrate.log) is located in the terminal session by default. You can change the log’s file name using the –log-to-file migration.log command at the end of the migrate command.
For example: ./migrate_tm1.sh –input D:/PA_Models/User/24Retail/ –output D:/PA_Models/User/24Retail/24Retail.tar.gz --log-to-file 24Retail_migration.log

The TM1 to Planning Analytics Engine Database Migration Utility generates extensive log messages detailing its progress. At the conclusion, a summary of the migration process is displayed, including the memory usage, which is useful for planning the resources for your Planning Analytics Engine database.
Most messages are prefixed with “info” and represent standard progress updates. This example appeared near the end of the migration process.

Messages that begin with “warn” indicate issues that should be examined, but do not hinder the migration. In many cases, lines directly preceding warnings and errors in the log provide further details on the issue encountered during migration. Below are examples from a recent migration.


Messages labeled with “error” signal that a component from the Planning Analytics version 11 database could not be migrated. Below, an element attribute cube could not be migrated.

Severe errors can sometimes end the migration without producing a final output dataset, while other errors may simply exclude the affected component from the output dataset.
Any files found in the Planning Analytics version 11 database that are not recognized as part of the model are transferred to the Planning Analytics Engine database and can be accessed via the ~/Contents(‘Files’)/Contents API. A log message is generated for each such file, similar to the following example from IBM:

Uploading migrated data to Planning Analytics Engine
Once you have migrated your Planning Analytics version 11 database to the Planning Analytics Engine format, you are ready to upload the resulting dataset to the Planning Analytics Engine. The dataset is saved as a <filename>.tar.gz file, which is in the same format as a standard Planning Analytics Engine database backup. This file will be used to upload data to your new Planning Analytics Engine database.
1. Log into Planning Analytics as an administrator.
2. In Planning Analytics Workspace and click the Administration tile.
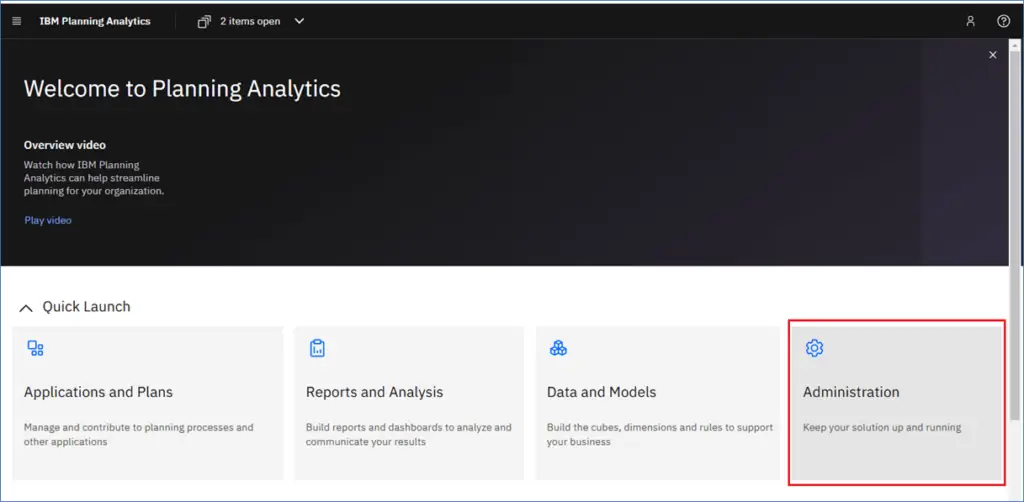
3. Click the Databases tile.
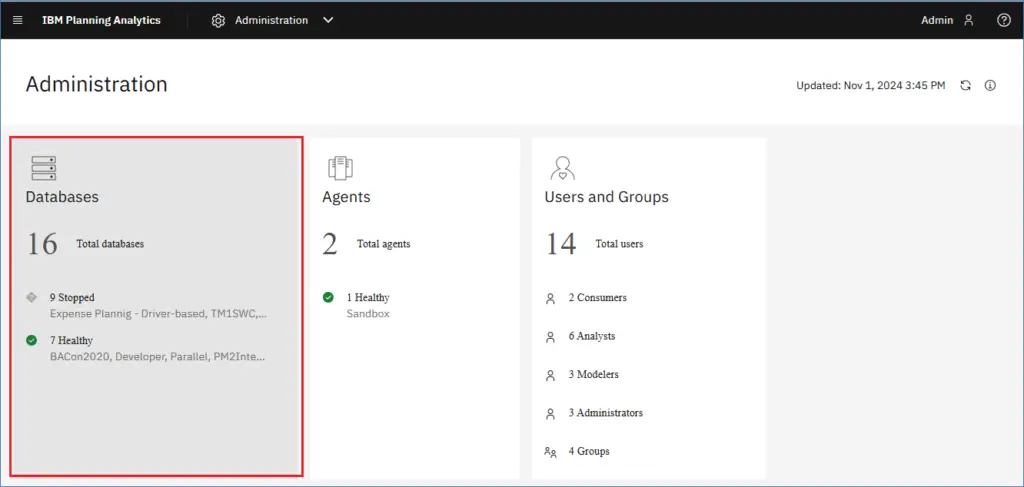
4. Click Create to create a new database.
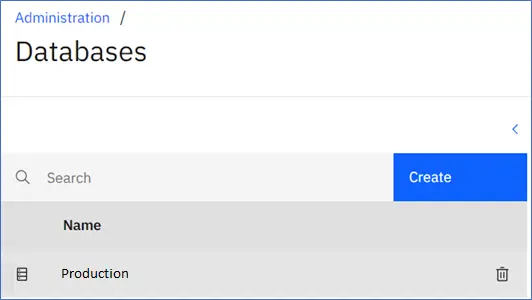
- The name of the new Planning Analytics Engine database should match the name of the Planning Analytics version 11 database that was processed through the TM1 to Planning Analytics Engine Database Migration Utility.
- When setting up the database, allocate enough resources (RAM and CPU cores) to handle the database you are uploading. For instance, if the version 11 database required up to 48 GB of memory, you should allocate the same 48 GB to the new Planning Analytics Engine database.
5. Select the new database on the Databases list.
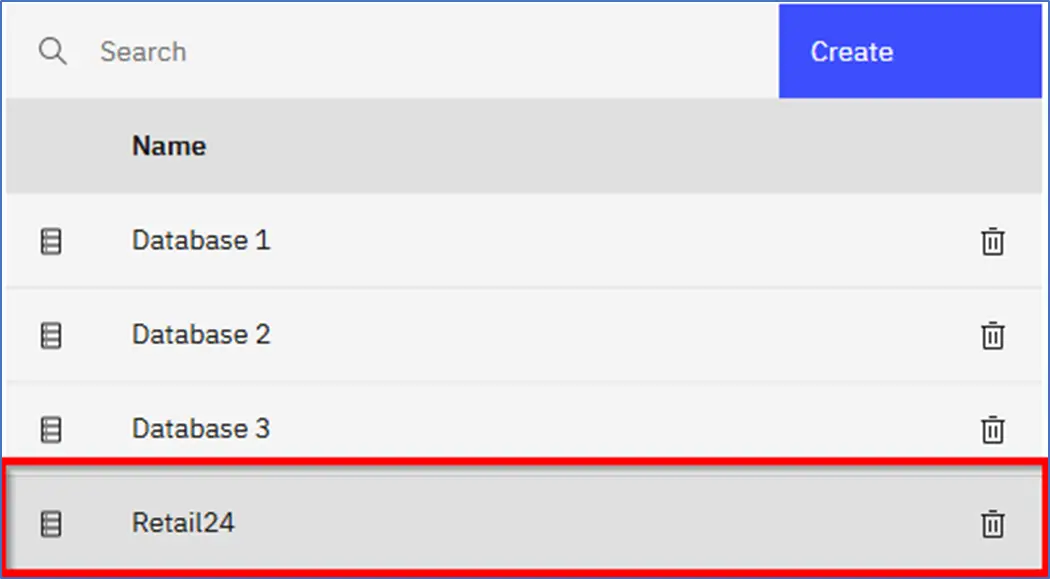
6. Click the Backup tab.

7. Click Upload.

8. On the Upload and restore screen, drag and drop your <filename>.tar.gz file onto the target region or browse to locate the file. Click Upload.
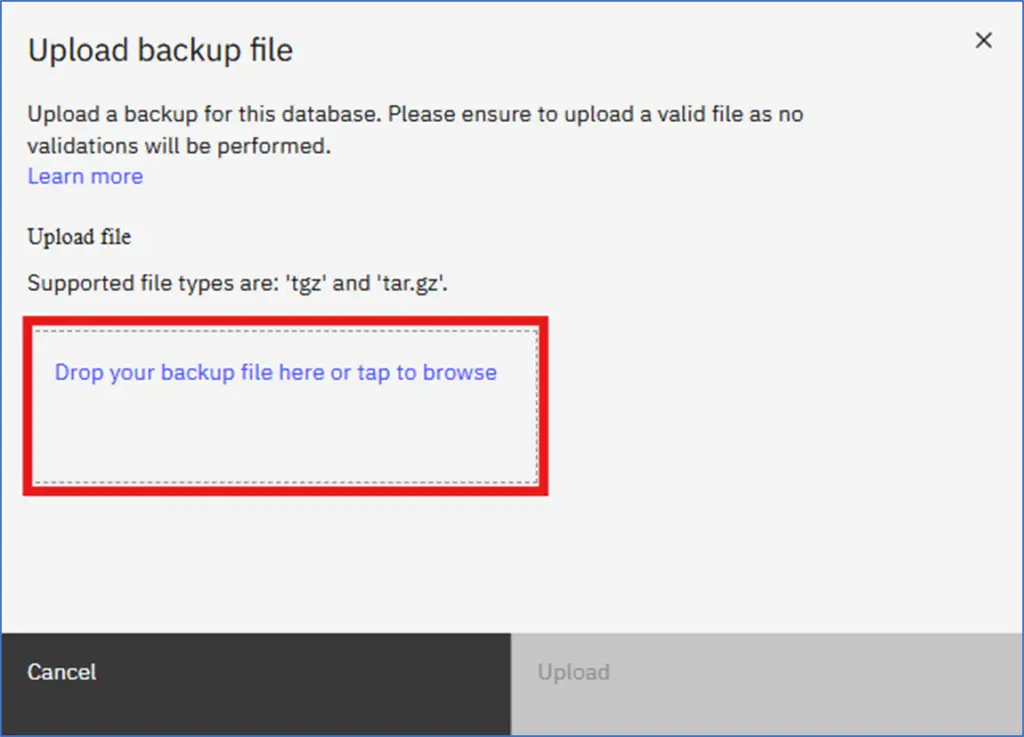
Wait for the upload and restore processes to complete.
You can start working in the new Planning Analytics Engine database when the restore is complete. An on-screen notification will pop up when the restore process has finished.
Conclusion
Migrating from Planning Analytics Version 11 to Version 12 requires careful planning and execution. Ensure you understand the prerequisites, limitations, and steps involved, and carefully monitor the migration process for any potential issues.
If you are planning an upgrade to your Planning Analytics environment, and would like some help or advice, contact PMsquare today!
Be sure to subscribe to our newsletter to have PMsquare articles and updates sent straight to your inbox.
Publish Date:


