PMsquare Cognos Analytics Consulting Team, June 12, 2023
Get the Best Solution for
Your Business Today!
Once upon a time, new releases of Cognos Analytics (at the time known as Cognos BI) only came around once a year or so. This was how the software industry as a whole used to operate—but these days things are different. More frequent, smaller releases are the name of the game, and with the more rapid release cadence comes a more persistent urge to install new Cognos Analytics software versions, delivering powerful new features and critical bug fixes to end users in an expedient manner.
For those whose only experience upgrading software is watching their phone load the latest versions of apps, the effort involved in upgrading Cognos might seem negligible. However, those familiar with upgrading enterprise-grade, distributed, secured, client-server architected software might guess that this process can take significant time to complete. Frankly, software upgrades of this complexity are often better outsourced (especially in multi-server environments). If you’d like to have your upgrades and maintenance handled for you on an ongoing basis, check out our managed services offering.
If you’re feeling brave though, this article is a step-by-step guide for performing an in-place upgrade and installation of Cognos Analytics servers. It includes a detailed demonstration of planning the upgrade, implementing the steps for the upgrade, and finally testing the upgraded server. As with any technical advice, the applicability of certain steps may vary from environment to environment.
Before You Begin
The guide assumes that you have basic knowledge of:
- Cognos Analytics features and functions
- Cognos Analytics components: Content Manager, Application Tier (aka Dispatcher) and Gateway
- Distributed Software architecture
- Database Operations
Preliminary Preparation for In-Place Upgrades
Before upgrading the Cognos Analytics application, you must create an upgrade plan and a workflow for every stage of the upgrade process. During the planning stage, the Cognos administrator must review the Cognos Analytics infrastructure, configuration settings, and the components to be upgraded.
The Cognos administrator should also consider researching information regarding the target Cognos version for expected behavior, new features, deprecated features, compatibility between versions, and requirements for preparing your environment.
After reviewing and gathering all the prerequisites you can then create the upgrade workflow plan. After the upgrade has been completed, test the application to ensure that your reports, other features, and functionality run as expected.
Creating an Upgrade Plan Workflow for Every Stage of the Upgrade Process:
Table of Contents
Review the Minimum System Requirements, Resources, Compatibility with Third-Party Applications, and Minimum System Requirements as a Prerequisite
The IBM Cognos Analytics software supports a wide range of third-party application software and data sources, this makes it crucial for the Cognos Administrator to review, research and ensure compatibility with your other software and data sources during the planning stage.
The supported environment page provided by IBM is the ideal place to review and gather information regarding third-party applications such as web servers, reporting Data sources, content store data sources, authentication directory servers, etc.
Determine the Version of the Current Cognos Analytics Server to be Upgraded
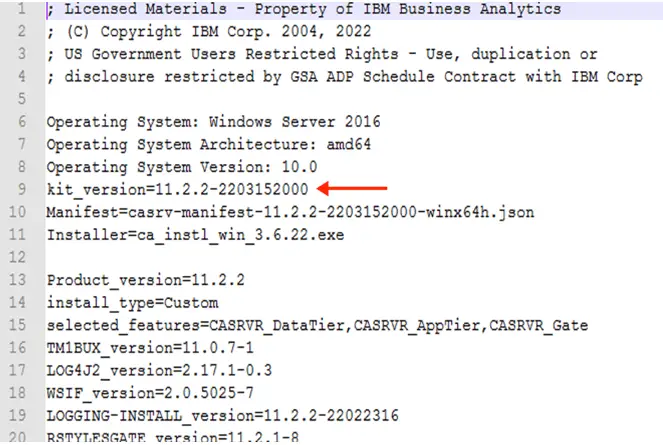
During the upgrade process, it’s very important to identify the version of the Cognos Analytics server to be upgraded, and if you are not sure about the version of Cognos Analytics server to be upgraded the information can be found in the CMPLST.txt file located at the root of the Cognos installation directory.
The CMPLST.txt file displays the build version for the Cognos server along with any Fix packs or interim fixes applied on the server.
The following picture provided below is from a CMPLST.txt file taken from the Cognos Analytics 11.2.2 server. The kit version highlighted in the file reveals the exact build of the Cognos server.
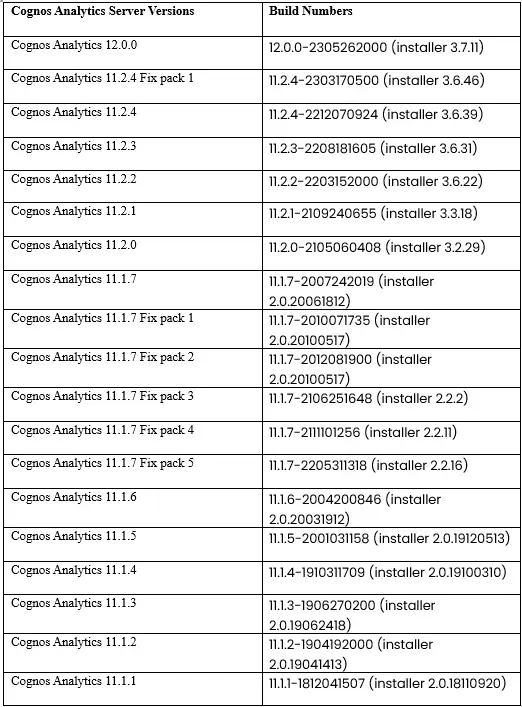
A table has also been provided, which will help you to identify the build versions for all Cognos server releases starting with Cognos 11.2.x and 11.1.x including fix packs.
Determine Cognos Analytics Server Installation Type
The IBM Cognos Analytics software is part of distributed system software which promotes the possibility of installing the Cognos components across different servers and operating systems. One might choose to install the Cognos analytics server components under one single install also known as a single server installation or choose to install them across a cluster of operating systems also known as a multi-server install.
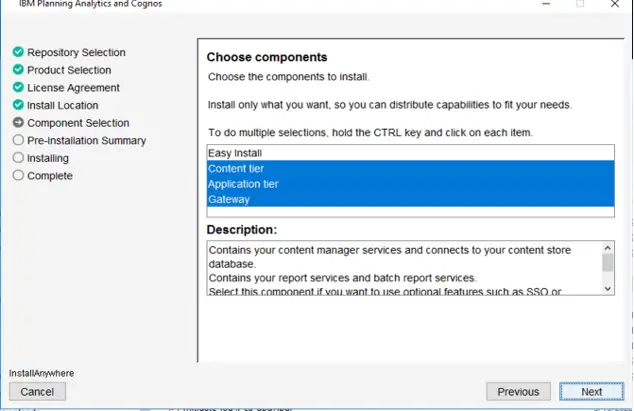
Speaking of Cognos components, there are three major components included with the Cognos Analytics server install package. These three major components are known as:
- The Data Tier also known as the Content manager
- The Application Tier is also known as the dispatcher
- The Optional gateway is also known as the Cognos gateway client
During the planning stage of the upgrade process, the Cognos Administrator must determine whether the Cognos environment to be upgraded is a single server environment installation or a multi-server environment installation and plan accordingly.
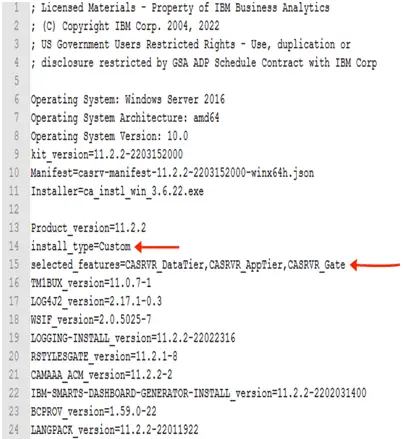
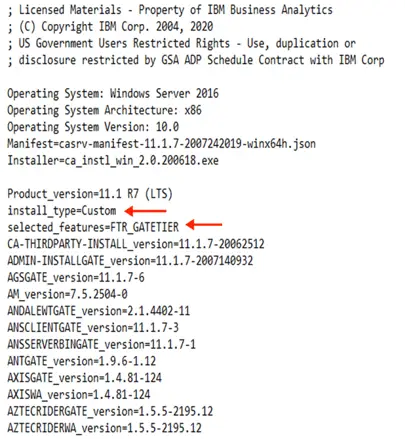
The CMPLST.txt file located at the base of the Cognos installation directory is the primary file that provides information regarding all the components installed with the Cognos server. The example provided below details components installed between two different Cognos servers helping the Cognos administrator determine whether the Cognos install type is an optional gateway, data tier, application tier, or all three.
Back Up Your Environment Before the Upgrade Task
Before proceeding with the Cognos upgrade, the Cognos administration must back up the following files residing in the Cognos environment.
- Back up the Cognos configuration file that contains all the information regarding the configuration settings that were enabled in the IBM Cognos Analytics Configuration.
- Back up the content store database.
- Back up any third-party application files used by the Cognos Analytics server.
These third-party application files would include:
- Database drivers (JDBC or ODBC)
- Application servers (any type of custom configuration such as LTPA Token enablement)
- Custom Java provider authentication files (CJAP)
- Custom Images generally stored under CA installsweb contentbiimages
- Any type of plugin generally required for integration between the IBM Cognos Analytics Server and third-party application (e.g., MotioCI, Planning Analytics, etc.)
Back up the Cognos Configuration File that Contains all the Information Regarding the Configuration Settings you Enabled
Backing up the Cognos configuration involves taking an export of Cognos configuration file by launching the Cognos configuration cogconfigw.exe, cogconfig.sh from the bin64 directory located under Cognos installsbin64 and saving it in a safe location.
Alternatively, the configuration settings can also be exported from the Windows command line or RHEL shell using the command ./cogconfig.sh -e filename.xml | ./cogconfig.bat -e filename.xml.

Backing up the Content Store Database
Backing up the content store database is an essential step in the upgrade process therefore it’s important to preserve and save the data in the content store database before the upgrade.
It’s not uncommon to perform a backup of the content store database. There are two options available for a rollback if you are unsure about the best method to follow:
- Export the Content Store via the Cognos Administration console
- Export the Content Store via Database Backup
Important: Prerequisites before performing a full content store export, it’s always recommended to run a Content store maintenance task to remove any inconsistencies in the Content Store that might occur due to non-existing user accounts, deleted user accounts, or any inconsistent objects.
Export the Content Store via the Cognos Administration Console
Exporting the Content Store data through the Cognos administration console extracts all the objects in the content store one at a time and writes them to an encrypted and compressed deployment archive file located under Cognos installsdeployment directory.
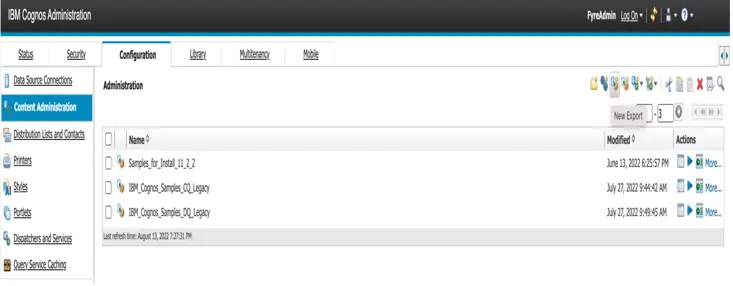
The example provided below demonstrates how to use the Cognos export wizard in order to create a deployment archive for the entire content store.
1) Cognos administration export wizard
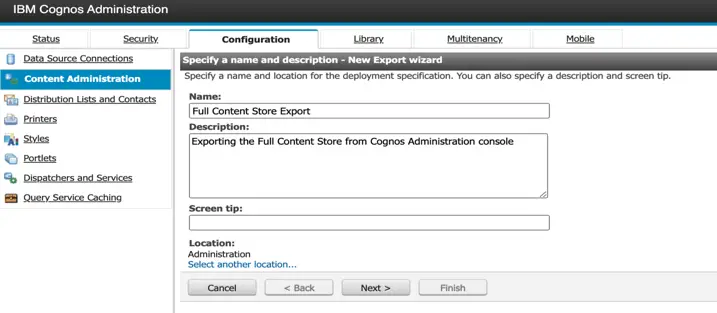
2) Specify the name of the export
3) Select the option to export the entire content store
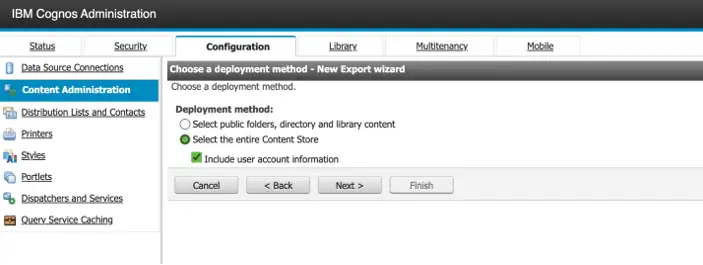
Important: You must check the option to ‘Include user account information If you want to preserve data source access accounts and security groups and roles configured within the Cognos application.
If you want to include to the configuration settings such as pre-defined advanced parameters, you will have to add the following Advanced Setting to the Content Manager(CM) Service:
CM.DEPLOYMENTINCLUDECONFIGURATION at the time of export.
4) Specify the name of deployment export
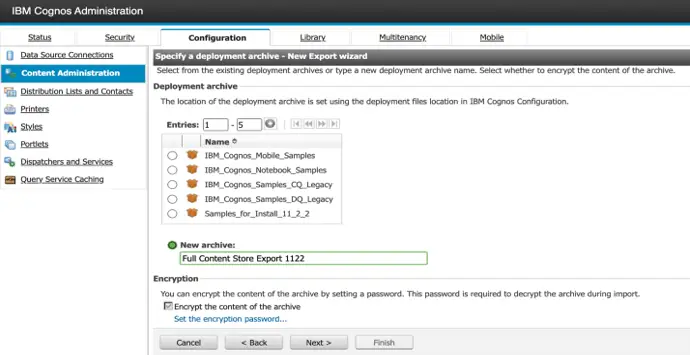
5) When you export the entire content store, you can encrypt the deployment archive by setting a password. Later, when you import, you must type the encryption password. The password must contain eight or more characters.

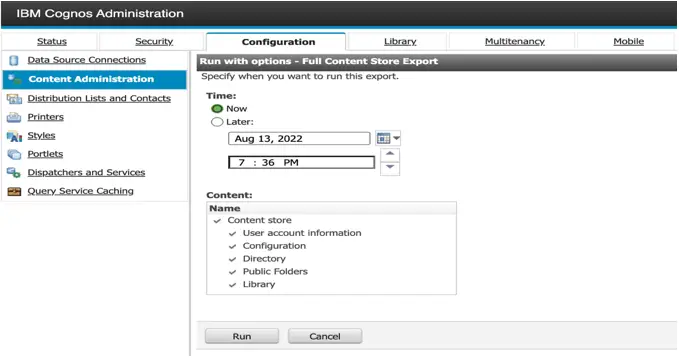
6) Final summary before performing the content store export
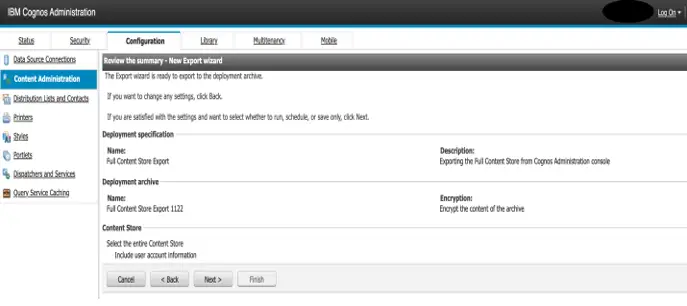
7) Specify the export deployment specification
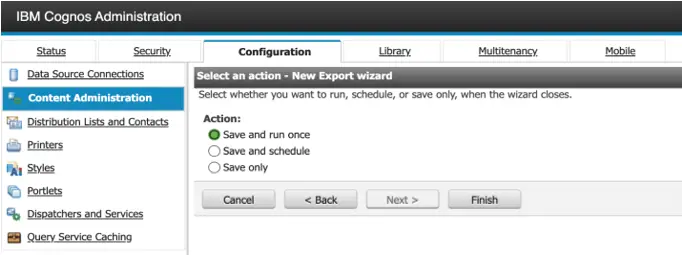
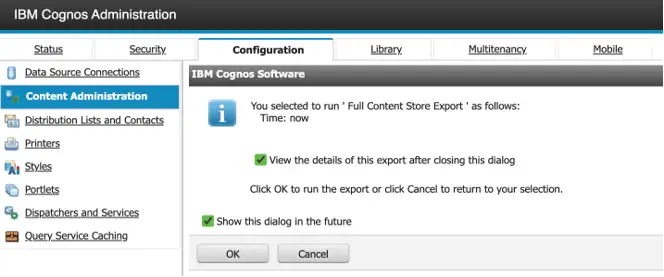
8) Content store export summary of contents to be exported
9) Click on view the details of this export if you like to revive the object details
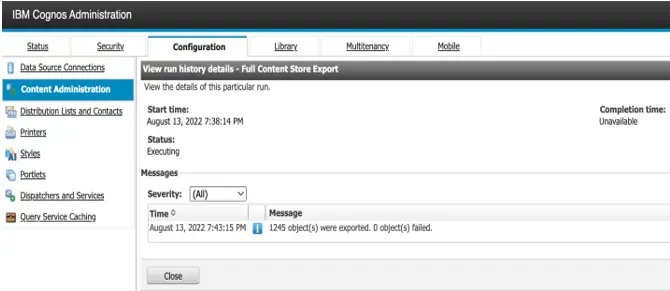
10) Content Store export history indicating total number of objects exported
11) The deployment archive created in the deployment directory

Export the Content Store via Database Backup
Backing up the database requires a point-in-time snapshot of the database in a database-specific format which contains everything that was in the original database.
Exporting the content store from a Database standpoint can be done with the use of Database Management Tools while the Cognos server is offline.
Since the Cognos Analytics server supports multiple database vendors as a content store database, the database administrator will need to follow the standard procedure specific to the Database vendor in order to perform the backup.
This topic falls outside the scope of this article hence we will not be covering it in this guide to upgrading Cognos Analytics Servers.
Preserve the Configuration Data during the Upgrade Process
The Cognos Analytics server automatically preserves your key files when upgrading the server. The key files include the following files and Folders by default
Folders
- install_locationdeployment
- install_locationdatacmstorage
- install_locationdatasearch
- install_locationdrivers
- install_locationldapschema
- install_locationinformix
- install_locationconfigurationcerts
- install_locationconfigurationcsk
- install_locationconfigurationdata
- install_locationconfigurationcaSerial
- install_locationwebappsp2pdWEB-INFAAAlib
- install_locationiso-swid
- install_locationapachedsinstancescognos
- install_locationwarAuditExt
Configuration files
- install_locationconfigurationcogconfig.prefs
- install_locationconfigurationcogconfig_reg.txt
- install_locationconfigurationcoglocale.xml
- install_locationconfigurationcogstartup.xml
- install_locationconfigurationdispatcher.properties
- install_locationconfigurationinstall_gatewayurl.xml
- install_locationconfigurationinstallData.properties
- install_locationconfigurationipfclientconfig.xml
- install_locationconfigurationconfigurationcaSerial
- install_locationconfigurationxqe.diagnosticlogging.xml
- install_locationconfigurationc11AuditExtension.keystore
- install_locationconfigurationlocal-server.xml
Miscellaneous files
- install_locationwebappsp2pdWEB-INFweb.xml
- install_locationwlpusrserverscognosserverbootstrap.properties
- install_locationwlpusrserverscognosserverjvm.options
- install_locationwlpusrserverscognosserverserver.xml
- install_locationwlpusrserversdataset-servicebootstrap.properties
- install_locationwlpusrserversdataset-servicejvm.options
- install_locationwlpusrserversdataset-serviceserver.xml
- install_locationcgi-binweb.config
- install_locationwlpdropinsAuditExt.war
- Web content files
- install_locationwebcontentweb.config
- install_locationwebcontentbiweb.config
However, if you have any customizations on your environment pertaining to Cognos themes, custom images embedded in reports, or any files configured for integration between Cognos Analytics and other third-party applications, you will need to ensure that the files and directories customized are going to be preserved.
Preserve Custom Configuration Files
The steps provided below demonstrate the procedure on how to preserve the custom configuration file on the Cognos Analytics Server before upgrading the Cognos Servers.
The files to be preserved during an upgrade are listed in the following location Cognos Analytics server Installconfigurationpreserve.ca_base_preserve.txt

We would recommend not to edit the original ‘. ca_base_preserve.txt’ file instead create a copy of the ‘preserve.txt.template’ file and rename this file to preserve.txt.
Edit the preserve.txt file to include or exclude certain files or directories as provided in the example below, before upgrading the Cognos Analytics Server.

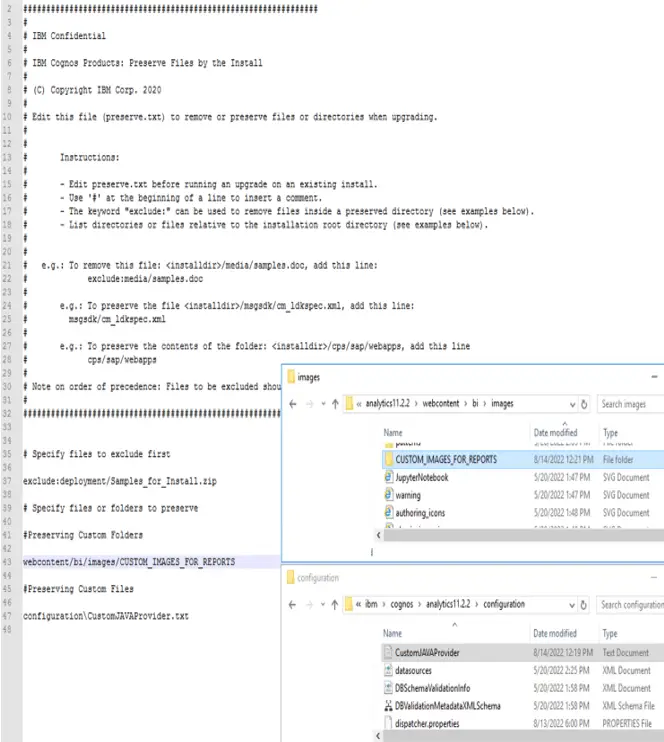
Under the circumstance where you are installing the Cognos analytics server in a new directory location instead of the existing directory or uninstalling the current version of Cognos completely and then installing a new version, you will have to manually migrate these custom files and folders before proceeding with any of the steps mentioned above.
The Installation Method
The Cognos Administrator can follow any of the two approaches as part of the installation method. Depending on the setup of the environment or the requirement of the business, the Cognos Administrator can install or upgrade the Cognos Server using the following two procedures:
- Installing/Upgrading the Cognos Analytics Server using the Graphical User Interface (GUI)
- Installing/Upgrading the Cognos Analytics Server using Silent Method
When to Upgrade/Install Using the Graphical User Interface (GUI)
Installing or upgrading the Cognos Analytics server using the Graphical User Interface is one of the most commonly known standard procedures followed by Cognos Administrators at the time of in-house upgrades or installations.
Over the past years, IBM has changed the procedure for installing and upgrading the Cognos Analytics servers compared to the older version of Cognos Analytics formerly known as Cognos Business Intelligence Server. At the time of writing this article, the latest release of Cognos Analytics Server is Cognos Analytics 11.2.2.
The Cognos Analytics server 11.2.2 is comprised of two files required for the installation:
- The Cognos Analytics installer
- The Cognos Analytics repository
The Cognos Analytics installer is an executable file(.exe) for Windows and a self-extracting binary file(.bin) for Linux that launches the Installation Wizard to proceed with the installation.
Once the Installation Wizard launches you are then required to provide the path of the repository file (CA Server repository or CA Client repository) depending on the upgrade objective.
The CA Server repository is the repository file comprising the Cognos server components such as the Data tier, the application tier, and the optional gateway.
The CA Client repository is the repository file comprising all the Cognos clients such as Framework Manager, Cube Designer, Dynamic Query Analyzer, and Life-Cycle Manager.
It is always mandatory to have both the Cognos Server and the Cognos clients on the same version to avoid any issues that may arise due to version incompatibility.
Therefore, it is highly recommended for the Cognos Administrator to upgrade the Cognos clients as well after post-upgradation of the Cognos Analytics servers.


When to Install/Upgrade Using Silent Method
The Cognos administrator may choose to perform an upgrade of the Cognos Analytics servers using the silent method under the following scenarios:
- If you want to install or upgrade multiple Cognos Analytics servers installed across several servers on the network with the same configuration as the existing server.
- If you want to automate the installation and upgrade process with the help of scripts
- If your environment is Linux or Unix and not configured with XWindows required for launching the installation wizard in GUI mode.
Step-by-Step for Using the Graphical User Interface (GUI)
Procedure for GUI Method
- Preparing to install
- Ensure that you have a minimum of 8 GB of Free Disk Space required for the installer to lunch
- Ensure that the content store database has been backed up and stored in a safe location
- Review the Supported Software Environment page for Cognos Analytics provided by IBM and ensure version compatibility with Third-party applications such as the content store database, web server, Reporting database versions, etc.
- Review the cmplst.txt file of the Cognos server to be upgraded and keep a note of the build version prior to upgrade.
Step-by-step for GUI method
Right-click on the Cognos Analytics installer and launch the installation wizard as Run as administrator.

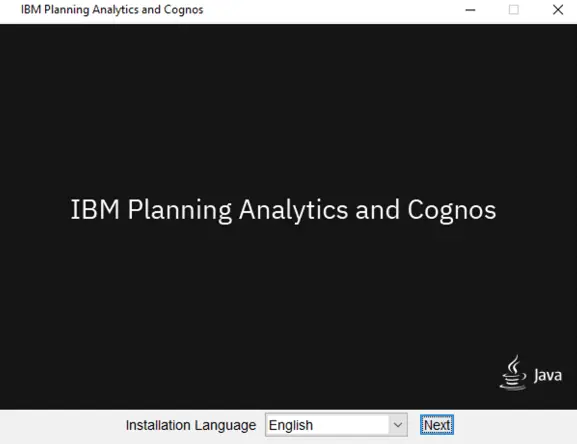
The above step will launch the installation wizard. You may select your desired installation language and proceed further by clicking on ‘Next’ as provided below.
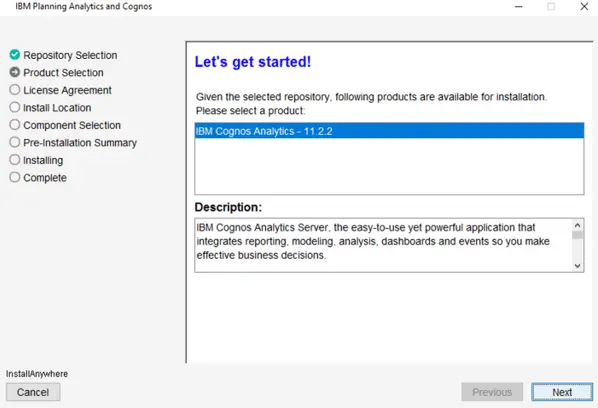
The next step is to provide the installer with the path to the latest version of Cognos Analytics Server repository file, however, if the Cognos Analytics installer and the repository files are stored under the same directory then you’re not required to explicitly provide the path to the Cognos Analytics Server repository file. The installer has the capability to automatically identify the correct repository file during the installation phase.
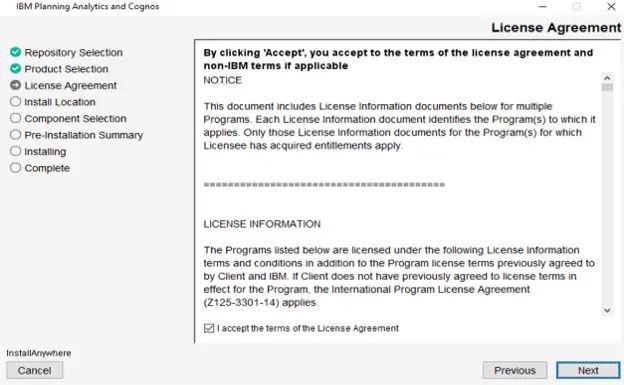
Review and accept the license agreement and select “Next.”
In the next step, the Installation wizard will now be requesting the location of the installation. When you are upgrading the Cognos Analytics server the Cognos Administrator will have to point the location of installation to the existing Cognos Analytics installation.
For the purpose of the demonstration, we will be upgrading a Cognos 11.1.7 server to Cognos Analytics 11.2.2. This type of upgrade or the installation method is commonly known as an over-the-top upgrade or installation.
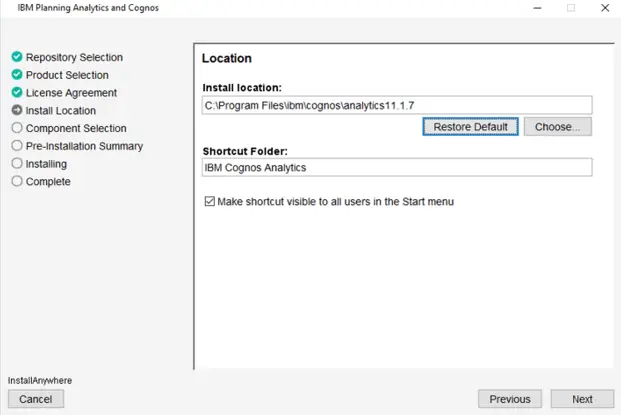
Provide the location of the Cognos Analytics server to be upgraded and select Next.
The Installer will automatically determine the existing components residing on the existing server and present the administrator with a warning indicating that the existing files will be overwritten before proceeding further.
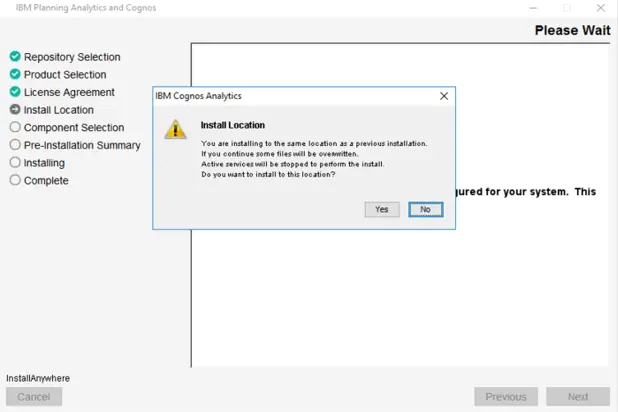
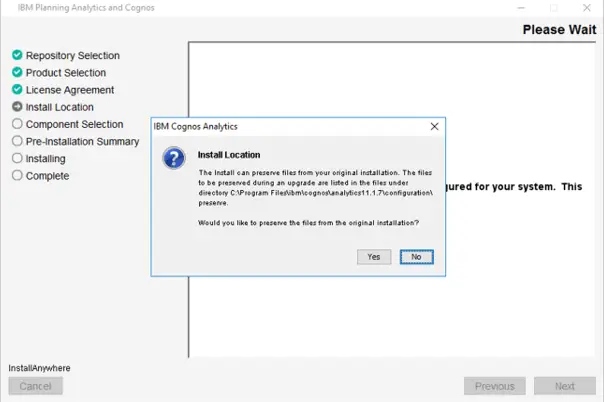
Before the final confirmation for installation, the installation wizard will provide the administrator to confirm the preserve file to be chosen for preserving any custom configuration files as mentioned in the earlier section of this article.
Select No if you want the Cognos installer to preserve all the custom configuration files defined under the CA server Installconfigurationpreservepreserve.txt.
Select Yes if you want the Cognos Installer to preserve all the default configuration files defined under the CA server Installconfigurationpreserveca_base_preserver.txt.
The last step from the installation wizard would be to present the Pre-Installation Summary to the administrator providing information regarding:
- The install folder to be upgraded
- Estimated Disk Space on the server
- Available Disk space on the server
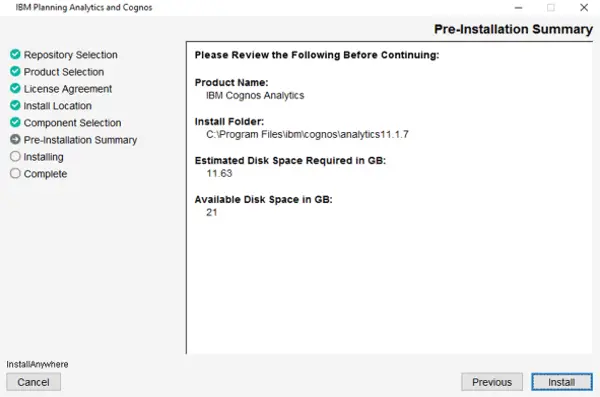
Proceed with selecting Install and Cognos Analytics 11.1.7 will be upgraded to Cognos Analytics 11.2.2.
This section concludes the procedure for Upgrading a Cognos Analytics server to a new Cognos Analytics release. The same steps would apply for upgrading the existing Cognos server to a particular patch level.
It is important to note that IBM only releases patches better known as Fix packs for Cognos Analytics servers determined as a Long term Supported Release. The Long-Term support release for Cognos Analytics suite 11.1.x is Cognos Analytics server 11.1.7.
The LTSR version for Cognos Analytics suite 11.2.x is yet to be determined.
Step-by-Step for using the Silent Method
Upgrading the Cognos Analytics server using the Silent method requires the Cognos Administrator to use the response file template which contains information regarding the type of installation such as custom install, easy install, or client install.
The Cognos Administrator can either choose to use the response file template or run the installation wizard from the command line to save a response file.
In case you do not have the response file, you create it by launching the installer with the -r option and run it until the last summary details and then cancel out the install. This will create the response properties file once the install exits as provided in the demonstration below.
ca_instl_win_3.<build>.exe -DREPO=ca_srv_win64_11.2.2.zip -r
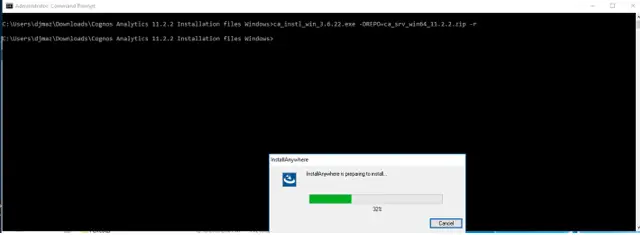
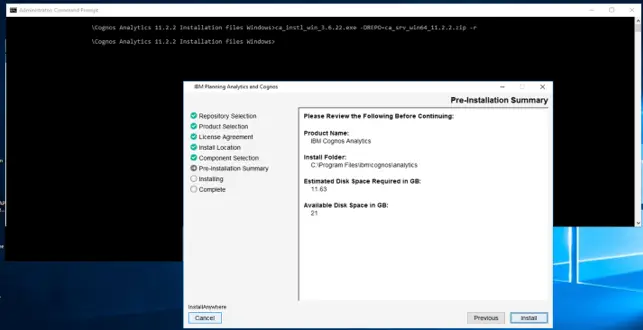
Cancel the installation wizard and this action creates the installer. Properties file in the location from where the command was executed.

Once the Installer.Properties file is created you can modify the file as a response. Properties and provide the values that correspond to the values used when the install wizard was run to create the response file. The password entered during the installation is encrypted in the response file.
Alternatively, you can use a template provided by IBM to create a response file instead of running an installation to generate the response file.
The sample file provided below is the basic template for performing a custom installation or upgrade.
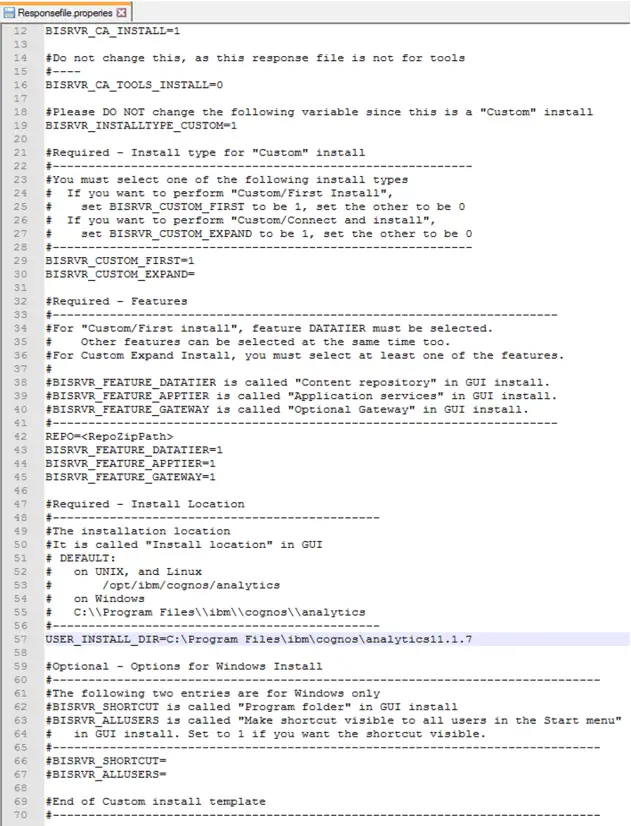
To perform a silent installation:
ca_instl_win_3.<build>.exe “-DREPO= ca_srv_win64_11.2.2.zip ” -f ” “locationresponse_filename” “-i” “silent”
To ensure the installation/upgrade process is completed successfully review the logs directory location under CA_Installation_location and ensure the return status code is 0.
Test the Upgrade After Completion
Last but not least, after the upgrade process has been completed successfully, ensure that all the files provided on preserve.txt or ca_base.preserve.txt are intact.
Review the CMPLST.txt of the Cognos Analytics install that was upgraded and ensure that the file displays the correct Cognos Analytics upgraded build version.
The next task as a Cognos administrator would be to start the Cognos Analytics server and take note of any exceptions that may occur at the time-of-service initialization.
In case of any error review the cogaudit.log and the cognoserver.log located under the Cognos Analytics installationlogs
If are no exceptions then the next task for the Cognos administrator would be to log in to the upgraded Cognos environment and ensure all the customizations, user content, and data source connections are preserved and identified as the previous version.
Testing your Upgrade After a Distributed Installation
After upgrading the IBM Cognos Analytics servers in a distributed environment, it is highly recommended for the Cognos administrator to launch the Cognos configuration for each component on every single server in the cluster and explicitly save them again. The Cognos configuration component includes the optional gateway, the application tier, and the Data tier. The reason why launching the Cognos configuration graphical user interface after the upgrade is so important is that it ensures the underlying Cognosstartup.xml schema version is updated with the latest schema version.
You might be thinking that the recommendations provided need no explanation as the Cognos administrator is bound to launch and save the Cognos configuration by default when they are starting the Cognos Analytics services. While this may be true, it is easy to overlook this step for a Cognos Gateway only install in the distributed environment.
The Cognos gateway aka the optional gateway is not a service unlike the Data Tier or the Application Tier therefore it’s not uncommon to explicitly Launch and save the Gateway configuration after the upgrade.
Launching and saving the Cognos Gateway configuration not only ensures that the cryptographic keys between the application tiers and the data tiers are in sync with each other but also ensures seamless access to the Cognos application via the Gateway URI configured on the web server e.g., IIS, Apache, and IHS.
Additionally, if you have a single sign-on configured with your webservers, the above step ensures that the configuration is updated and single-sign-on (SSO) is functional after the upgrade.
Upgrading a Cognos Environment with SSL Enabled on the Application Tiers
There are a lot of scenarios where the Cognos server components are configured with SSL to Third-party SSL certificates provided by the organization. Upgrading such an environment requires additional pre-emptive steps necessary for backing up the KEYSTOREs containing the chain of trust.
It is highly recommended to back up the following files on the Cognos Server before proceeding with an upgrade, especially when the Cognos component is configured with SSL.
- Take a decrypted export of the Cognos configuration
- Take a backup of the entire certs’ directory
Take a Decrypted Export of the Cognos Configuration
Backing up a decrypted copy of the Cognos configuration is essential prior to performing any type of maintenance task on the Cognos Server. When the Cognos server undergoes an upgrade the underlying schema for the Cognos configuration also gets upgraded as well. In any case, if the schema for the Cognos configuration does not go through, the Cognos administrator might encounter an issue with launching the Cognos configuration.
Under such circumstances, the immediate solution would be to replace the existing cogstartup.xml located under CA11.2.2 installsconfiguration with the decrypted version of the cogstartup.xml taken prior to Cognos Server upgrade.
IMPORTANT NOTE: Handle a decrypted Cognos Configuration file with care! It will include decrypted (plain-text) passwords. Therefore, always store a decrypted config file in a secure location, and then permanently delete it as soon as it is no longer needed.
You can perform an export of the Cognos configuration via the following methods:
- Export the Cognos configuration via the Command Line option
- Export the Cognos configuration via the Graphical user Interface
Export the Cognos Configuration via Command Line Option
Exporting the Cognos configuration via the Command Line option can be done by launching the Command Line or Shell on Windows or Linux and executing the following command as shown below:
./cogconfig.sh -e <filename>
cogconfig.bat -e <filename>
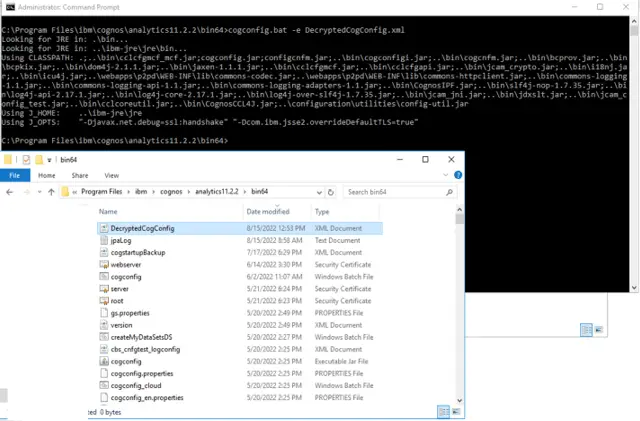
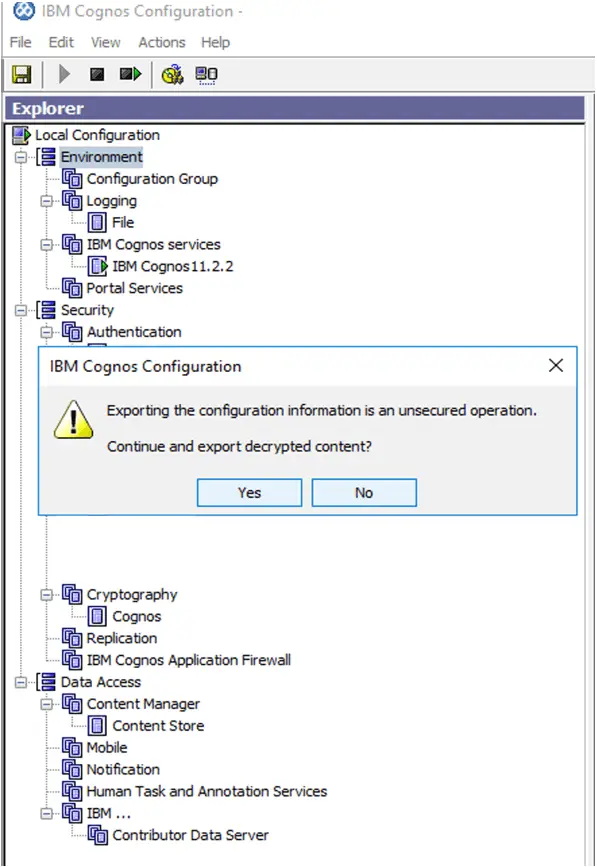
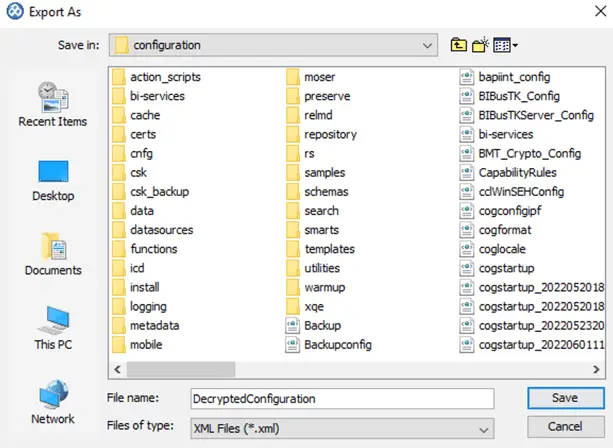
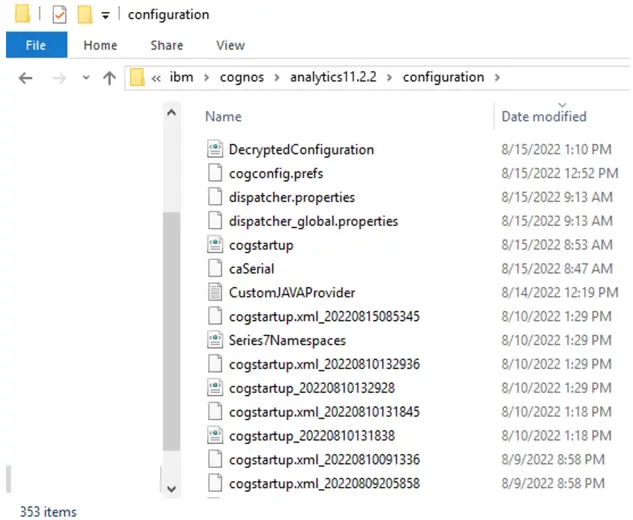
This will create a file entitled “DecryptedCogConfig.xml” which will contain all the current settings, including decrypted userids and passwords used to configure the product.
Export the Cognos configuration via the Graphical user Interface
Alternatively, you can also export a decrypted copy of the Cognos configuration from the graphical user interface as shown below:
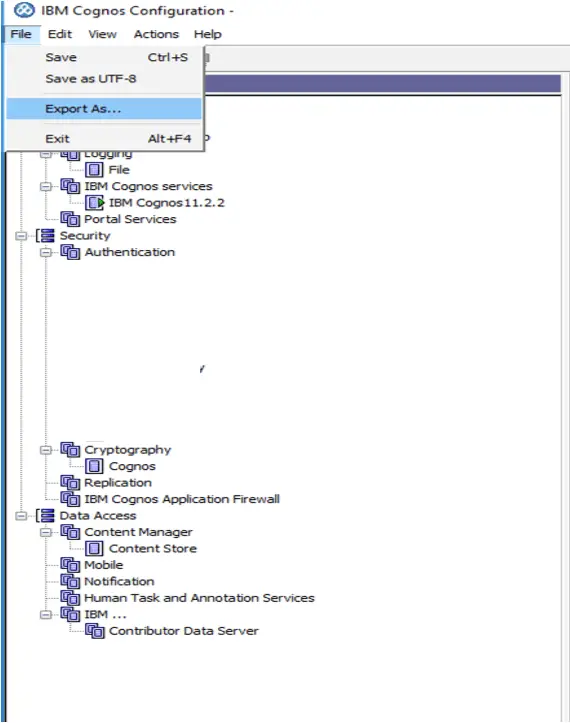
Take a backup of the entire certs’ directory
The SSL certificates imported in the Cognos environment are stored in the CAMKeystore. Therefore, it is always best practice to keep a copy for the CAMKEYSTORE before performing an upgrade. The CAMKSYSTORE is located in the Cognos installationconfigurationcerts, therefore it is an important task to back up the entire certs directory and store it in a safe location.
The following section assumes that the Cognos Analytics server to be upgraded has been pre-configured with SSL and the audience has prior knowledge regarding its implementation. Therefore, the backup procedure mentioned in this section is only applicable for a Cognos Analytics server configured with SSL on the IBM Cognos components i.e., the application tier, the data tier, and the gateway.
We do understand the SSL on the web server is also in play here, but this is out of scope for purpose of this document. For more information, please see these related topics that are relevant but outside the scope of this document.
- https://www.ibm.com/docs/en/cognos-analytics/11.1.0?topic=components-configuring-ssl-cognos-analytics
- https://www.ibm.com/docs/en/cognos-analytics/11.2.0?topic=options-certificate-management-in-cognos-analytics
- https://www.ibm.com/docs/en/cognos-analytics/11.2.0?topic=options-configuring-ssl-protocol-cognos-components
Conclusion
There are many variables in each Cognos environment that make upgrades and installs somewhat unique. Be sure that you fully understand your environment before planning your upgrade.
If you’re guilty of pushing off installs because of how time-consuming they are, check out our managed services. Our managed services offering can take care of upgrades, maintenance, and administration to free up time so you and your team can work on what matters most.
We hope you found this article informative. Be sure to subscribe to our newsletter for PMsquare original articles, updates, and insights delivered directly to your inbox.
