Paul Mendelson, June 15, 2017
Get the Best Solution for
Your Business Today!
In this article I continue to explore ways to use custom JavaScript in Cognos to modify prompts. This is the fourth article on the topic (I really like custom JavaScript in Cognos) so be sure to check out my other blogs. In the previous article, I looked at how to create notifications to explain why certain actions are or are not working.
Table of Contents
Horizontal Radio and Checkboxes
In all of the versions of Cognos, many people had complaints about the way prompts looked or behaved. From the default settings in the search and select prompts, to making checkbox prompts horizontal. Many scripts were written to make the necessary changes, but those won’t work in C11. So now is our chance to rewrite those to meet our needs.
One of the first JavaScript widgets I wrote was to make checkbox prompts horizontal. It looped through all of the options, and applied an inline display:inline-block to each of them. It worked quickly and efficiently, and a lot of people used it. Cognos Analytics gives us the opportunity to improve on this script.
First, let’s start with radios. The HTML structure of the radio prompt is pretty simple. Simplified, it looks like:
[sourcecode language=”html”]</code>
<pre style="overflow: auto; font-family: monospace, monospace; font-size: 1em; overflow-wrap: break-word;"><code style="font-family: monospace, monospace; font-size: 1em; overflow-wrap: break-word;"><div class=”clsPromptSelectValue”></code></pre>
<pre style="overflow: auto; font-family: monospace, monospace; font-size: 1em; overflow-wrap: break-word;"><code style="font-family: monospace, monospace; font-size: 1em; overflow-wrap: break-word;"><div class=”clsAdornmentsArea”></code></pre>
<pre style="overflow: auto; font-family: monospace, monospace; font-size: 1em; overflow-wrap: break-word;"><code style="font-family: monospace, monospace; font-size: 1em; overflow-wrap: break-word;"><img src=”cchl/images/icon_required.gif”></code></pre>
<pre style="overflow: auto; font-family: monospace, monospace; font-size: 1em; overflow-wrap: break-word;"><code style="font-family: monospace, monospace; font-size: 1em; overflow-wrap: break-word;"></div></code></pre>
<pre style="overflow: auto; font-family: monospace, monospace; font-size: 1em; overflow-wrap: break-word;"><code style="font-family: monospace, monospace; font-size: 1em; overflow-wrap: break-word;"><div></code></pre>
<pre style="overflow: auto; font-family: monospace, monospace; font-size: 1em; overflow-wrap: break-word;"><code style="font-family: monospace, monospace; font-size: 1em; overflow-wrap: break-word;"><div></code></pre>
<pre style="overflow: auto; font-family: monospace, monospace; font-size: 1em; overflow-wrap: break-word;"><code style="font-family: monospace, monospace; font-size: 1em; overflow-wrap: break-word;"><div class=”clsInputArea”></code></pre>
<pre style="overflow: auto; font-family: monospace, monospace; font-size: 1em; overflow-wrap: break-word;"><code style="font-family: monospace, monospace; font-size: 1em; overflow-wrap: break-word;"><div class=”clsListView clsDialogText” role=”radiogroup”></code></pre>
<pre style="overflow: auto; font-family: monospace, monospace; font-size: 1em; overflow-wrap: break-word;"><code style="font-family: monospace, monospace; font-size: 1em; overflow-wrap: break-word;"><div class=”clsListItem_normal”></code></pre>
<pre style="overflow: auto; font-family: monospace, monospace; font-size: 1em; overflow-wrap: break-word;"><code style="font-family: monospace, monospace; font-size: 1em; overflow-wrap: break-word;"><img alt=”” src=”hal/images/lv_radio.svg” class=”clsLVRadio”></code></pre>
<pre style="overflow: auto; font-family: monospace, monospace; font-size: 1em; overflow-wrap: break-word;"><code style="font-family: monospace, monospace; font-size: 1em; overflow-wrap: break-word;"><span>Lorem</span></code></pre>
<pre style="overflow: auto; font-family: monospace, monospace; font-size: 1em; overflow-wrap: break-word;"><code style="font-family: monospace, monospace; font-size: 1em; overflow-wrap: break-word;"></div></code></pre>
<pre style="overflow: auto; font-family: monospace, monospace; font-size: 1em; overflow-wrap: break-word;"><code style="font-family: monospace, monospace; font-size: 1em; overflow-wrap: break-word;"><div class=”clsListItem_normal”></code></pre>
<pre style="overflow: auto; font-family: monospace, monospace; font-size: 1em; overflow-wrap: break-word;"><code style="font-family: monospace, monospace; font-size: 1em; overflow-wrap: break-word;"><img alt=”” src=”hal/images/lv_radio.svg” class=”clsLVRadio”></code></pre>
<pre style="overflow: auto; font-family: monospace, monospace; font-size: 1em; overflow-wrap: break-word;"><code style="font-family: monospace, monospace; font-size: 1em; overflow-wrap: break-word;"><span>Ipsum</span></code></pre>
<pre style="overflow: auto; font-family: monospace, monospace; font-size: 1em; overflow-wrap: break-word;"><code style="font-family: monospace, monospace; font-size: 1em; overflow-wrap: break-word;"></div></code></pre>
<pre style="overflow: auto; font-family: monospace, monospace; font-size: 1em; overflow-wrap: break-word;"><code style="font-family: monospace, monospace; font-size: 1em; overflow-wrap: break-word;"></div></code></pre>
<pre style="overflow: auto; font-family: monospace, monospace; font-size: 1em; overflow-wrap: break-word;"><code style="font-family: monospace, monospace; font-size: 1em; overflow-wrap: break-word;"></div></code></pre>
<pre style="overflow: auto; font-family: monospace, monospace; font-size: 1em; overflow-wrap: break-word;"><code style="font-family: monospace, monospace; font-size: 1em; overflow-wrap: break-word;"></div></code></pre>
<pre style="overflow: auto; font-family: monospace, monospace; font-size: 1em; overflow-wrap: break-word;"><code style="font-family: monospace, monospace; font-size: 1em; overflow-wrap: break-word;"></div></code></pre>
<pre style="overflow: auto; font-family: monospace, monospace; font-size: 1em; overflow-wrap: break-word;"><code style="font-family: monospace, monospace; font-size: 1em; overflow-wrap: break-word;"></div></code></pre>
<pre style="overflow: auto; font-family: monospace, monospace; font-size: 1em; overflow-wrap: break-word;"><code style="font-family: monospace, monospace; font-size: 1em; overflow-wrap: break-word;">[/sourcecode]We can simply loop through all of the divs with the class clsListView and set those to inline-block.
Checkbox Prompt
Next, let’s take a look at a checkbox prompt now.
[sourcecode language=”html”]</code>
<pre style="overflow: auto; font-family: monospace, monospace; font-size: 1em; overflow-wrap: break-word;"><code style="font-family: monospace, monospace; font-size: 1em; overflow-wrap: break-word;"><div class=”clsInputArea”></code></pre>
<pre style="overflow: auto; font-family: monospace, monospace; font-size: 1em; overflow-wrap: break-word;"><code style="font-family: monospace, monospace; font-size: 1em; overflow-wrap: break-word;"><div class=”clsListView”></code></pre>
<pre style="overflow: auto; font-family: monospace, monospace; font-size: 1em; overflow-wrap: break-word;"><code style="font-family: monospace, monospace; font-size: 1em; overflow-wrap: break-word;"><table></code></pre>
<pre style="overflow: auto; font-family: monospace, monospace; font-size: 1em; overflow-wrap: break-word;"><code style="font-family: monospace, monospace; font-size: 1em; overflow-wrap: break-word;"><tbody></code></pre>
<pre style="overflow: auto; font-family: monospace, monospace; font-size: 1em; overflow-wrap: break-word;"><code style="font-family: monospace, monospace; font-size: 1em; overflow-wrap: break-word;"><tr role=”option” checkboxitem=”true” tabindex=”0″ aria-label=”Lorem” aria-checked=”false”></code></pre>
<pre style="overflow: auto; font-family: monospace, monospace; font-size: 1em; overflow-wrap: break-word;"><code style="font-family: monospace, monospace; font-size: 1em; overflow-wrap: break-word;"><td></code></pre>
<pre style="overflow: auto; font-family: monospace, monospace; font-size: 1em; overflow-wrap: break-word;"><code style="font-family: monospace, monospace; font-size: 1em; overflow-wrap: break-word;"><div class=”clsListItem_normal”></code></pre>
<pre style="overflow: auto; font-family: monospace, monospace; font-size: 1em; overflow-wrap: break-word;"><code style="font-family: monospace, monospace; font-size: 1em; overflow-wrap: break-word;"><img src=”hal/images/lv_checkbox.svg”></code></pre>
<pre style="overflow: auto; font-family: monospace, monospace; font-size: 1em; overflow-wrap: break-word;"><code style="font-family: monospace, monospace; font-size: 1em; overflow-wrap: break-word;"><span>Lorem</span></code></pre>
<pre style="overflow: auto; font-family: monospace, monospace; font-size: 1em; overflow-wrap: break-word;"><code style="font-family: monospace, monospace; font-size: 1em; overflow-wrap: break-word;"></div></code></pre>
<pre style="overflow: auto; font-family: monospace, monospace; font-size: 1em; overflow-wrap: break-word;"><code style="font-family: monospace, monospace; font-size: 1em; overflow-wrap: break-word;"></td></code></pre>
<pre style="overflow: auto; font-family: monospace, monospace; font-size: 1em; overflow-wrap: break-word;"><code style="font-family: monospace, monospace; font-size: 1em; overflow-wrap: break-word;"></tr></code></pre>
<pre style="overflow: auto; font-family: monospace, monospace; font-size: 1em; overflow-wrap: break-word;"><code style="font-family: monospace, monospace; font-size: 1em; overflow-wrap: break-word;"><tr role=”option” checkboxitem=”true” tabindex=”-1″ aria-label=”Ipsum” aria-checked=”false”></code></pre>
<pre style="overflow: auto; font-family: monospace, monospace; font-size: 1em; overflow-wrap: break-word;"><code style="font-family: monospace, monospace; font-size: 1em; overflow-wrap: break-word;"><td></code></pre>
<pre style="overflow: auto; font-family: monospace, monospace; font-size: 1em; overflow-wrap: break-word;"><code style="font-family: monospace, monospace; font-size: 1em; overflow-wrap: break-word;"><div class=”clsListItem_normal”></code></pre>
<pre style="overflow: auto; font-family: monospace, monospace; font-size: 1em; overflow-wrap: break-word;"><code style="font-family: monospace, monospace; font-size: 1em; overflow-wrap: break-word;"><img src=”hal/images/lv_checkbox.svg”></code></pre>
<pre style="overflow: auto; font-family: monospace, monospace; font-size: 1em; overflow-wrap: break-word;"><code style="font-family: monospace, monospace; font-size: 1em; overflow-wrap: break-word;"><span >Ipsum</span></code></pre>
<pre style="overflow: auto; font-family: monospace, monospace; font-size: 1em; overflow-wrap: break-word;"><code style="font-family: monospace, monospace; font-size: 1em; overflow-wrap: break-word;"></div></code></pre>
<pre style="overflow: auto; font-family: monospace, monospace; font-size: 1em; overflow-wrap: break-word;"><code style="font-family: monospace, monospace; font-size: 1em; overflow-wrap: break-word;"></td></code></pre>
<pre style="overflow: auto; font-family: monospace, monospace; font-size: 1em; overflow-wrap: break-word;"><code style="font-family: monospace, monospace; font-size: 1em; overflow-wrap: break-word;"></tr></code></pre>
<pre style="overflow: auto; font-family: monospace, monospace; font-size: 1em; overflow-wrap: break-word;"><code style="font-family: monospace, monospace; font-size: 1em; overflow-wrap: break-word;"></tbody></code></pre>
<pre style="overflow: auto; font-family: monospace, monospace; font-size: 1em; overflow-wrap: break-word;"><code style="font-family: monospace, monospace; font-size: 1em; overflow-wrap: break-word;"></table></code></pre>
<pre style="overflow: auto; font-family: monospace, monospace; font-size: 1em; overflow-wrap: break-word;"><code style="font-family: monospace, monospace; font-size: 1em; overflow-wrap: break-word;"></div></code></pre>
<pre style="overflow: auto; font-family: monospace, monospace; font-size: 1em; overflow-wrap: break-word;"><code style="font-family: monospace, monospace; font-size: 1em; overflow-wrap: break-word;"></div></code></pre>
<pre style="overflow: auto; font-family: monospace, monospace; font-size: 1em; overflow-wrap: break-word;"><code style="font-family: monospace, monospace; font-size: 1em; overflow-wrap: break-word;">[/sourcecode]This is a little less pretty, but still workable. We could create a new row in the prompt, and append the clsListItem_normal divs. But for some strange reason, the “Select All” buttons recreates all of the checkboxes! Any changes we do to those rows are lost whenever a user selects all of the prompts. Instead, we have to be clever here. Let’s append a className to the clsListView, since that isn’t affected by the “Select All”, then we just need to programmatically add a style element:
sourcecode language=”javascript”]if(!document.getElementById(‘horizPrompt’)){var styleNode = document.createElement(‘style’);styleNode.type = ‘text/css’;styleNode.id=’horizPrompt’;if(!!(window.attachEvent && !window.opera)) {styleNode.styleSheet.cssText = ‘.horizPrmpt tr .horizPrmpt div.clsListItem_normal else {var styleText = document.createTextNode(‘.horizPrmpt tr .horizPrmpt div[/sourcecode]If the style node already exists, we can skip it. If it doesn’t, create one that looks for the horizPrmpt class, then looks for any table rows or divs, setting them to inline-block.
Next we add a little styling to make the prompt look good, and we’re done!


A Better Select and Search
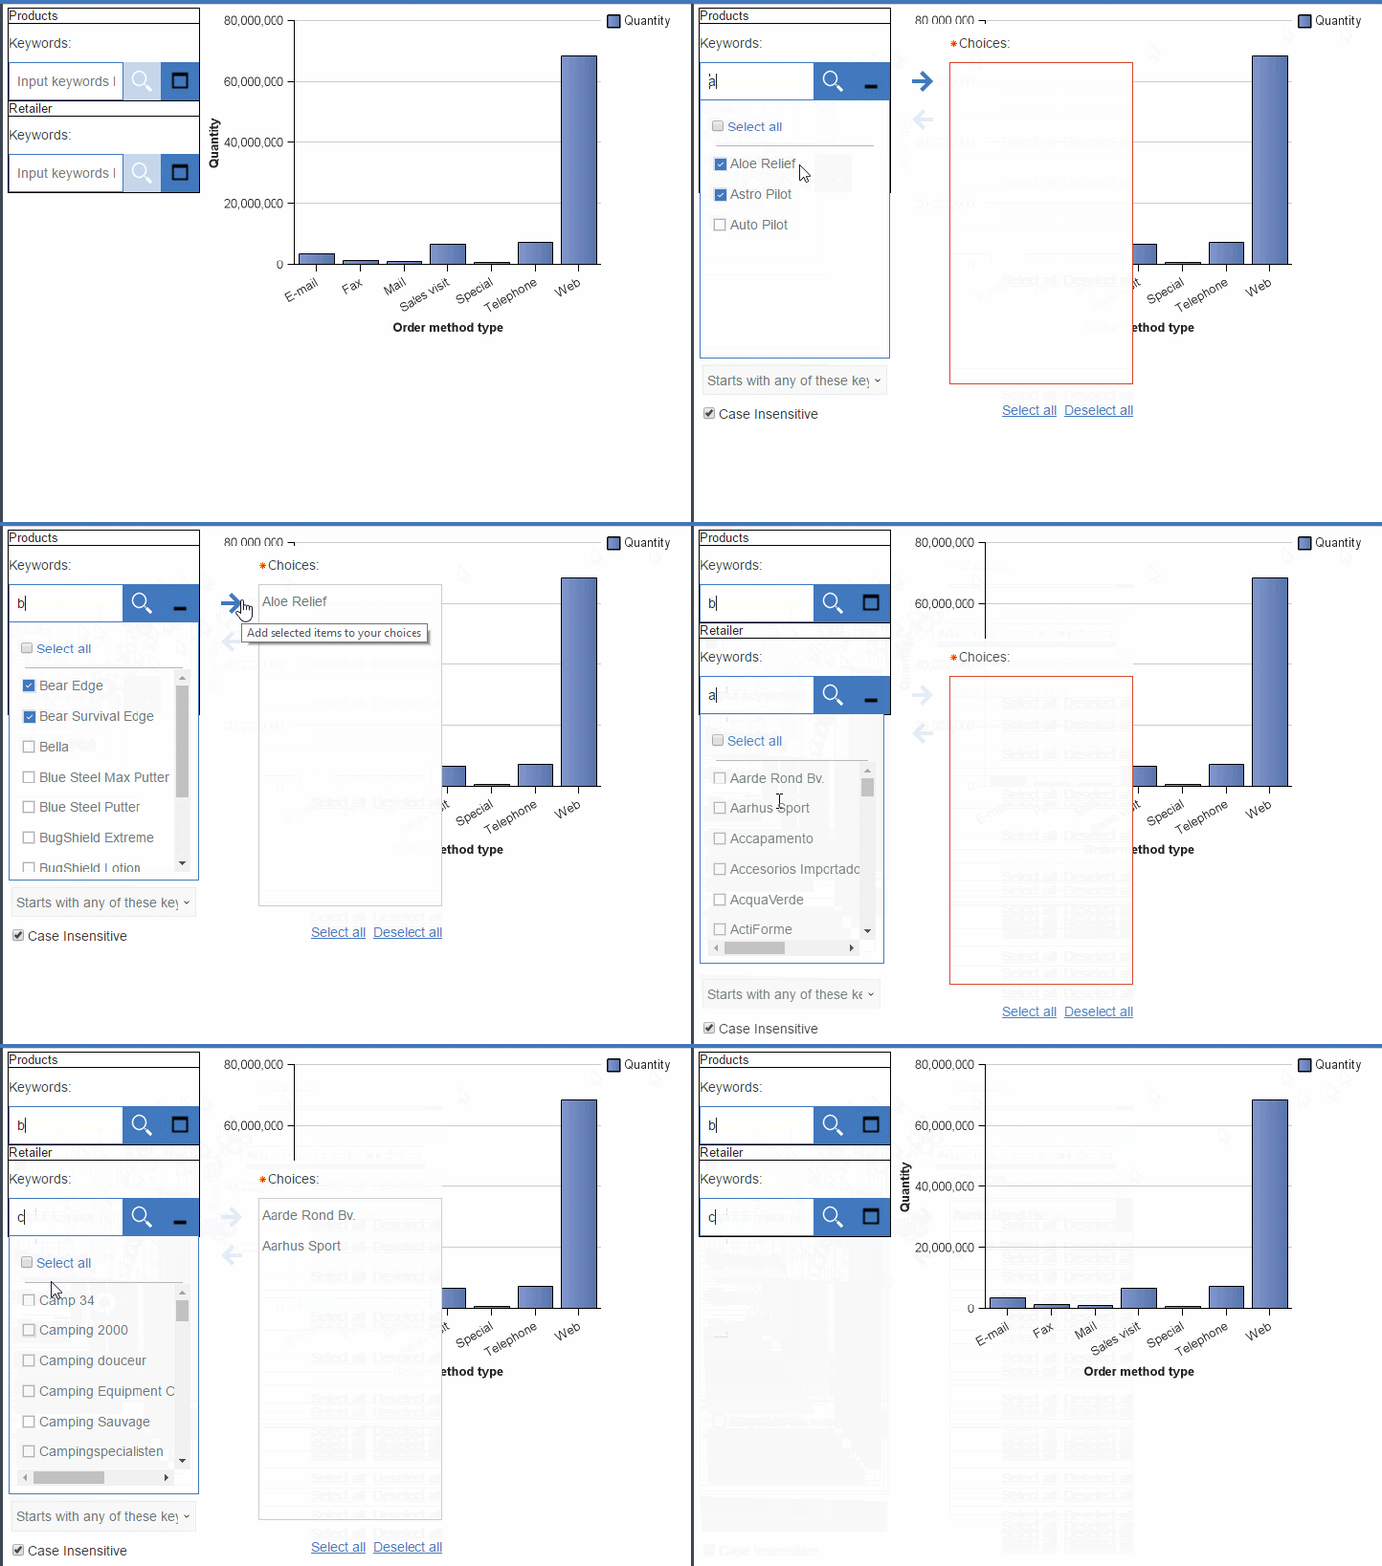
The new select and search prompts are gorgeous. Streamlined, fast, wide. Seriously wide. It’s 428 pixels wide, who has that kind of real estate in their dashboards?
Compare:

To:

Well, maybe not as wide as it used to be. It went on a relatively ineffective diet.
Personally, I’d prefer a little narrower prompt. One that would fit nicely on a dashboard. With jQuery being available now, it’s a simple matter of identifying which elements we need to hide. Create a new button to manually trigger it, and trigger it when a user searches for something. Again, there’s nothing really new or novel here. The vast majority of the code is actually formatting the prompt so it looks good after we apply position:absolute to all of the divs. So let’s gaze in amazement at the jQuery hide() function in action!

Advanced Formatting Options
I have seen the occasional request for advanced formatting options in prompts. When a value is selected, the background color should be different, the cursor should be set to a pointer, the text should spin around whenever the user hovers over it. And although these are completely normal requests for a business intelligence application, Report Studio doesn’t have a native way of providing this essential functionality.
Therefore the way to solve this is to give the report developer the ability to specify the styles wanted for each individual prompt. The script will then take the element ID of the prompt, and prepend that before the generated classes. This allows a developer to specify two separate styles for two separate prompts of the same type.
The configuration file for this script is significantly more advanced than the previous scripts. Here, not only do we specify the name of the prompt, but we write in the desired CSS. This is done by means of an array in the config JSON:
{“promptName”: “stylePromptRadio”,“styles”: [{“className”: “clsDialogText”,“style”: “color: transparent; text-shadow: 0 0 5px rgba(0,0,0,0.5); “},{“className”: “clsLVRadio_checked+span”,“style”: “text-shadow:none”}]}In this case, we are calling the prompt named stylePromptRadio, and adding two classes. clsDialogText will have a text shadow making a bit blurry by default, but the checked one will not have this shadow. And now, let’s see it, and a few others in action.

You can view the report and js files here:
Conclusion
I hope you find this closer look at custom JavaScript in Cognos helpful. If you haven’t already, be sure to check out my previous article on custom JavaScript on our blog for additional tips and tricks. Subscribe to our e-newsletter for more technical articles and updates delivered directly to your inbox.
Next Steps
If you have any questions or would like PMsquare to provide guidance and support for your analytics solution, contact us today.


