Paul Mendelson, April 28, 2017
Get the Best Solution for
Your Business Today!
In the previous article, I created a library for handling start/end date prompt validation with custom JavaScript. This works beautifully, but end users may not understand why their selections are not working. A well designed page should include some form of notification explaining why certain actions are, or are not working. So let’s dive back into some custom JavaScript in Cognos to resolve.
Custom JavaScript in Cognos – Notifications
There are two basic ways of dealing with this.
1. A text item magically appears near the prompt explaining the problem.
This is by far the easiest solution to build. The JS API already contains code to interact with text items. Let’s start by creating a blank text item under the prompts. Give it a name so the JavaScript API can access it. The config of the control can be modified to incldue the name of the text item, and the text item can be modified with the following code:
//this assumes the text item name is “textNote”var txt = oControlHost.page.getControlByName(o[“textNote”])txt.text=’error message goes here’;txt.setColor(‘red’);txt.setDisplay(‘inline’);In my opinion, however, anything worth doing is worth overdoing. So let’s make it a little more noticeable. Let’s make the error text fade in, bounce a little, then fade away. To do this we can use jQuery and the <a href=”http://textillate.js.org/” target=”_blank”>textillate plugin</a>.
Let’s start by adding jQuery to the define:
define( [ “/javascript/moment.js” ,”jquery” ], function( ) We now require the plugins:
require( [ “/javascript/jquery.lettering.js” , “/javascript/jquery.textillate.js” ]);
Now we need a link to the lettering css file (animate.css), but we really only need one. So let’s try the following:
//Create link to animate.cssif(!document.getElementById(‘animatecss’)){ var cssFile = document.createElement(‘link’); cssFile.rel = ‘stylesheet’; cssFile.type = ‘text/css’; cssFile.id=’animatecss’; cssFile.href = ‘/javascript/animate.css’; document.getElementsByTagName(‘head’)[0].appendChild(cssFile)}This will check for the existence of the animatecss link, and create it if it doesn’t exist.
Now let’s create the animation for the notification:
if(textNote) { textNoteElm = oControlHost.page.getControlByName(textNote).element; $(textNoteElm).textillate({ selector: ‘.texts’, loop: false, minDisplayTime: 2000, initialDelay: 0, in: { effect: ‘pulse’, sync: true, reverse: false, shuffle: false, callback: function () }, out: { effect: ‘fadeOut’, delayScale: 1.5, delay: 2500, sync: true, reverse: false, shuffle: false, callback: function () {} }, autoStart: false, inEffects: [], outEffects: [ ‘hinge’ ], callback: function () {}, type: ‘char’ }); }When the note becomes visible, it will pulse into existence. As soon as it finished pulsing in, it calls the out function. After a delay of 2500ms, the warning fades away.
Instead of a text item, we’ll use a block as a container for the error. The lettering plugin will modify the span to such an extent that the API will no longer work with it.
Modify the config to reference the block, and let’s use the following in one of the checks:
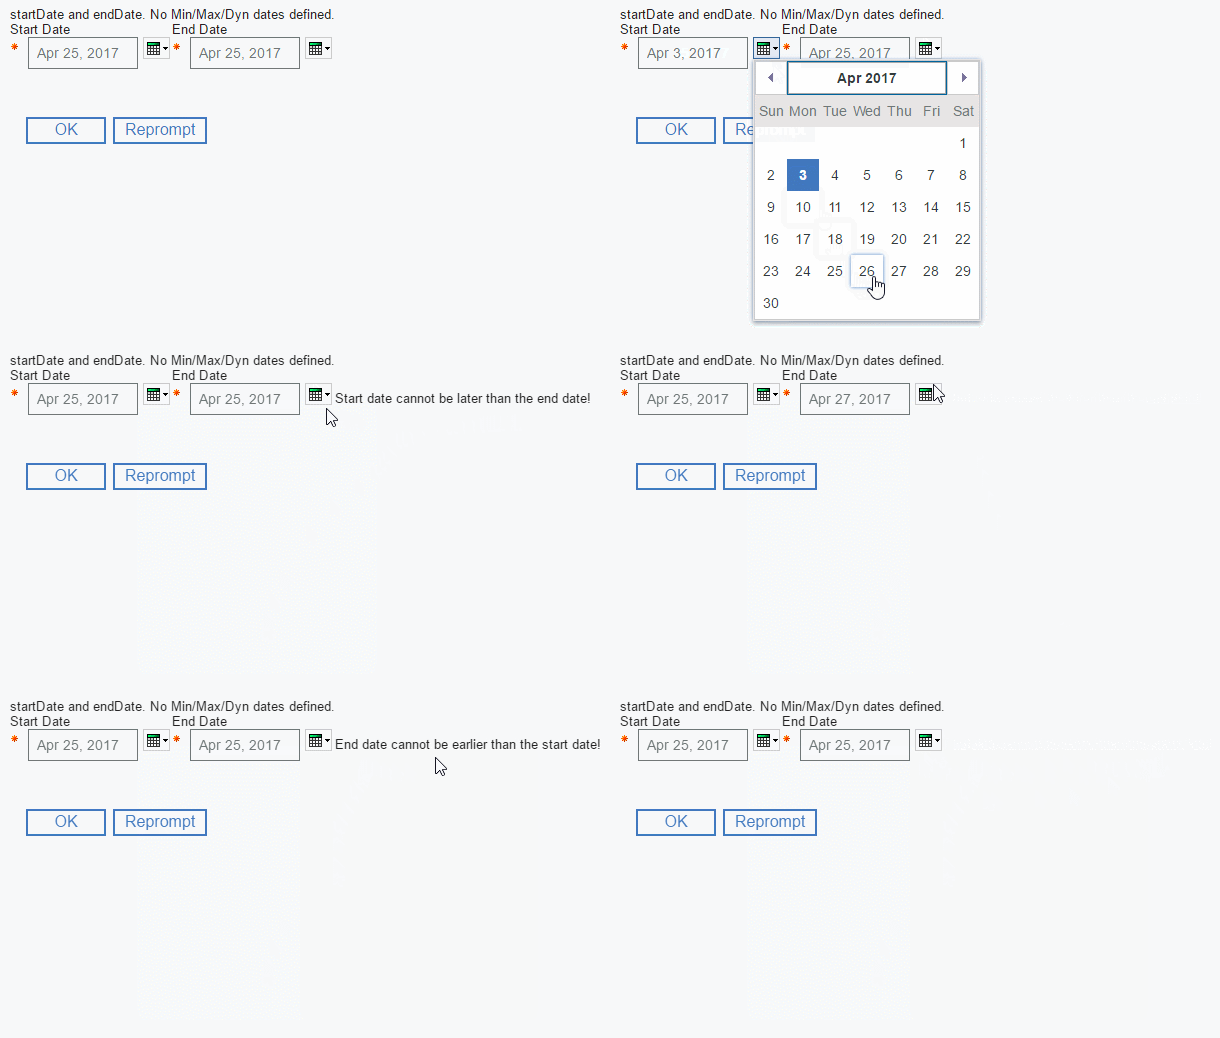
//basic check to ensure the from date is before than the to date.if(fromDt > toDt ) { ctrl.setValidator(function(){}); ctrl.setValues(oControlHost.page.getControlByName(ctrlTo).getValues()); if(textNote){ $(textNoteElm).find(‘.texts li:first’).text(‘Start date cannot be later than the end date!’); $(textNoteElm).textillate(‘start’); }Now when we run it, the error message will magically appear.

The other common way is to create a popup message. For this we can turn to Bootstrap and use it’s popover feature.
First, we add Bootstrap to the define:
define( [ “/javascript/moment.js” ,”jquery” , “https://maxcdn.bootstrapcdn.com/bootstrap/3.3.7/js/bootstrap.min.js” ], function( ) {Next, we need to add the bootstrap CSS, and we can use the same method we did for the animatecss:if(!document.getElementById(‘bootstrapcss’)){ var cssFile = document.createElement(‘link’); cssFile.rel = ‘stylesheet’; cssFile.type = ‘text/css’; cssFile.id=’bootstrapcss’; cssFile.href = ‘https://maxcdn.bootstrapcdn.com/bootstrap/3.3.7/css/bootstrap.min.css’; document.getElementsByTagName(‘head’)[0].appendChild(cssFile) }The code to trigger the popover can be applied after the check for the text note:
if(textNote){ $(textNoteElm).find(‘.texts li:first’).text(‘Start date cannot be set before ‘ + moment(minDate).format(‘YYYY-MM-DD’)); $(textNoteElm).textillate(‘start’); } else { ctrl.element.setAttribute(‘data-content’,’Start date cannot be set before ‘ + moment(minDate).format(‘YYYY-MM-DD’)); ctrl.element.setAttribute(‘data-placement’,’top’); ctrl.element.setAttribute(‘data-trigger’,’focus’); $(ctrl.element).popover(‘show’); setTimeout(function(),3000); ctrl.element.setAttribute(‘data-content’,”); }The label is set as the data-content attribute on the date control element. It appears, waits 3 seconds, and hides after 3 seconds. After it’s hidden, the data-content attribute is cleared to prevent the popover from appearing when a new date is typed in or selected.

There are all sorts of ways we could use notifications and popups – for more than just errors. I’ll leave those as an exercise for the reader.
You can view the report and js files here:
Conclusion
I hope you find this closer look at custom JavaScript in Cognos helpful. If you haven’t already, be sure to check out my previous article on custom JavaScript on our blog for additional tips and tricks. Subscribe to our e-newsletter for more technical articles and updates delivered directly to your inbox.
Next Steps
If you have any questions or would like PMsquare to provide guidance and support for your analytics solution, contact us today.


