
Share


Adriaan Boot, March 6, 2023
Get the Best Solution for
Your Business Today!
Table of Contents
What is bursting?
Bursting is the process of running a report once and then dividing the results for recipients who each view a subset of the data. In the example which will be discussed in this blog post, a report is run for a group of hospitals. The bursting operation splits the data so that every hospital only receives the data applicable to it.
What knowledge is required before bursting is set up?
The client requesting the report must specify what data must be split up and how it must be split up. The ‘how’ part is important as it will determine how the data will be split up in subsets. The Cognos term for how it must be split up is determining the burst key.
How is a report set up for bursting?
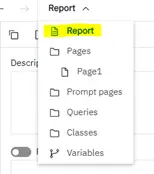
Enable bursting
Bursting must be enabled and set up. It is enabled on the ‘Report’ page.
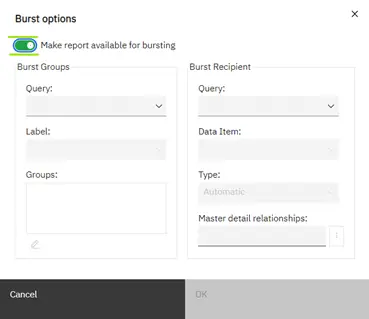
Set burst parameters
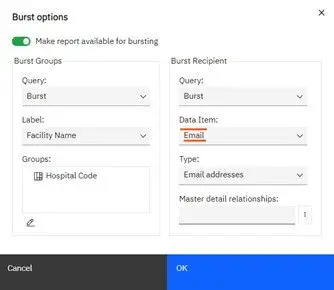
Move the ‘Make report available for bursting’ switch icon to the ‘on’ position. The other items displayed in the dialog box can now be edited.
There is space for two queries, namely for the ‘Burst Groups’ and the ‘Burst Recipient’. The ‘Burst Group’ query must contain the burst key. The ‘Burst Recipient’ query contains the information about how to make the data that was burst out available to the recipients.
The two queries may be the same. If it is not, the master detail relationship between the ‘Burst Groups’ query and the ‘Burst Recipient’ query must be set up. Normally, the join will be on the burst key.
Values for the ‘Burst Group’ query
From this point onwards the data from an example report will be used. At the end of the blog post, information about the source of the data will be given.
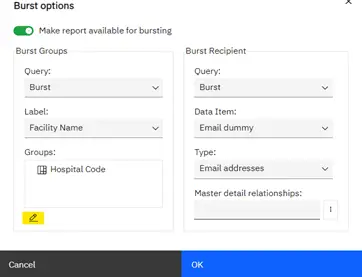
The data is taken from the query called ‘Burst’. Select the item ‘Facility Name’ for the ‘Label’ field. The ‘Label’ is the title of the individual versions of the saved report. When the email bursting is used, the attachment name will however be the name of the report. If the email message title must include the value of the label it can be done in Event Studio. See the notes at the end of the blog post.
The burst key is set under ‘Groups’ by clicking the highlighted edit icon and then selecting the item to use. The sort order of the burst key can be set as well.
Values for the ‘Recipient’ query
The data is once again taken from the ‘Burst’ query. The ‘Data Item’ contains the recipients of the individual reports.
The ‘Type’ is one of ‘Automatic’, ‘Email addresses’ or ‘Directory entries’. Use ‘Email addresses’ if the values of the ‘Data Item’ field are email addresses. Use ‘Directory entries’ if the values are CAMIDs. When ‘Automatic’ is selected, Cognos will select one of the abovementioned options.
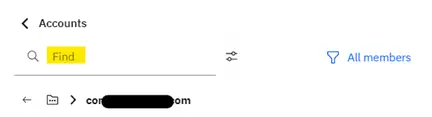
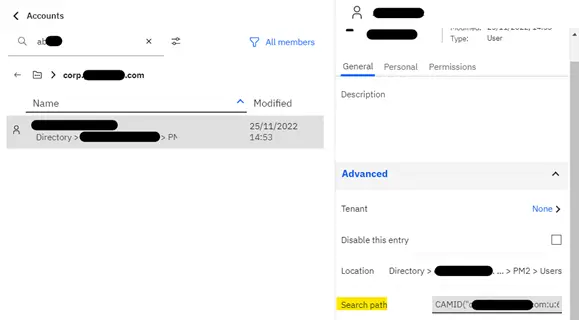
Only people with access to the Cognos Portal have a CAMID value. To get the CAMID of a user, select ‘Manage’ from the ‘Open Menu’ hamburger icon. Select ‘People’ and then ‘Accounts’. Select the ‘Namespace’ which will contain the users. Search for the user.
On the user profile, select ‘General’ tab and open show the ‘Advanced’ settings. The content of the ‘Search path’ is the CAMID of the user.
Since only one query is used in this example, the ‘Master Detail’ relationship is not set up.
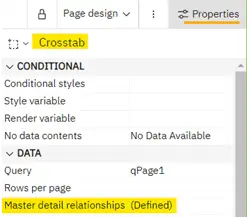
What must the content of the report look like?
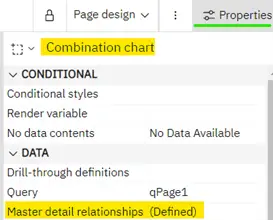
The data containers, for instance lists, crosstabs, and visualizations can be used in a report that was set up to burst. It is however important to know that master detail relationships must be defined for all data containers which are used. This requirement is not available for most of the newer generation visualizations. In the example report, charts were used. In this report the master detail relationship is between the page query and the data container queries.
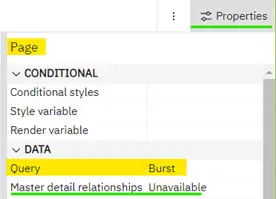
Page query
The setup of the page query is shown below
Data Container Queries
Master Detail Relationship example
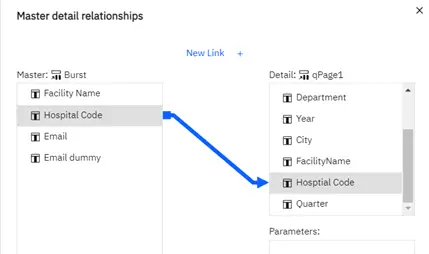
The master detail relationship is based on the burst key in all cases.
If the burst key doesn’t feature in your crosstab layout, then make the burst key a property of one of the rows. If you are using a chart, then make it a property of the x axis node. This was done in the example created for the blog post.
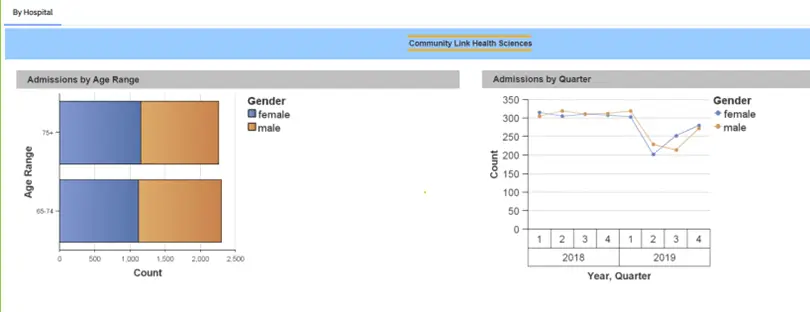
Report layout example
The name of the hospital (Facility Name from the Burst query) was included in a report expression text item. In the example below, it is ‘Community Link Health Services’. The displayed visualizations are both charts. The report further contains a list and a crosstab.
How to test a report that was set up to burst?
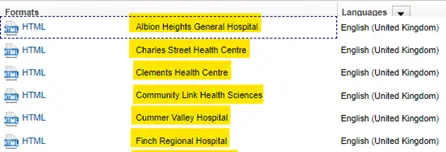
The first step is to run the report in the normal interactive mode. If the burst parameters were set correctly, the report will complete normally. Only the data of the first instance of the burst key will be displayed. This is the case in the example above.
The second step, once the first step is successful, is to run the report with a dummy value in the ‘Data Item’ field of the ‘Burst Recipient’ query. This is to ensure that the test results do not go out to the intended recipients.
In the example, the item is ‘Email dummy’. The value of the item for all rows of the query is my email address. The individual reports will thus all be mailed to me.
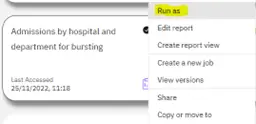
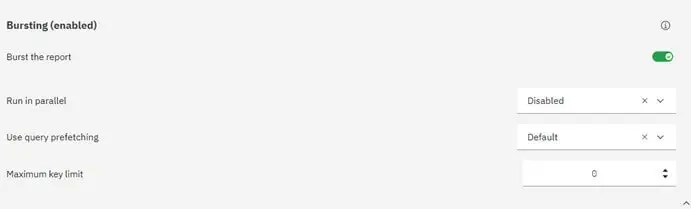
The report must be run with the ‘Run As’ option, in the background. The option to enable bursting must be selected. The new parameters that are displayed, may be left at the default value.
If the bursting is based on CAMID, the output must be saved, so that the users can access the output.
The steps mentioned above are illustrated below.
Run As:
Run in Background:
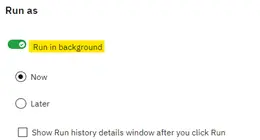
Enable Bursting:
Importance of testing for burst reports
During testing check that the data agrees with the specification received from the requester. It is of course something that should always be done. With bursting, if the wrong data is sent out it is an even bigger issue than is normally the case. The reports often go to multiple internal and external recipients. This could result in a security / data protection breach, which is something all developers hope to avoid.
Once the data has been checked, the value in the ‘Data Item’ field of the ‘Burst Recipient’ query may be replaced with the value that will be used in the production environment. In the example ‘Dummy Email’ is replaced with ‘Email’. Now the report is ready to be moved to the production environment.
Data Sources
The data used by the example is based on the data in the data module with the path ‘Team Content | Samples 11.2.3 | Samples | By Industry | Healthcare | Data | Hospital admissions data module’. An extra Excel document ‘Hospitals email’ containing the ‘Hospital Code’ and two email address items ‘Email’ and ‘Email dummy’ was created. The two Excel documents ‘Hospital Admissions’ and ‘Hospitals email’ were joined on ‘Hospital Code’ in data module. The created data module is the source of the report.
The report that was created is loosely based on the first page of the report with the path ‘Team Content | Samples 11.2.3 | Samples | By Industry | Healthcare | Data | Admissions by hospital and department’. All the visualizations were replaced with chart objects as mentioned above.
Notes
This blog post is just a primer on what can be done with bursting.
See the following articles for more possibilities:
Next Steps
We hope that you found this article to be informative and helpful. If you have any questions or would like PMsquare to provide guidance and support for your analytics solution, contact us today! Be sure to subscribe to our newsletter for more articles, updates and insights.