Share


Chris Chen, September 12, 2022
Get the Best Solution for
Your Business Today!
Hello again! Did you miss me?
Um… Yes?
I missed you too! It’s been a minute.
Last time, I helped you understand how AWS Redshift could help you survive the overwhelming success of your data warehouse. Today, I’m going to show you how to use custom transformations in AWS Glue Studio! This will help smooth out the bumps of AWS Glue Studio by using custom coding – with Python!
You’re Getting Excited Again, Like Last Time
Of course! I told you, I love great tools! This time I’m showing off AWS Glue Studio, the visual tool that helps you extract, transform and load your data wherever you need.
Table of Contents
I Tried Glue Studio, But I Got Stuck
I see what you did there! You’ve already tried it, that’s good. You know that Glue Studio simplifies authoring Glue jobs. It replaces the hand-coding of Glue scripts with a click-and-drag / drag-and-drop / connect-them-all interface. You drag in some nodes to replace blocks of code, configure the nodes, wire them together, and voila! ETL’s done! Winner winner chicken dinner!
Uh, Not Quite
I know, I know: not everything has a node in AWS Glue Studio. But they’re working on it! More and more nodes are added as AWS completes them, and the nodes are immediately released. No need to wait for a full release of Glue Studio.
Then I Have To Wait For Those New Nodes
Good news, you don’t have to! Glue Studio has a special node, the Custom Transformation node, where you can write Python code to handle what nodes don’t do yet. Saved by Python!
Python Coding In A Visual Tool?
You got me. There’s a leetle bit of coding. As new nodes are released by the Glue Studio team the need for coding is reduced. But in the meantime, you can drop in a Custom Transformation node to tide you over.
Ok, Show Me
Don’t mind if I do!
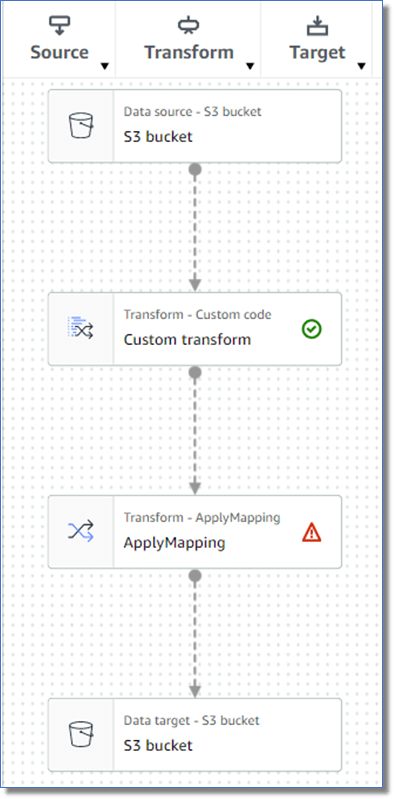
When you create a new AWS Glue Studio job you get the standard structure of data source to mapping to data target, like in Figure 1 over there.
Simple, right? You can built upon it by dropping in some Transform nodes: a Select Fields here, a Join there. But, what if you want to do something special? Special calculations. Filtering rows by two columns. Both in the same transformation! What do you do, hotshot? What do you do?
Use A Custom Transformation!
That’s right!
In between your data source node and your mapping node you add in a Custom Transformation and set the Data Source node as the parent and the ApplyMapping node as the child.
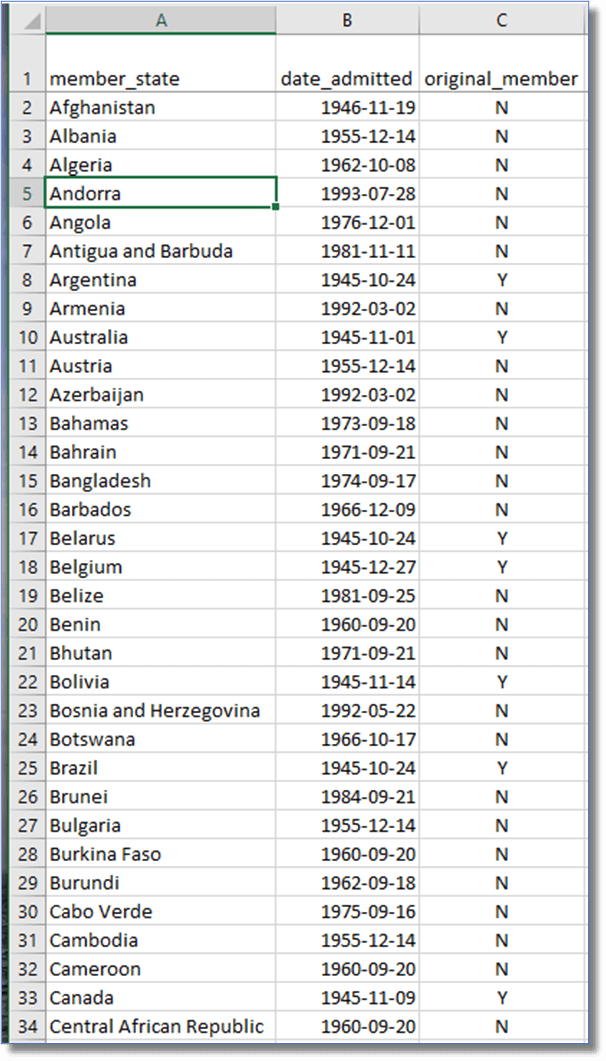
Let’s get some sample data before we go any further. Here is an Excel worksheet with three columns: names of countries that are members of the United Nations, the date they were admitted, and a Y/N flag indicating whether it was an original member, i.e. member when the UN was originally created. We’re going to extract the year from the date admitted, and filter for only those that were original members, all in one transformation!
To begin, we’ll save this to a CSV file and load it into an S3 bucket, glue-studio-files, in the input folder.
LOAD THE DATA CATALOG
Glue Studio can be configured to read directly from an AWS S3 bucket, but a more reliable way is to crawl the file and the definition into the Glue Data Catalog. My colleague Andreea calls this an “S3 backed table,” and it works so much better! Create and run an AWS Glue crawler to read the file in S3 and store the definition in the Glue data catalog.

NEW GLUE STUDIO JOB
Let’s get cracking! Create a new visual AWS Glue Studio job with a source and target:

Set the Data Source and Target nodes to use the data catalog and select the definitions we just created. Examine the output schema and confirm all three columns are present. At this point, the date_admitted column is defined as a string. We’ll fix that in a bit.

ADD THE CUSTOM TRANSFORMATION
Under Transforms, scroll down to the bottom and choose Custom transform. Configure the Node Properties so that the Node Parent is the Data Catalog source, then change the Node Parent of the ApplyMapping node to be the custom transformation node.
CONFIGURE THE CUSTOM TRANSFORMATION
Open the Transform section of the Custom Transformation and you’ll see a two-line code block with a Python function declaration.

Glue Studio has created the function MyTransform and will pass in a DynamicFrameCollection into the function. Glue Studio handles data internally in dynamic frames, which are a superset of the standard dataframes used in frameworks like Apache Spark. All the data is wrapped into a collection of dynamic frames then passed into the custom transformation.
GET THE DATA
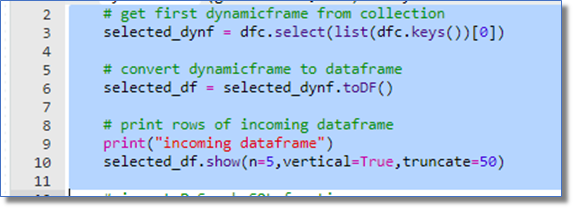
The first thing to do in the function is to get the incoming data by selecting the dynamic frame from the collection. The function declaration uses dfc to represent the collection, so we will put the first dynamic frame in the variable selected_dynf in line 3.
Unfortunately, dynamic frames alone cannot be changed, so we will convert this dynamic frame to the standard dataframe for further manipulation in line 6.
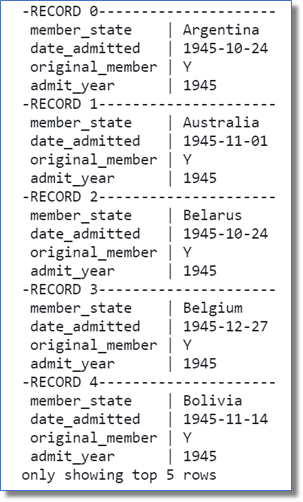
I find it a good practice to write major data transforms to the log, which I do in line 10. This writes the first five rows of the dataframe in vertical format, truncating any values at 50 characters as seen here.
CALCULATE ADMIT YEAR

Custom Transformations in Glue Studio reference dataframes using PySpark, a Python module written for Apache Spark dataframes. Since the Glue Studio dynamic frame has been converted to a dataframe, we’ll import the PySpark SQL module here, in line 13. We can then use the PySpark SQL functions to alter the dataframes.
To extract the year from country’s United Nations admission date, we need to take the date_admitted column and apply the PySpark SQL year() function. The output of the year() function will be stored in the new dataframe column admit_year.
Lines 19-20 use the withColumn() function to reference the admit_year column of the dataframe. Since admit_year does not exist in the dataframe, the withColumn() function creates the column.
Lines 21-23 use the when() function to return a zero if the date_admitted column is null, lines 24-25 returns the year from the date_admitted column, and line 26 casts the final result as an integer.

KEEP ONLY ORIGINAL MEMBERS
We also only want to return United Nations members that were admitted when the UN was created. Line 30 uses the filter() function to keep only the rows where original_member = ‘Y’.

SHOW YOUR WORK
After the calculations are complete, let’s write the results to the log to check our results:

SEND BACK THE DATA
To send the results back, we convert the dataframe back to a dynamic frame in line 37, then insert the dynamic frame into a new dynamic frame collection and return the collection.

How do you like them apples?
Seems Complicated
It can look that way at first blush, but when you break it down it’s a lot simpler. For example, here’s the entire script in the altogether:
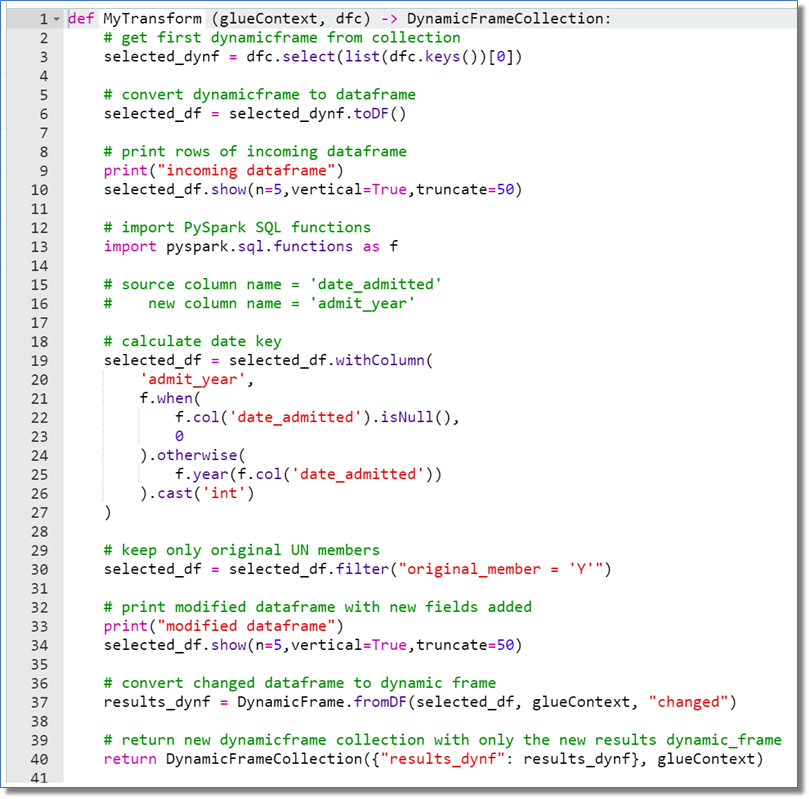
The editor shows 40 lines, but if you take out the comments and blank lines there are only 18. If you take out the four logging lines that leaves only 14 to apply a filter and calculate a new column! Easy peasy!
Now What?
The Custom Transformation is finished and now you can wire it together with the other nodes in your job. You may need to include a SelectFromCollection node to handle the results of the Custom Transformation node before sending to the data destination node.
But really, now the world is your oyster! Anything that Glue Studio doesn’t have a node for, or where you can condense multiple calculations (loops? recursion?) you can do in a Custom Transformation node! Anything Glue can’t do you can do better!
Next Steps
I hope you find this article helpful, fun, and it generates some useful ideas. Be sure to subscribe to our newsletter for data and analytics news, updates, and insights delivered directly to your inbox.
If you have any questions or would like PMsquare to provide guidance and support for your analytics solution, contact us today.