Share


Paul Mendelson, September 6, 2017
Get the Best Solution for
Your Business Today!
In this article I continue to explore ways to leverage custom JavaScript in Cognos. This is the fifth article on the topic (I really like custom JavaScript in Cognos) so be sure to check out my other blogs. An often requested feature in Cognos is the ability to make a list with expandable rows. There are a few different scripts to support this in Cognos 10, but they do not work in Cognos Analytics.
There are actually two different styles of lists that work with the expand collapse. The first is a list with groups, subgroups, and headers.
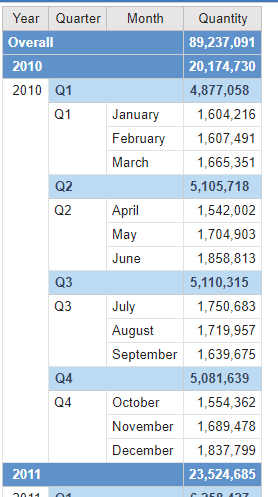
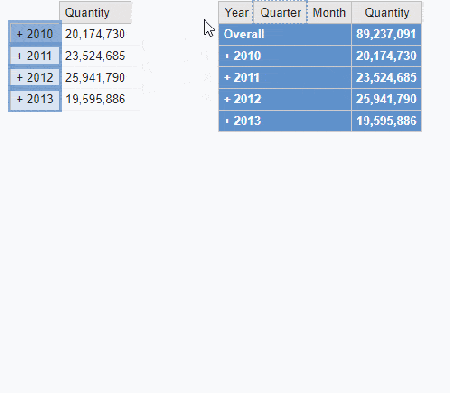
In this example we would want the list to show the overall total and each year on it’s own row. Something like this:
In report studio we see:
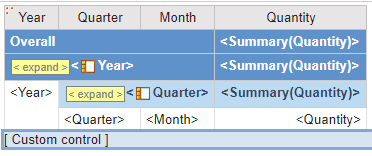
Those HTML items are used to by the script to identify the rows that are set to expand. The HTML is an empty span with the expand class.
<span class=”expand”/> When the script runs it looks for cells with those spans inside them, and checks the next row down. It takes the row span attribute (which makes the merge effect in the table), and counts that many rows down. Each cell in those rows are set with a new attribute called “parent”, with the unique ID of the parent cell. The next level does the same thing, appending it’s unique ID to the parent attribute. As it does this it hides the child rows. Let’s take a look at the JavaScript. First, find the actual table in the HTML:
var o = oControlHost.configuration, list = oControlHost.page.getControlByName(o[“listName”]), listElm = list.element;Set the text of the span to ‘+’, make the cell it’s in change to a pointer, and set the state which will be used later.
$(listElm).find(‘span[class=”expand”]’).text(‘+ ‘);$(listElm).find(‘td:has(span[class=”expand”])’).css( ‘cursor’, ‘pointer’ );$(listElm).find(‘td:has(span[class=”expand”])’).attr( ‘state’, ‘expand’ );This loops through every instance of the expand button. It checks the next row, and loops through the rows based on the row span. For each matching row it will append the expand cell ID as the parent. By looping like this we can assign multiple parents to the same cell. Note that the ID is salted with a pipe to prevent partial text matches. v11 would match v113v123, but v11| wouldn’t match v113|v123|.
$(listElm).find(‘tr:has(span[class=”expand”])’).each(function() {var r = this.rowIndex, a = this.nextSibling.firstChild.rowSpan;for (var i=r+1;i<r+a+1;++i){var id = $(this).find(‘td:has(span[class=”expand”])’)[0].id$(listElm.rows[i]).find(‘TD’).attr(‘parent’, function(){return $(this).attr(‘parent’)? $(this).attr(‘parent’)+id +’|’: id+’|’});$(listElm.rows[i]).find(‘TD’).hide();}});This is the function that is attached to the expand buttons. First it checks the state. If it’s set to expand, it will take any parent it has, append it’s own ID, and show() any cells with that matching parent attribute. If it’s set to collapse, it simply looks for any cells that have a matching parent. This ensures that all cells are collapsed, so if a user opens 2017, then 2017 Q1, closing 2017 will close 2017 Q1 as well.
$(listElm).find(‘td:has(span[class=”expand”])’).click(function(){var p = $(this).attr(‘parent’)?$(this).attr(‘parent’):”;if($(this).attr(‘state’)==’expand’){$(listElm).find(‘TD[parent=”‘+p+this.id+’|”]’).show(200);$(this).attr(‘state’,’collapse’);$(this).find(‘span[class=”expand”]’).text(‘- ‘);}else {$(listElm).find(‘TD[parent*=”‘+this.id+’|”]’).hide(200);$(listElm).find(‘TD[parent*=”‘+this.id+’|”]:has(span[class=”expand”])’).attr(‘state’,’expand’);$(this).find(‘span[class=”expand”]’).text(‘+ ‘);$($(listElm).find(‘TD[parent*=”‘+this.id+’|”]:has(span[class=”expand”])’)).find(‘span[class=”expand”]’).text(‘+ ‘);$(this).attr(‘state’,’expand’);
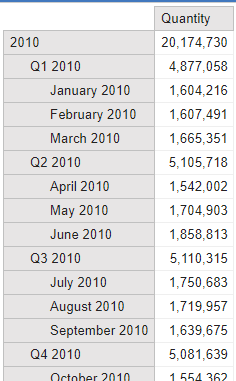
}});The other way of having expand collapse is to use left-padding. Crosstabs have an automatic way of setting padding based on a level in a dimension.
Consider a set made with:
descendants([Sales (analysis)].[Time].[Time].[Year],[Sales (analysis)].[Time].[Time].[Month],self beforewithmember)We would get all of the members in the Year, Quarter, and Month levels. By using the Level Indentation property on the crosstab node, we can be sure that the crosstab will appear correctly. Since we’re starting with the year member, and not the all, the indentation starts after the 1st level.
Let’s take a look a the code.
Like the previous example, we find the cells that have the expand
Unlike the previous one, we don’t have a rowspan attribute to tell us exactly which rows to look at. Instead, we go down one cell and compare the padding. If the padding of the next cell is greater than the current cell, it must be a child. Like the previous solution, each cell has the parent IDs embedded as an attribute. If the cell doesn’t have any children, the expand span is removed.
$(listElm).find(‘tr:has(span[class=”expand”])’).each(
function() {
var r = this.rowIndex
, a = listElm.rows.length
, lpad = parseInt($($(this).find(‘td:has(span[class=”expand”])’)[0]).css(‘padding-left’))
, itr=0;
;
for (var i=r+1;i<a;++i){
var id = $(this).find(‘td:has(span[class=”expand”])’)[0].id
, td = $(listElm.rows[i]).find(‘TD’)
if(parseInt($(td[0]).css(‘padding-left’))<=lpad) {
if(itr==0) $(this).find(‘span[class=”expand”]’).remove();
i=a;
}
else {
++itr;
$(td).attr(
‘parent’
, function(){
return $(this).attr(‘parent’)? $(this).attr(‘parent’)+id+’|’: id+’|’
}
);
}
$(listElm.rows[i]).find(‘TD’).hide();
}
}
);
Once the children have the expand span removed, we can now look for the remaining expand spans and apply the pointers as necessary.
var tds = $(listElm).find(‘td:has(span[class=”expand”])’);
tds.css( ‘cursor’, ‘pointer’ );
tds.attr( ‘state’, ‘expand’ );
And we apply the function to the expand buttons.
$(listElm).find(‘td:has(span[class=”expand”])’).click(function(){
var p = $(this).attr(‘parent’)?$(this).attr(‘parent’):”;
if($(this).attr(‘state’)==’expand’){
$(listElm).find(‘TD[parent=”‘+p+this.id+’|”]’).show(200);
$(this).attr(‘state’,’collapse’);
$(this).find(‘span[class=”expand”]’).text(‘- ‘);
}
else {
$(listElm).find(‘TD[parent*=”‘+this.id+’|”]’).hide(200);
$(listElm).find(‘TD[parent*=”‘+this.id+’|”]:has(span[class=”expand”])’).attr(‘state’,’expand’);
$(this).find(‘span[class=”expand”]’).text(‘+ ‘);
$($(listElm).find(‘TD[parent*=”‘+this.id+’|”]:has(span[class=”expand”])’)).find(‘span[class=”expand”]’).text(‘+ ‘);
$(this).attr(‘state’,’expand’);
}
});
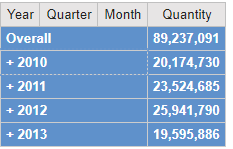
Let’s take a look at the effect of this custom JavaScript in Cognos in action.
You can view the report and js files here:
Custom JavaScript – Expand and Collapse
Conclusion
If you have any questions or would like PMsquare to provide guidance and support for your analytics solution, contact us today.
I hope you find this article on how to use custom JavaScript in Cognos to add expand and collapse functionality into a list helpful. If you haven’t already, be sure to check out our blog for additional tips and tricks. Subscribe to our e-newsletter for more technical articles and updates delivered directly to your inbox.