Rory Cornelius, January 10, 2020
Get the Best Solution for
Your Business Today!
Table of Contents
Introduction
One of my favorite features of Data Modules since version 11.1 is the ability to easily do relative date analysis. What used to take a bunch of coding in Framework Manager or several queries within a report, you can now do by pointing your measure to a calendar in a Data Module and automatically have several relative time data items and filters available. IBM provides both a Gregorian and a Fiscal calendar for you to use, but what if those two calendars don’t quite fit your needs? For example, what if your company needed to analyze data at a weekly level instead of monthly? Both of the provided calendars have yearly, quarterly, and monthly filters but no weeks. Let’s go through an example creating our own custom Gregorian calendar that does have weekly timeframes. I think you’ll see it’s not as complicated as it may seem.
For those new to using relative time in Data Modules, check out this video from IBM for an overview of the process.
Creating a Custom Calendar
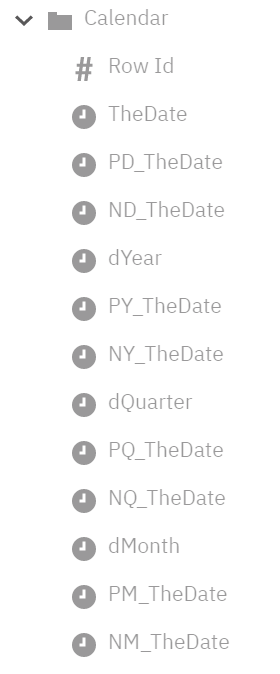
Let’s start by opening the provided Gregorian Calendar Data Module and take a look at the fields available. Depending on where your administrator imported these, it’s probably with the other Cognos samples in the Calendars folder. Here’s the list of fields we find:

The abbreviations are fairly easy to figure out, and they basically follow a typical Time dimension table. “TheDate” field contains one record for every date within the calendar. The other fields are all based on that. PD is “Prior Day”, and ND is “Next Day”. The same pattern appears for Year, Quarter, and Month.
Here are the first few rows of our calendar so you can see the pattern:

Now that we see what we have in this calendar, how would we go about adding weekly fields to this?
IBM has provided a “Calendar generator report” in the Tools folder for the calendars. This is a great place to start. Run this report, provide a starting date and a number of years. Download the CSV and open it in Excel.
Your spreadsheet should look like something like this:

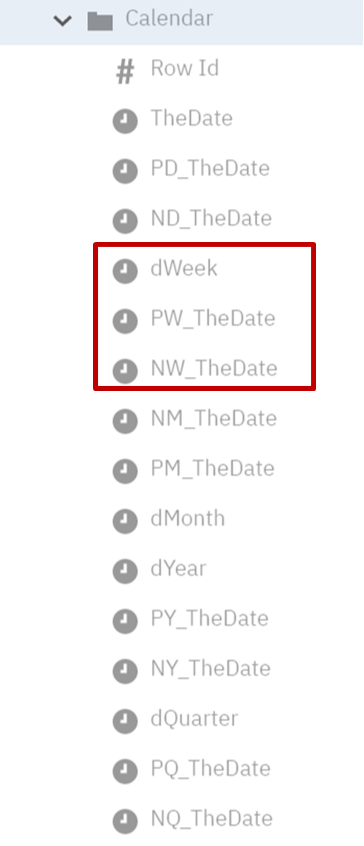
Now let’s add three new columns for week. The first column, “dWeek”, will be the first day of the week for our starting date, 1/1/1970. “PW_TheDate” will be the first day of the previous week, and “NW_TheDate” will be the first day of the next week. These names aren’t really important, but this does follow the naming conventions for the rest of the calendar which will make our lives easier when adding the new filters later.
The easiest way to set the data for dWeek is to use the Excel formula: =A2-WEEKDAY(A2,2)+1
The formula provides the most recent Monday based on TheDate field. We can then make PW_TheDate and NW_TheDate based on that field by subtracting or adding 7 to get the previous or next week. Once the top row is filled in, we can copy the formulas down for all of the rows in the spreadsheet.

Next, save the spreadsheet as either XLS or CSV and upload it into your Cognos environment.
The Cognos samples come with a Gregorian Calendar Data Module. You could edit this one directly if you always want week included, or you can make a copy and edit the new Data Module. Once your Data Module is open in edit mode, we’ll want to change the source to use the new uploaded file.
- Click on the sources button on the left
- Click on the three dots (action) button next to the existing file
- Select “Relink” and choose the new file
- Drag the table level node from the sources panel to the Data Module panel to update and add our three new fields
- The fields are put at the bottom by default. I like to drag them back up under the Calendar folder and put them between the Date fields and the Quarter fields to keep things organized.

Once our fields are included, the next step is to add in new relative time filters for the weekly breakdown. We can use Current Month as a starting point. Copy and paste that filter to get a new version. Change the name on the new filter to “Current Week” and edit the filter.
Before we add the weekly filters, let’s understand more about how Relative Time filters work.
The basic format for a filter is going to be something like this:
// validate: 1 = 1#$_this.parent.idForExpression# >= lower_bound_date expression#AND#$_this.parent.idForExpression# <= upper_bound_date expression#The first line is just a comment that needs to be there. The rest of the expression creates what’s basically a “between” statement. It’s saying, filter for only dates that are greater than or equal to the lower bound expression AND less than or equal to the upper bound expression. Specifically, $_this.parent.idForExpression evaluates to the Date column that has a Lookup Reference pointing to your calendar. For example, if you have an Order Fact table with an Order Date field set up for relative time, it would evaluate to that Order Date field. It could also be the Date field in your time dimension table if that’s how you have it set up. In any case, think of it as the date for your transactions.
Let’s get into more detail on how to set up that upper and lower bound expressions. We’ll start with the Current Month filter expression:

If we take out just the “lower bound” portion of the expression, we have this:
#queryValue($_this.parent.split.ref + '.dMonth', $_this.parent.split.ref + '.TheDate = ' + $_as_of_date)#The queryValue function takes two parameters and returns a single value from a table. The first parameter indicates which field should be returned. It needs to include a table name, followed by a period, followed by a field name (i.e. MyCalendar.TheDate). The second parameter is a boolean expression used to filter the table. You can think of it as a “where” clause in SQL or a detail filter in a Cognos report. It follows the same format with TableName.FieldName followed by an operator and then a value (i.e. MyCalendar.TheDate >= 2019-06-01).
Now that we know the queryValue function works, let’s look at what this one is doing. $_this.parent.split.ref is a macro variable that evaluates to the Calendar table that is used for the Lookup Reference for the field. Following the examples above, it would be “MyCalendar”. The next part, ‘dMonth’ is the field from the table that we’re selecting. In this case, dMonth refers to a date field that contains the first day of the month. The second parameter then has $_this.parent.split.ref + ‘.TheDate which evaluates to “MyCalendar.TheDate”. This field contains the actual date that is being evaluated. Finally, $_as_of_date is the current date unless the _as_of_date Global parameter has been set differently. (For more information on setting the _as_of_date, check out this article from IBM.)
If we replace all of the variables, we’re left with this:
OrderFact.OrderDate >= #queryValue(MyCalendar.dMonth, MyCalendar.TheDate = CURRENT_DATE)#That statement is essentially saying, include all rows where the OrderDate field is greater than or equal to the dMonth field (first day of the month) where the TheDate field is equal to today.
Assuming today is 2019-12-13, the queryValue function would evaluate to ‘2019-12-01’ based on the row from our Calendar below:

That gives us our lower bound. Now, let’s take a look at the upper bound. It follows the same pattern, but it has one extra layer of the queryValue functions. If we do the same process as above and replace all the variables with what they would evaluate to in our example, we end up with this:
OrderFact.OrderDate < #queryValue(MyCalendar.dMonth, MyCalendar.TheDate = queryValue(MyCalendar.NM_TheDate, MyCalendar.TheDate = CURRENT_DATE))#We’ll start with the lowest level queryValue function. It’s querying for the Next Month date where the row is for the current date. Still assuming a 2019-12-13 current date, we can get the NM_TheDate field from the screenshot below. In this case it’s 2020-01-13.

If we replace the lowest level queryValue function with that value, we get:
OrderFact.OrderDate < #queryValue(MyCalendar.dMonth, MyCalendar.TheDate = 2020-01-13)#The remaining queryValue function is looking for the dMonth field for the row whose TheDate field is 2020-01-13. Here’s that row from our table:

Given the value of 2020-01-01, we now have our upper bound. If we put them both together, we’re left with a filter that includes all dates within the current month:
OrderFact.OrderDate >= 2019-12-01 AND OrderFact.OrderDate < 2020-01-01All of the other relative time filters follow this same structure using different fields within the Calendar table to get the values that are needed.
Now that we understand more about the filters in general, let’s see about adding the new ones for our weekly values. All of our new week fields follow the same standards as the previous timeframes, so it’s a pretty simple exercise to change the Current Month to work for Current Week. For the lower bound, instead of querying for dMonth, we change it to dWeek. This will get us the first day of the week for the date we’re looking at. The upper bound needs to change from querying for Next Month to be for Next Week instead. NM_TheDate now becomes NW_TheDate. We also make a similar change as the lower bound to look for dWeek instead of dMonth. Everything else in the expression can remain the same. Our new Current Week expression will look like this:
#$_this.parent.idForExpression# >= #queryValue($_this.parent.split.ref + '.dWeek', $_this.parent.split.ref + '.TheDate = ' + $_as_of_date)#AND#$_this.parent.idForExpression# < #queryValue($_this.parent.split.ref + '.dWeek', $_this.parent.split.ref + '.TheDate = ' + queryValue($_this.parent.split.ref + '.NW_TheDate', $_this.parent.split.ref + '.TheDate = ' + $_as_of_date))#By following the same pattern, you should be able to start with a monthly filter and easily change it to be a weekly filter for all of the different timeframes. Once all of the weekly filters are in place, save your new Data Module and use it just like the other calendars. You’ll now be able to more easily evaluate weekly performance.

Conclusion
Being able to see how one timeframe compares to another across different measures is a key component of most organizations’ standard reporting. The sample Calendars provided go a long way toward filling that need, but they don’t always work for how your organization looks at data. Hopefully this walkthrough has helped you understand how you can create the custom relative time filters and measures that work best for your needs. However, if the thought of updating macros makes your head spin, let us know. We’ll be happy to help create whatever relative time analysis you need.
Next Steps
We hope you found this article informative. Be sure to subscribe to our newsletter for data and analytics news, updates, and insights that are delivered directly to your inbox.
If you have any questions or would like PMsquare to provide guidance and support for your analytics solution, contact us today.


