
Share


Dan Swan, September 30, 2024
What’s New in PAW Series
- New Features in Applications and Plans (read here)
- New Features in Books and Reporting (read here)
- New Features in Modeling (You are Here)
- Watch the corresponding Modeling video on YouTube.
Notes:
This article covers the updates to Modeling released in 2024 as of August 2024.
Examples shown here use the Smartco sample model provided by IBM.
Get the Best Solution for
Your Business Today!
Table of Contents
New Filtering Options in the Dimension Editor
Release 2.0.93 – February 20, 2024
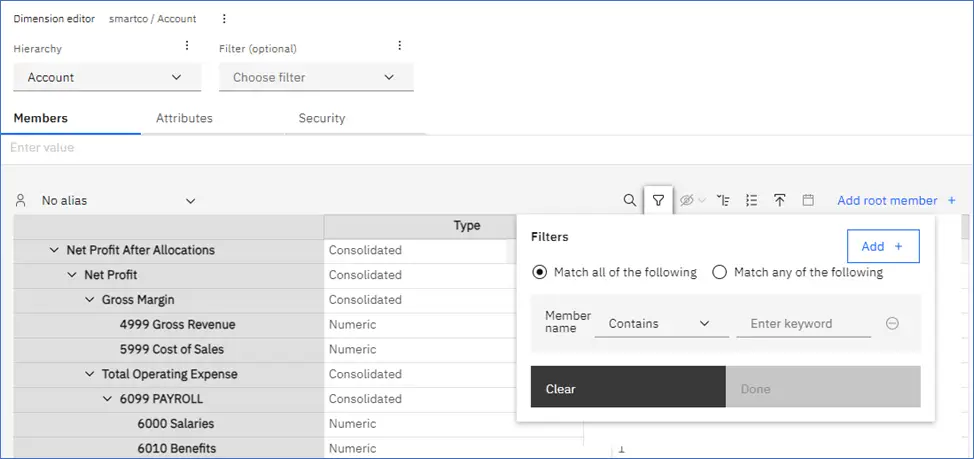
A new filter has been added to the Dimension Editor in addition to the two filtering options already available.
You can still filter dimension members in the dimension editor with “Filter” (optional) or use “Search” to create a list of members that match the search term.
Click on the new “Filter” icon to further filter dimension members.
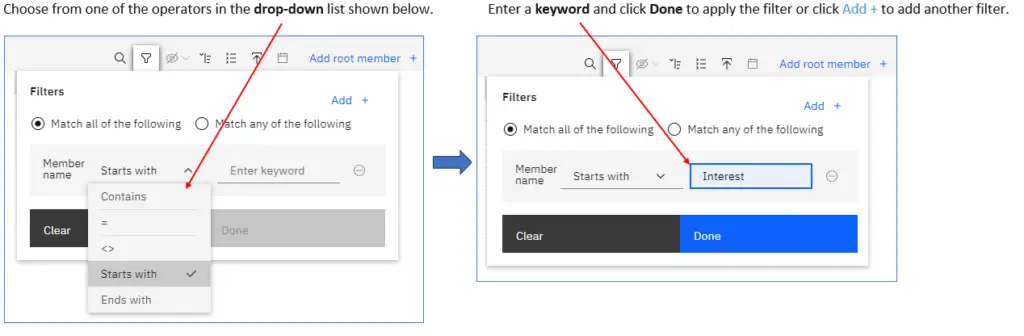
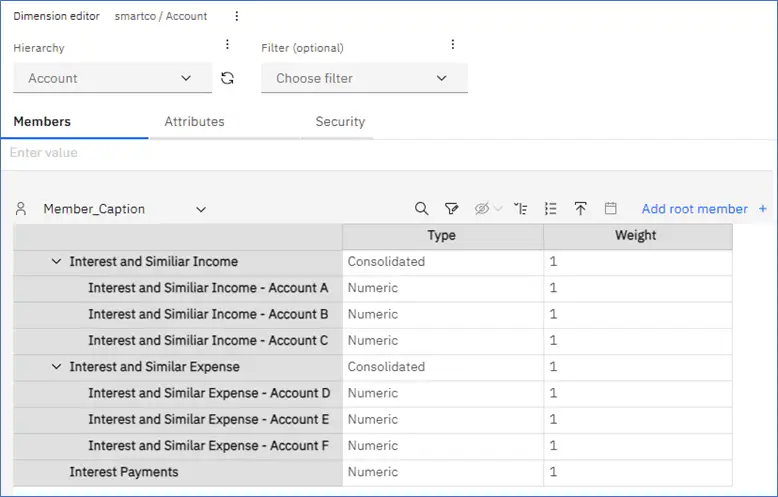
With the filter applied, the dimension members all start with “interest”. Note that the filter icon has changed to indicate a filter is active.
You can combine up to three filter parameters in one go. Use “Match all of the following” or “Match any of the following” to refine the filter further.
This filter applies to the “Members” tab and the “Attributes” tab.
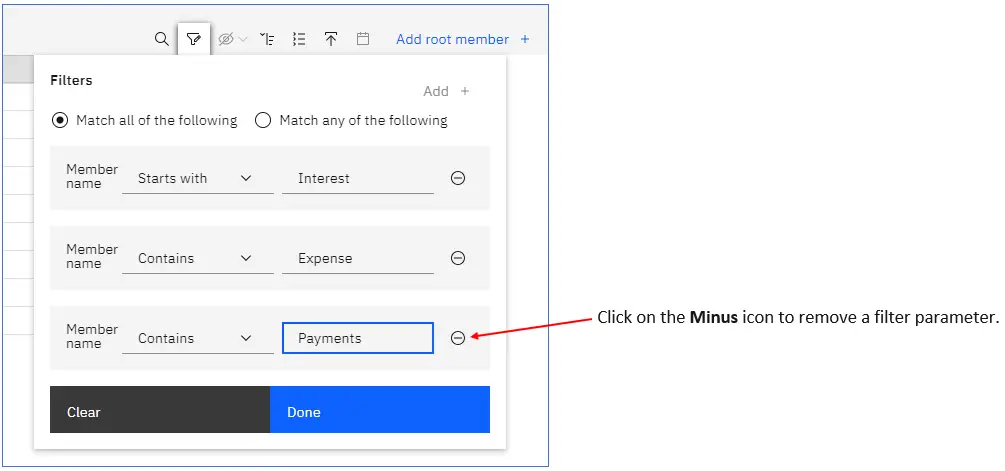
Click “Clear” to remove the filter completely.
Clearing the filters on either the “Members” tab or “Attributes” tab clears the filter on both tabs.
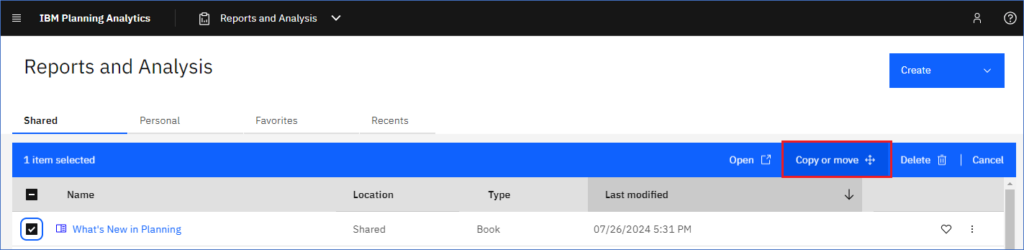
Copy and Move Multiple Assets or Folders
Release 2.0.93 – February 20, 2024
Copy and move multiple assets or folders to a new location within the “Reports and Analysis” page and the “Data and Models” page.
In this example we are starting in Reports and Analysis page and we are transferring a book to a new location.
Click in the check box next to the folder or asset you want to move. Then click “Copy or move” in the toolbar.
Choose the Shared or Personal folder. You can move the folders or assets here within the Shared folder, or choose a folder within Shared.
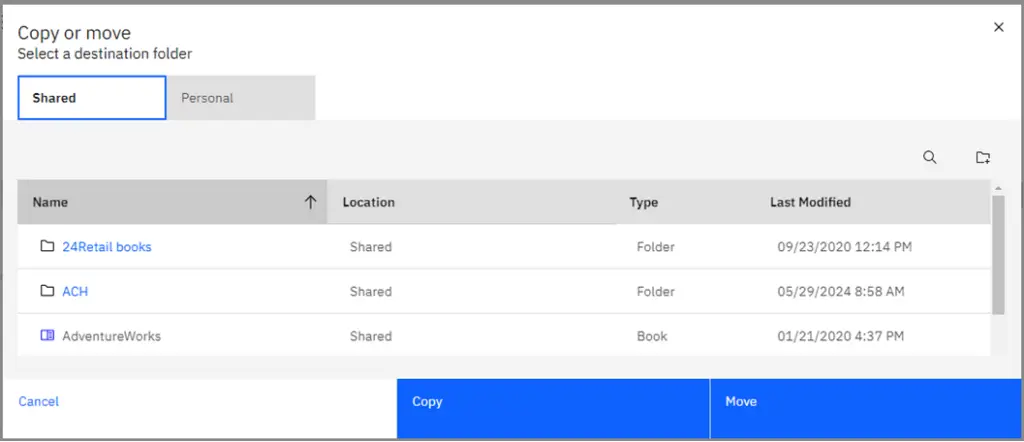
When you are in the desired location, click “Move” and the assets or folders will be placed in the new location.
Replace an Existing Cube
Release 2.0.93 – February 20, 2024
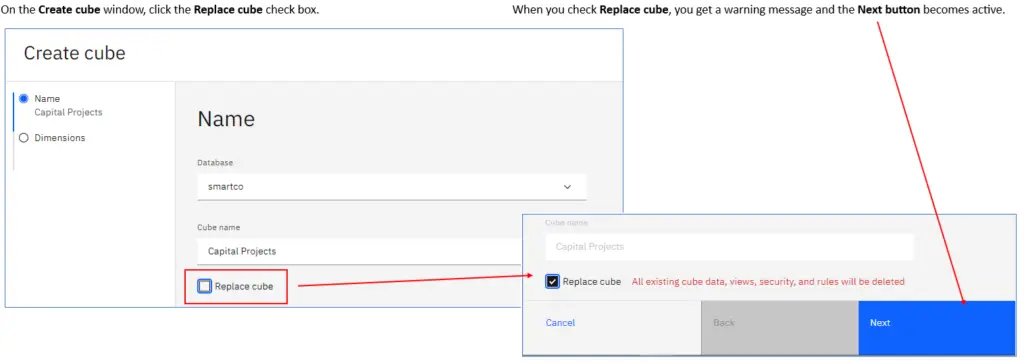
You can now replace an existing cube with a new cube in the IBM Planning Analytics Workspace “Create cube” menu.
To replace an existing cube with a new cube, complete the following instructions:
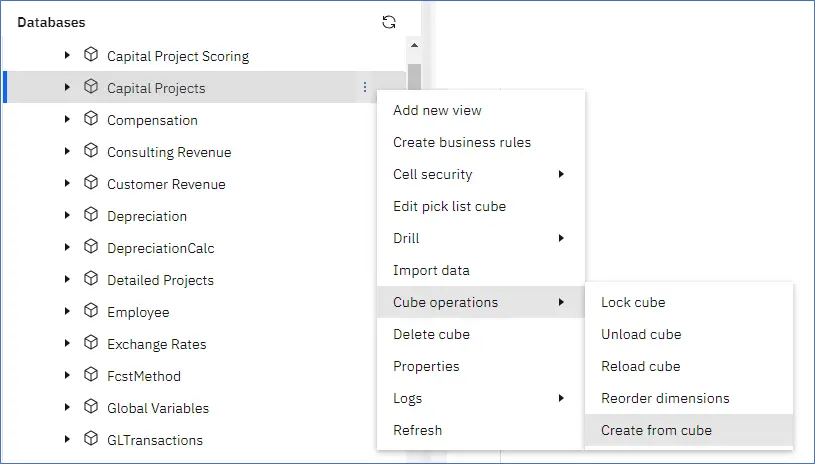
- In the Databases tree, right-click on the cube that you want to replace.
- Click “Create from cube”.
- In the Create cube menu, you can change the database and name of the cube. Then, click the check box next to “Replace cube.”
- Click “Next”.
- In the Dimensions menu, you can add or remove dimensions from the cube you are creating.
- Click “Create.” A warning will appear, explaining that deleted data is not recoverable.
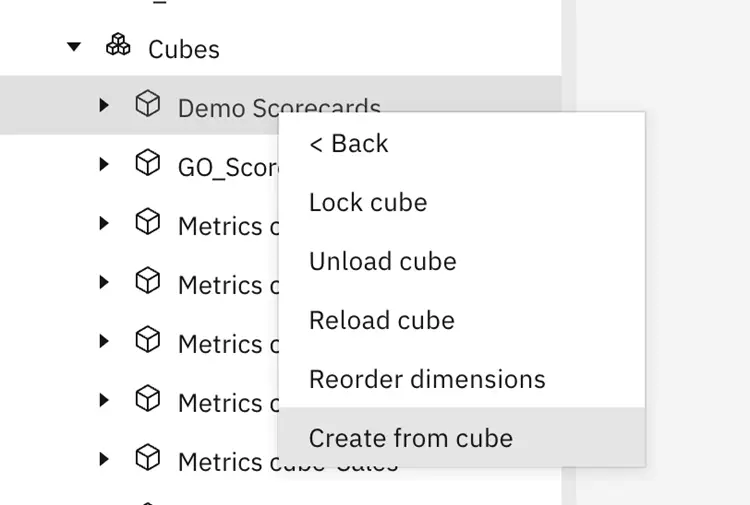
Within the Databases tree, right-click on the cube that you want to replace or create a new cube.
Navigate to “Cube operations,” then “Create from cube.”
After clicking “Next,” the dimension selection window opens where you can create a new cube based on the dimensions of the cube you started with.
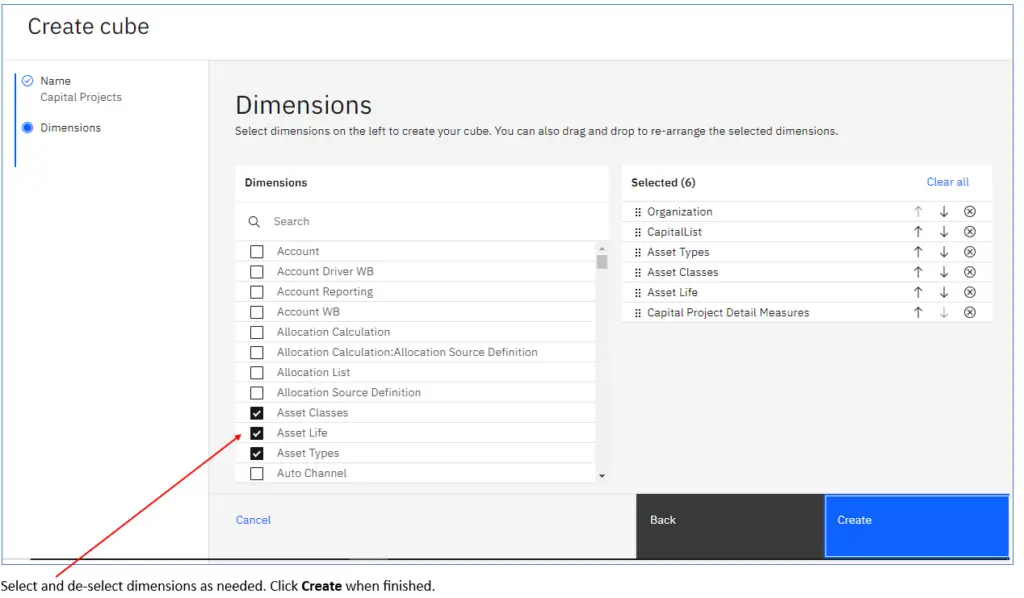
The existing cube is deleted, and a new one is created with the same name.
Map to Existing Dimensions when Importing Data to a New Cube
Release 2.0.93 – February 20, 2024
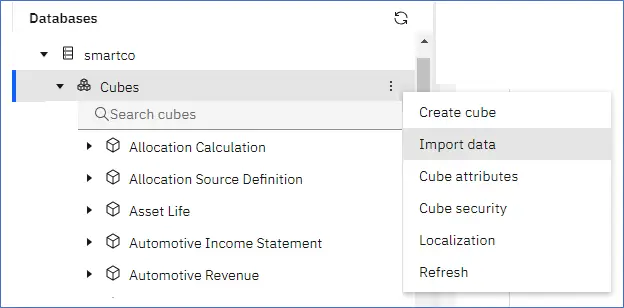
When using the “Import data” feature from the Cubes rollup, you can map to an existing dimension or a control dimension when you import data into a new cube.
Before this release, you were required to build all new dimensions for the new cube from the imported data.
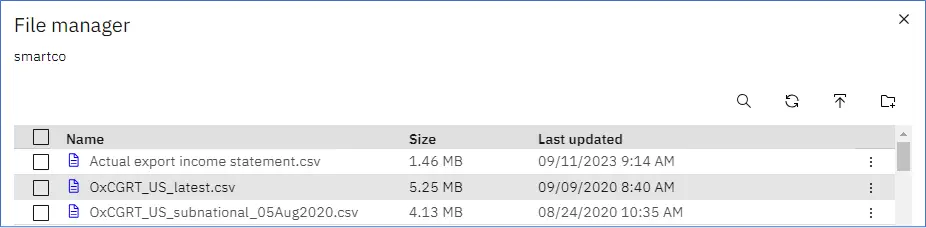
From the “Cubes” rollup, click or right-click and select “Import data.”
The “Import data” window will open. Click the “New cube” check box and enter the name of your new cube.
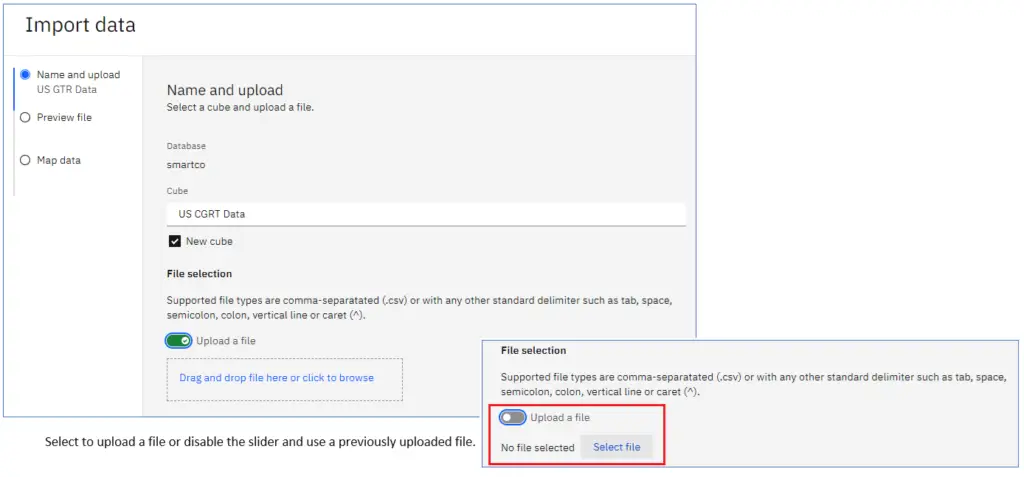
If using a previously uploaded file, the “File manager” window will open. Select the file and click Select.
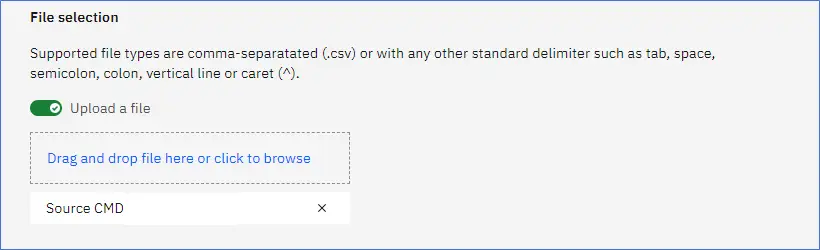
If you are uploading a file from your computer, click to browse and select a standard delimited file.
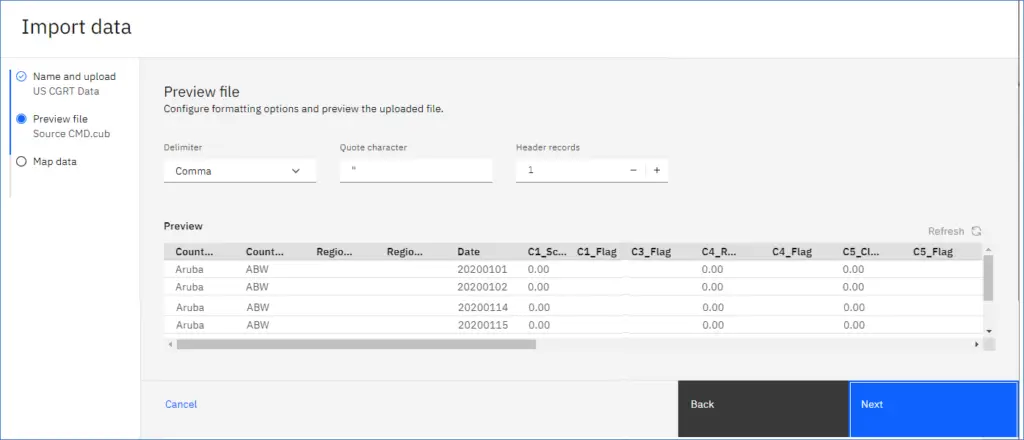
Preview the file and ensure that the Delimiter, Quote character and the number of Header records are correct. Click “Next.”
In the “Import data” window below, the “Data source mapping” procedure has been updated to include three options for mapping.
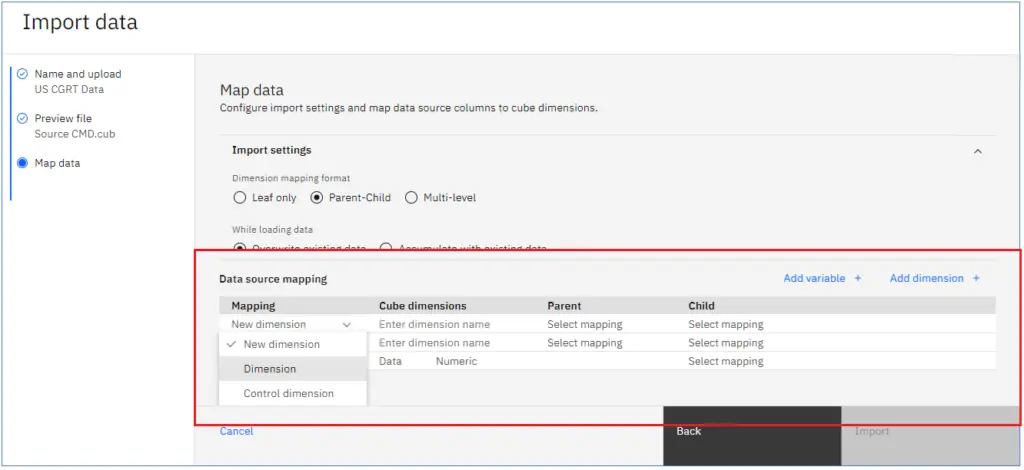
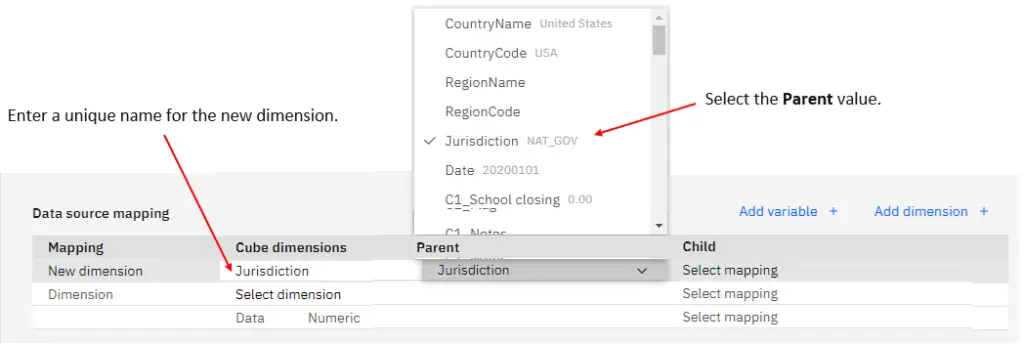
“New dimension” – map the source data to a new dimension.
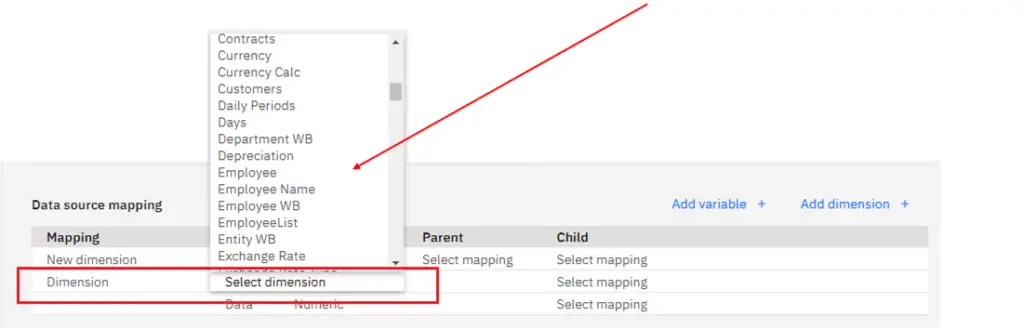
“Dimension” – the data source is mapped to an existing dimension. Select from a list of existing dimensions in the “Cube dimensions” column.
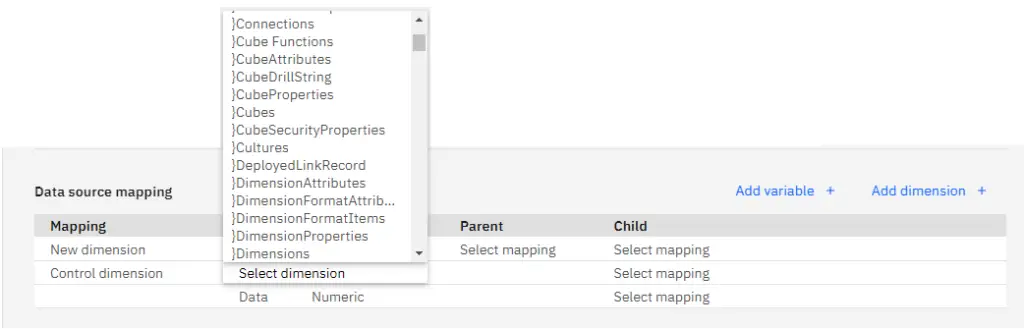
“Control dimension” – map the data source to an existing “Control” dimension. Choose a control dimension from the “Cube dimensions” column.
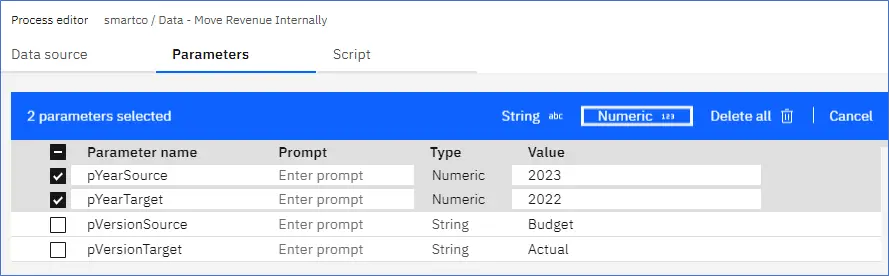
Change Multiple Parameter Types in the Process Editor
Release 2.0.94 – March 20, 2024
You can now change the type of multiple parameters in the process editor simultaneously.
Open the Process editor and go to the “Parameters” tab.
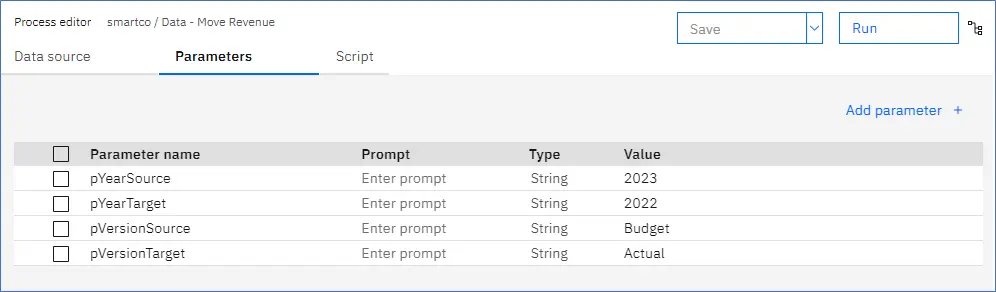
Click in the check boxes for each parameter you want to change. Click the “Parameter name” check box to select all parameters.
A blue tool bar will appear indicating the number of parameters selected and options to change the type or “Delete all” selected.
Click “String ᵃᵇᶜ” or “Numeric ¹²³” in the blue tool bar to change the type for all parameters selected.
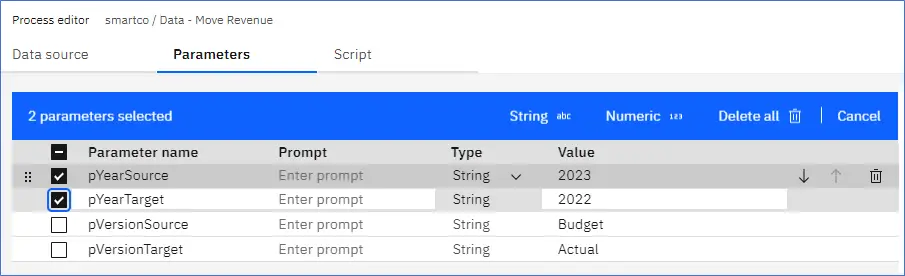
You can still make individual changes by clicking the drop-down arrow in the type column, even if you have multiple parameters selected.
In the example below, the parameter type was changed to “Numeric ¹²³” for the first two parameters.
Enhancements to the File Manager
Release 2.0.95 – April 23, 2024
The File manager tool on the modeling workbench features several enhancements in this release that lets you easily move files around. The File manager shows a list of all the files and folders that have been uploaded to the Planning Analytics database and allows you to manage those items.
Improvements to the File Manager tool within Workspace were designed to make moving files easier.
The File manager improvements depicted here are available only in Planning Analytics Workspace on Cloud and Planning Analytics Workspace Local. They are not available in Planning Analytics Workspace on Planning Analytics as a Service or when connected to Planning Analytics Engine.
Attention: If you’re working with Planning Analytics Workspace Local, you won’t be able to use the File manager in Planning Analytics Workspace 2.0.95 unless you update the Planning Analytics Administration agent to the version from the same release. For more information, see Planning Analytics Administration agent (local only).
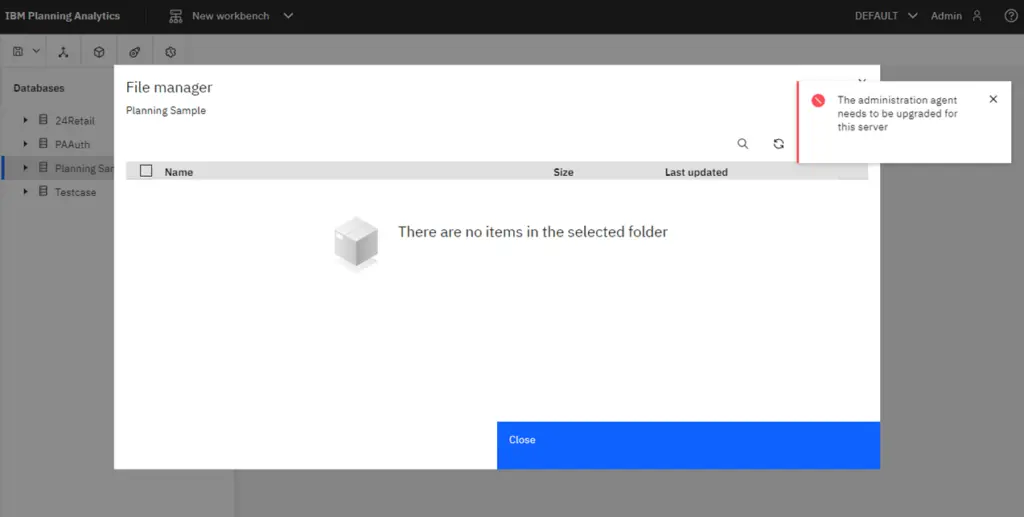
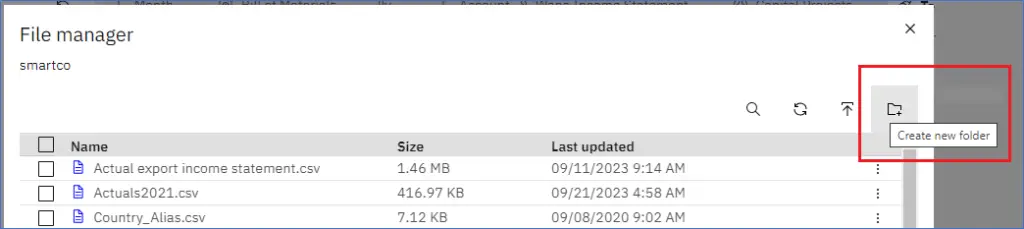
The following updates have been made to the File Manager:
Create folders and subfolders
Cut, copy, and paste files
Select one or more files and the blue toolbar will appear with options to “Cut, Copy, Compress” or “Delete all” selected files. If you delete a folder or subfolder, the files in that folder are also deleted.
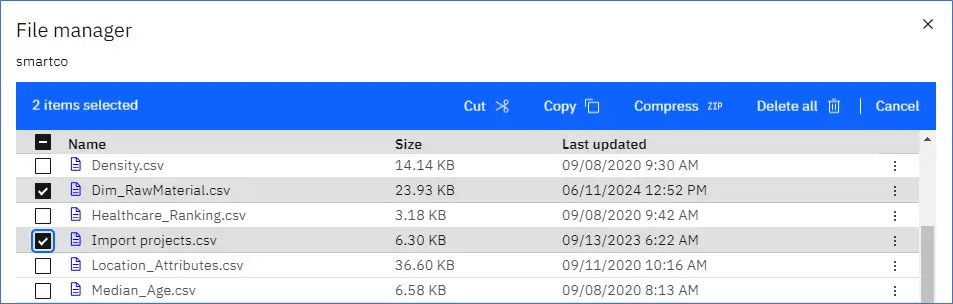
When you click cut or copy, your selections appear in alphabetical order as a horizontal list for a quick review.

To paste a cut or copied item, go to the destination folder and click “Paste.”
Compress and Expand Files
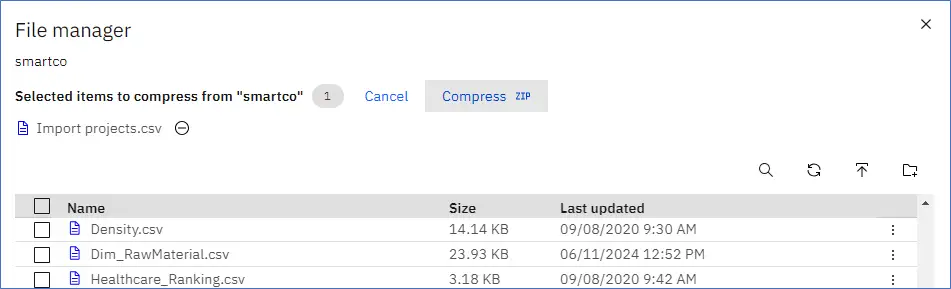
Select one or more files or folders and click “Compress” to create a .zip file.
Compress and move a file to a new location without using “Cut.” Select a file and click “Compress,” then, go to the destination folder and click “Compress” again.
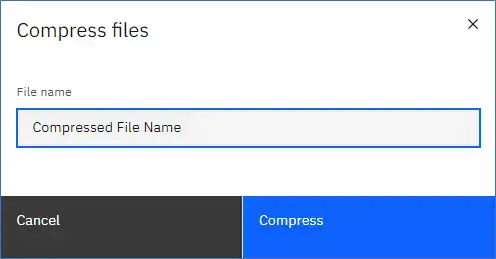
Enter a name for the compressed file and click “Compress.”
Expand a compressed file by selecting the file and clicking “Expand.” To Expand a file to a new location, go to the destination folder and click “Expand” again.
Roll Back Transactions in the Transaction Log
Release 2.0.95 – April 23, 2024
In this release, transactions can be rolled back from the database transaction log within Workspace.
Start from the Databases tree on a modeling workbench. In this example, we are starting from the Smartco database.
Right-click the database, then click “Logs” then “Transaction Log.”
To open the transaction log for a cube, right-click the cube, then click “Logs” then “Transaction Log.”
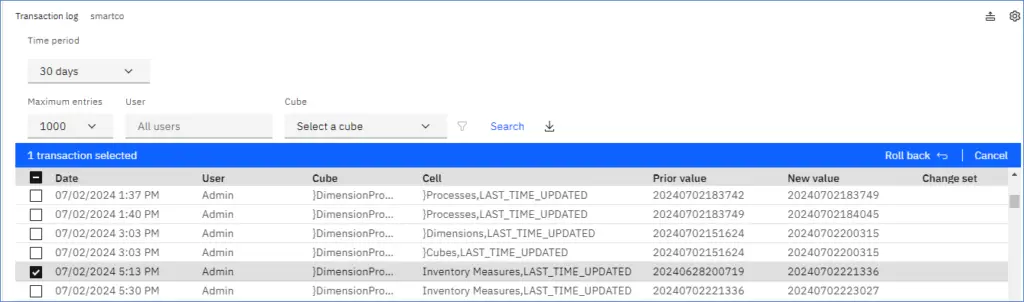
Set filtering options if needed, then click “Search.” You can click any column heading to sort the transactions.
Select the transactions to roll back. Click “Roll back” to roll back a single selected transaction or click “Roll back all” to roll back multiple selected transactions
Click “OK” to confirm the action.
The current cell value is reverted to the value indicated by the “Prior value” column. If multiple selections target the same cell, the most recent transaction takes precedence.
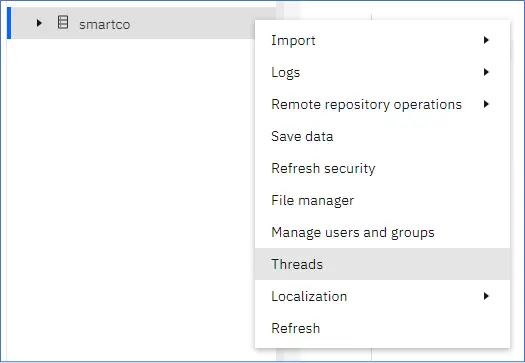
Manage Database Thread Activity on the Modeling Workbench
Release 2.0.95 – April 23, 2024
Beginning with this release you can manage thread activity for a database directly on the modeling workbench.
This feature provides most of the capabilities available for thread monitoring in Administration.
Right-click the database in the Databases tree, then click “Threads.”
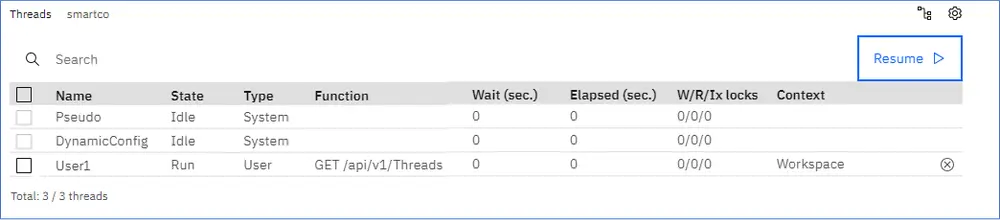
The thread monitor displays all threads on the database using the sortable columns shown below.

The availability of columns can vary between the Planning Analytics database and the Planning Analytics Engine. Click “Settings” to change how the columns are displayed.
Thread Monitor Columns:
Name – The user name that initiated the thread.
State – The current thread state.
- Idle: not using resources
- Wait: this thread is blocked and waiting on other threads
- Running
- Commit: committing updates made by a thread
- Rollback: rolling back to a state before an update
- Login: when a user logs in and initiates a thread
Type – Indicates a User or System thread.
Function – The API function being executed by the thread.
Wait – The time, in seconds, that the thread has been in a wait state.
Elapsed – The elapsed time of the thread in its current state.
W/R/Ix locks – The number of write, read, and intent-to-write locks that the thread holds.
A write lock allows only the thread that holds the lock to access and write changes to an object. No other thread can read or modify the object until the W (write) lock has been released.
A read lock allows many threads to read from an object at the same time, but does not allow another thread to modify or write to the object until all R (read) locks have been released.
An intent-to-write lock reserves the right for a thread to obtain a write lock on an object when all read locks have been released. Only one thread at a time is allowed to have an Ix lock on an object.
Context – The connected Planning Analytics client that is associated with the thread.
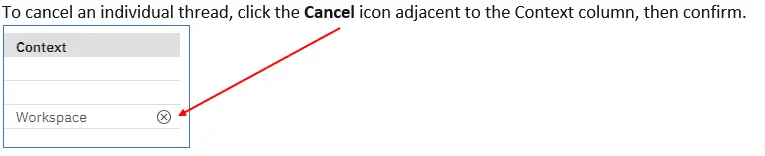
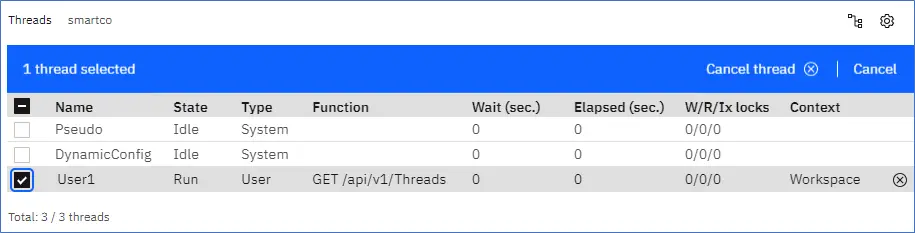
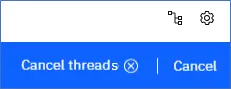
To cancel multiple threads:
- Click “Pause.” When monitoring is paused, check boxes are available to select individual threads.
- Select the threads to cancel.
- Click “Cancel threads” on the toolbar, then confirm the action.
- Click “Resume” to continue monitoring.

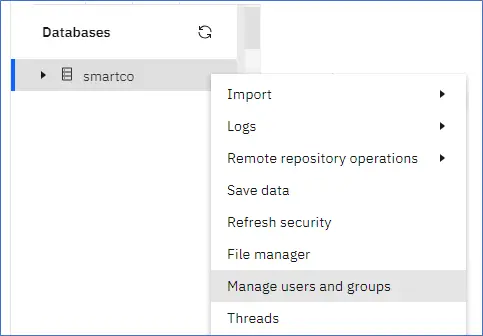
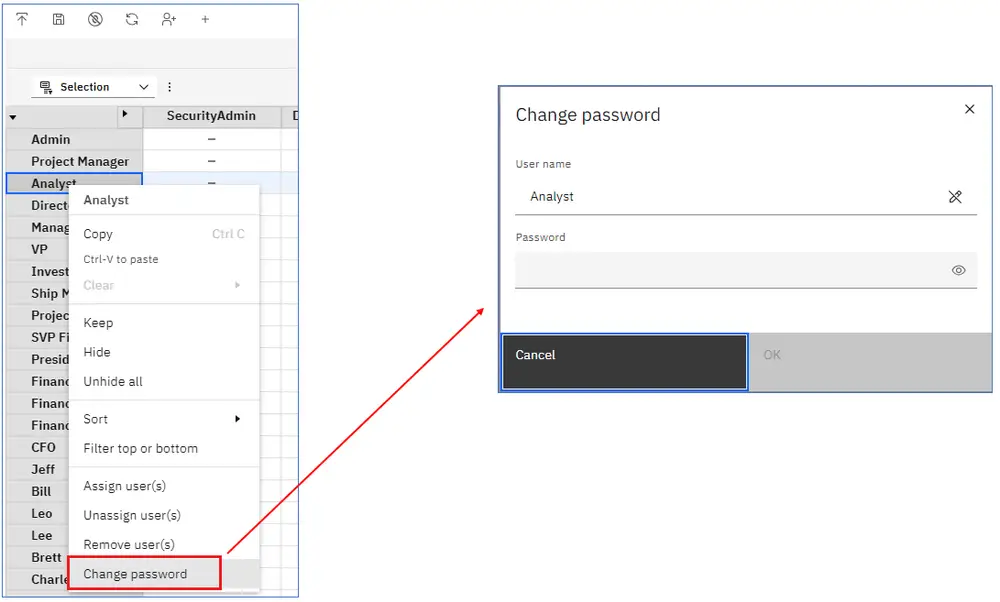
Create Users in a Planning Analytics Local Database
Release 2.0.96 – May 28, 2024
The ability to create users in a Planning Analytics Local database has been added using the Users and groups editor.
Create new users by opening the “Users and groups” editor in a modeling workbench.
Right-click a database in the Databases tree, and then click “Manage users and groups.”
Click the “Create new user” icon in the Editor Toolbar to add new users.
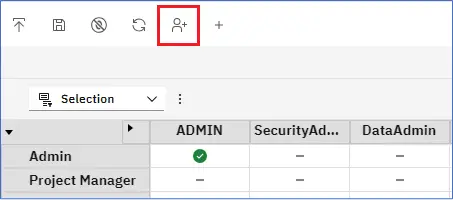
Enter the new user’s name and password. The new user’s name appears at the end of the list of existing users.
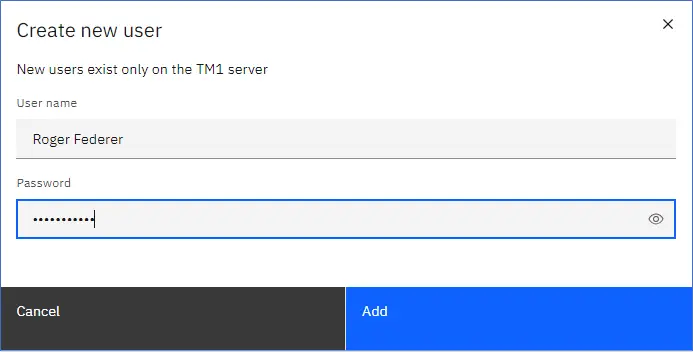
A new user added in Workspace is added to the TM1 server only, not to Workspace. Add the user to Workspace if you want to use the new user for authentication.
Also new in this release is the ability to change a user’s password. Right-click the user name, and select “Change password” option from the menu.
Localize Objects on your Database with the Localization Editor
Release 2.0.96 – May 28, 2024
Localization provides a mechanism to localize objects on your TM1 server, so that users can view object names based on their current locale without requiring any configuration.
The new “Localization” editor makes it easier to localize the names of cubes, dimensions, dimension members, processes, and chores on your Planning Analytics Workspace database.
The Localization editor is available from the modeling workbench.
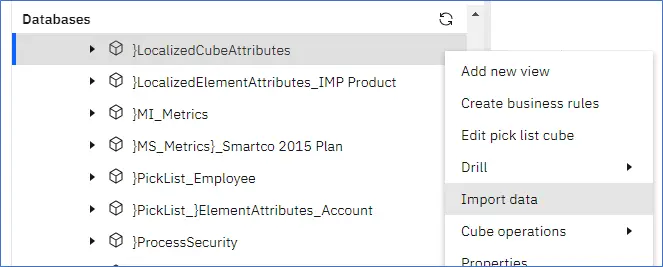
To localize cubes, dimensions, processes, or chores, right-click an database on the Databases tree, then click “Localization > object type.”
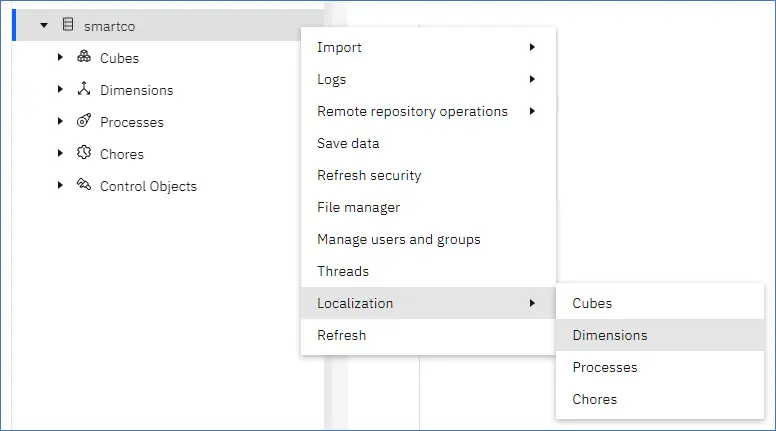
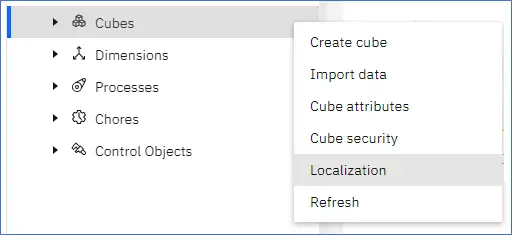
You can also open the Localization editor by right-clicking an object node in the Databases tree (Cubes in the example below), then clicking “Localization.”
The Localization editor opens a view, with object names on the rows and the languages included as members in the “}Cultures” control dimension on the columns.
Below, we are using the 24retail example that IBM provided within the 24retail sample model.
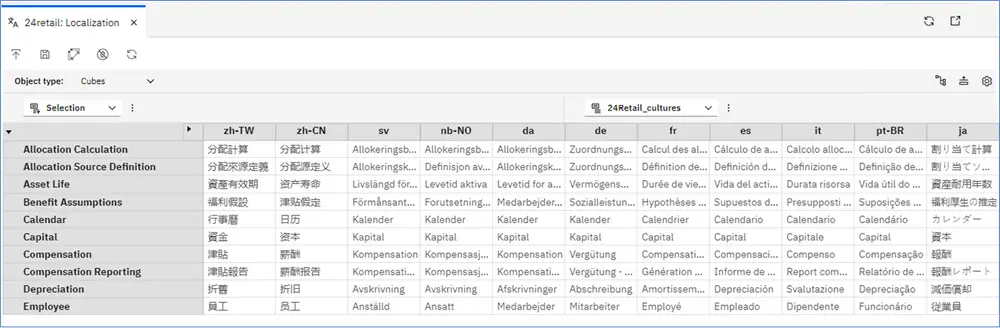
The first time the Localization editor is opened for an object type, a new localization control cube is created within the database where the objects reside. Localized object names are saved in these control cubes.
Object Type Localization Control Cubes
- Cube – }LocalizedCubeAttributes
- Dimension – }LocalizedDimensionAttributes
- Processes – }LocalizedProcessAttributes
- Chores – }LocalizedChoresAttributes
Below is an example of a control cube for the IMP Product dimension:
- }LocalizedElementAttributes_IMP Product
To localize object names, you can work directly in the Localization editor or upload data to the appropriate localization control cube.
To enter localized data directly, click the cell at the intersection of an object name and a language, then enter the appropriate localized name.

To upload data, right-click on the localization control cube in the Databases tree and click “Import data.”
See Importing data into a cube for more information.
The instructions above work for the localization editor when you are editing process and chore names, or member names in a specific dimension
Use the Improved Auto-Complete and Validation for Rules
Release 2.0.96 – May 28, 2024
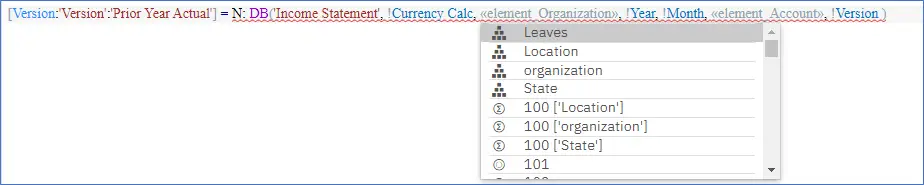
An enhanced auto-complete feature better identifies the required components of a rule statement and offers relevant components for the selected rule when you press CTRL+SPACE in the rules editor.
In the example below, CTRL+SPACE was pressed at the “<<element Organization>>” component of the rule.
You can now also click the “Validate business rules” icon to fully validate your rules. This performs a validation that is equivalent to how the system performs when you save a rule, and exceeds the real-time syntax checking and validation that occurs while creating a rule.

Schedule Chores Using Daylight Saving Time (DST)
Release 2.0.96 – May 28, 2024
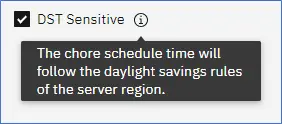
A new DST Sensitive option is now available in the Chore “Schedule” tab.
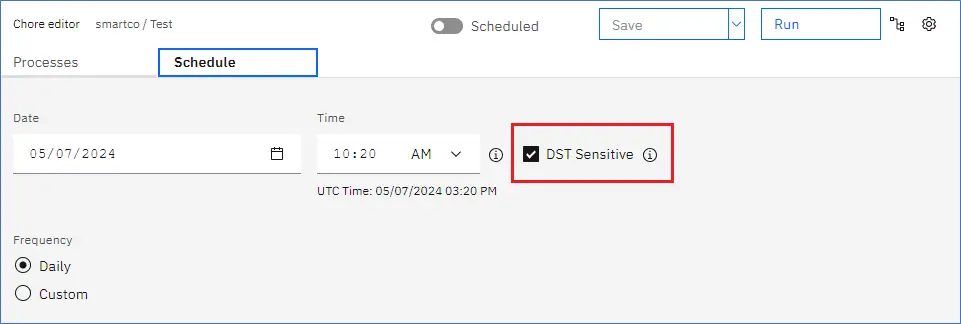
The DST Sensitive checkbox is selected by default and the chore time is automatically updated when Daylight Saving Time (DST) starts or ends for the region where the Planning Analytics database server is located.
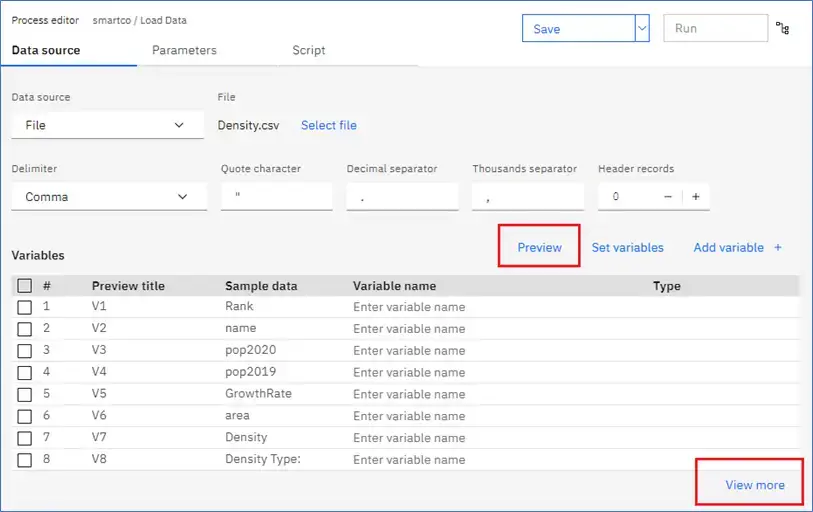
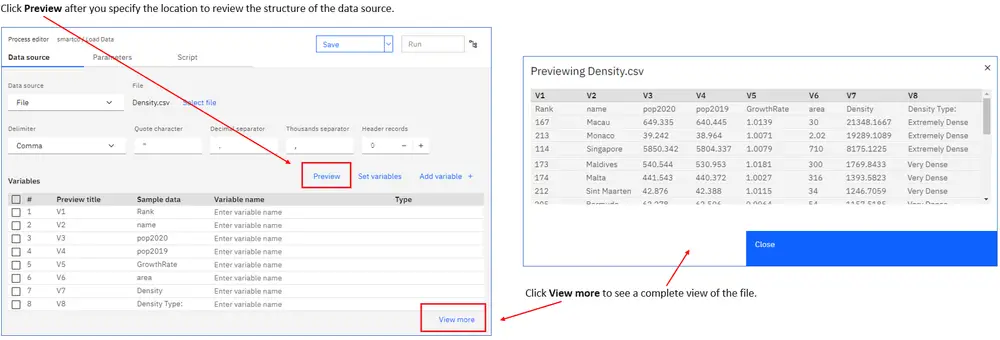
Preview a Location Data Source in the Process Editor
Release 2.0.96 – May 28, 2024
A preview of a location data source can now be inspected while creating or editing a process in the process editor.
Click “Preview” after you specify the location to review the structure of the data source.
Next Steps
As you explore the latest enhancements in Planning Analytics Workspace (PAW) modeling, it’s crucial to leverage these features effectively to drive better outcomes for your business. Whether you’re optimizing existing models or building new ones, choosing the right partner can make all the difference. With PMsquare’s expertise in PAW and data analytics, we can guide you through these updates, ensuring a smooth and impactful implementation. If you have any questions or need support in optimizing your PAW environment, don’t hesitate to reach out to PMsquare today.
I hope this article has sparked some fresh ideas on how to harness the power of PAW’s new modeling features. To stay ahead with the latest updates and best practices, be sure to subscribe to our newsletter for expert insights delivered directly to your inbox.
Published Date: