Share


Danny Gargus, June 8, 2020
Get the Best Solution for
Your Business Today!
Table of Contents
Easier Access
Oftentimes Cognos report output is needed to be consumed by many users in your organization. You could have them log into the portal and access the output directly but maybe you don’t have the time or expertise to be setting up users to access Cognos directly and then maintain all of those users. You could have the output emailed to them but you don’t want to clog up your mail server with hundreds of attachments. Or maybe the attachments are just too large to be sent through email.
A good option could be to save the report outputs to your internal network or the cloud and have your users access them from there.
Setup
Saving to the file system is not difficult but there are a few steps you’ll need to do first and then additional steps when you run the reports. You will need access to the Cognos server as well as administrator access in Cognos Connection.
Note: Even if you are distributing output to a server and your users are accessing them but not directly receiving the output, they may be required to be licensed. Check with your IBM representative for complete licensing requirements.
The first thing you’ll need to do is decide where you want your report outputs to reside. This is generally going to be a network location that the consumers of the output will have access to, but it can also be on the Cognos server if you have an additional Windows process to disseminate the reports. In my example, I’m going to save it on the server so I have created a folder called CognosReportOutputs on the D: drive in the root folder.
In addition to the root folder, you can have any number of subfolders under it for finance, HR, accounting, etc. or you can separate by department or whatever makes sense for your organization. You can also have subfolders of subfolders as far down as you want but you will have to maintain those in Cognos Connection so keep that in mind when designing your structure. You can apply security to those subfolders so that the users can only see the locations to which they have access. Any number of subfolders can be added after the fact as well so if you don’t know the whole hierarchy yet don’t sweat it.
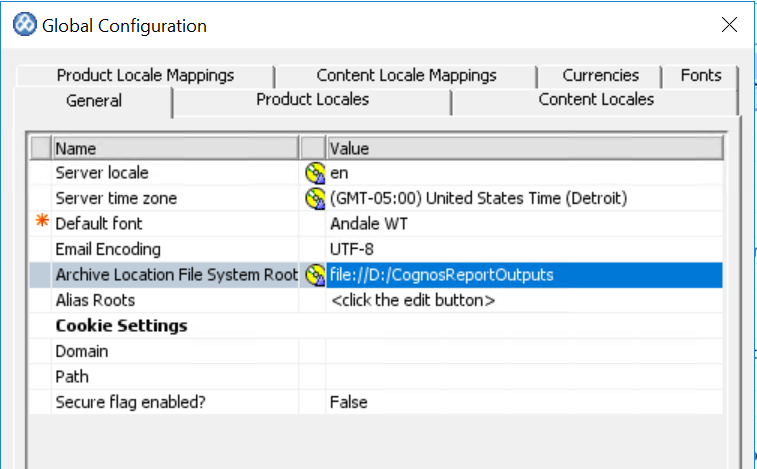
Once you have your root folder location created, navigate to the Cognos server and open Cognos Configuration. In the menu bar at the top, select Actions and then Edit Global Configuration… a dialog box will open. On the General tab, enter the path to the directory you created in Archive Location File System Root.
There are a few considerations to keep in mind.
- Use only your top-level folder.
- The path must be in the format of “file://(file-system-path)”.
- If you’re using a location on the Cognos server then it would be, for example, file://C:/reports.
- If you’re using a network path then it would look like file://\\network_location\folder.
- If using a network location, make sure that your Cognos server and the network server can talk to each other with read and write access.
Using our above example, I have entered my info in the Global Configuration.
Click OK to close.
Next, still in Cognos Configuration, in the Explorer window, click on Content Manager under Data Access. Set the value for “Save report outputs to a file system?” to True.

Now you’ll need to save your configuration and restart the services for the changes to be picked up.
Setup 2- Revenge
Just when you thought you were done setting things up there are a couple more steps to be done. At least we’re not on the server anymore though.
Now that we’re finished with the server-side configuration, log in to Cognos as an administrator. Navigate to Manage and select Administration Console.
- Select the Configuration tab.
- Select Dispatchers and Services on the left-hand side.
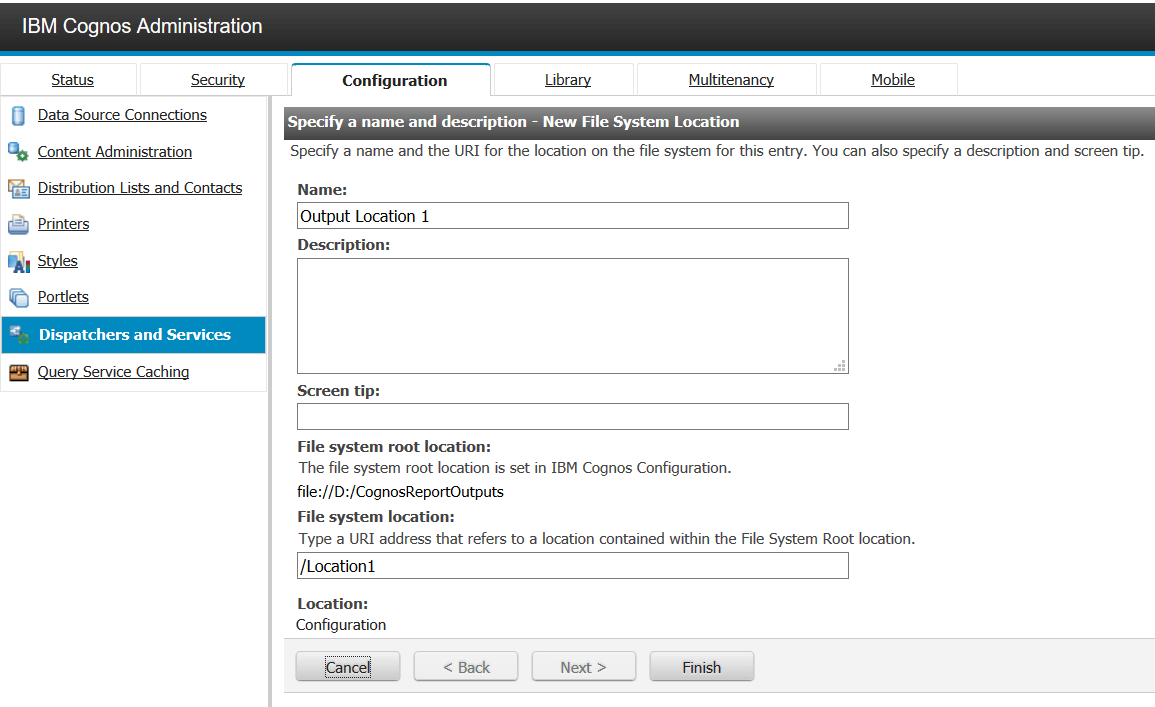
- On the toolbar, click the Define File System Locations icon.
- Select the New… link.
- Specify a name and optional description or screen tip.
- Note: The name does not have to match the actual folder name we will supply below.
- Under “File system root location” you will see the root location that is defined in Cognos Configuration that we set earlier.
- Under “File system location” set the relative path to the root location for the folder you want to place your report outputs in.
Here is where you will want to think hard about how you want your directory structure to look. You will need to add all of the folders and subfolders to your root location that was specified in Cognos Configuration. You won’t be able to save directly to the root folder because “File system location” is a required field so it is expecting a subfolder.
I have created two subfolders called Location1 and Location2 but they can be named anything. In this scenario, since we want to save to Location1 enter “/Location1” in this field. Make sure to include the preceding slash.
Click Finish and you will see your results. Again, you can add more subfolders at any time if so desired.

Setup 3- The Return
OK. So this step is kind of an either/or with the first one. We will cover a little bit about saving to the cloud instead of a network drive or the Cognos server. As of 11.1.5 there are three options for saving to the cloud – IBM, Amazon, and MinIO. Since I already have an AWS account, I will use Amazon.
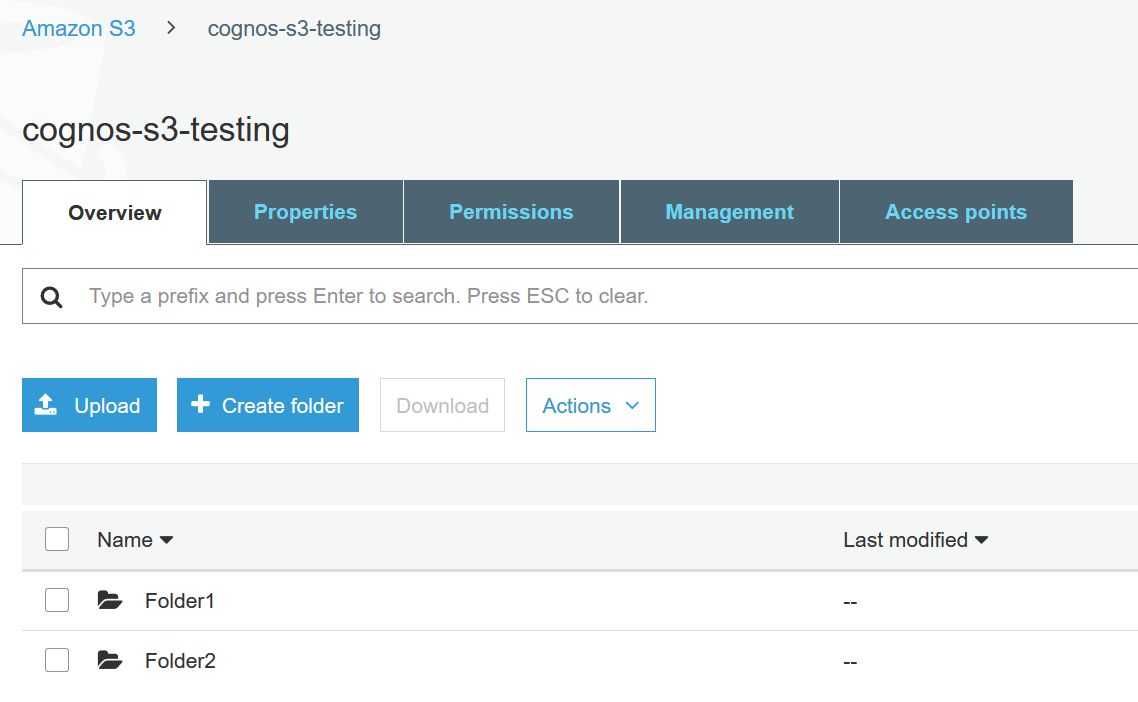
AWS uses their Simple Storage Service (S3) to house files so we will need to create a bucket there. Refer to AWS documentation on how to do this. You will also need your Access Key and your Secret Access Key to create a connection to the bucket from Cognos.
Once your bucket is created then you can create your folder structure in the same way that you would if you were using a network location or the Cognos server.
Now that we have our folders ready, let’s login to Cognos as an administrator. On the lower left-hand side click Manage and select Storage. This is a separate location where you can set up all of your cloud storage connections.
Click the Plus sign to create a new connection. Enter the name and select the type of storage solution. Enter your Access Key and Secret Access Key that we got when we set up our account in AWS and then test the connection. Select Create and Finish at the bottom and your connection is ready to be used.

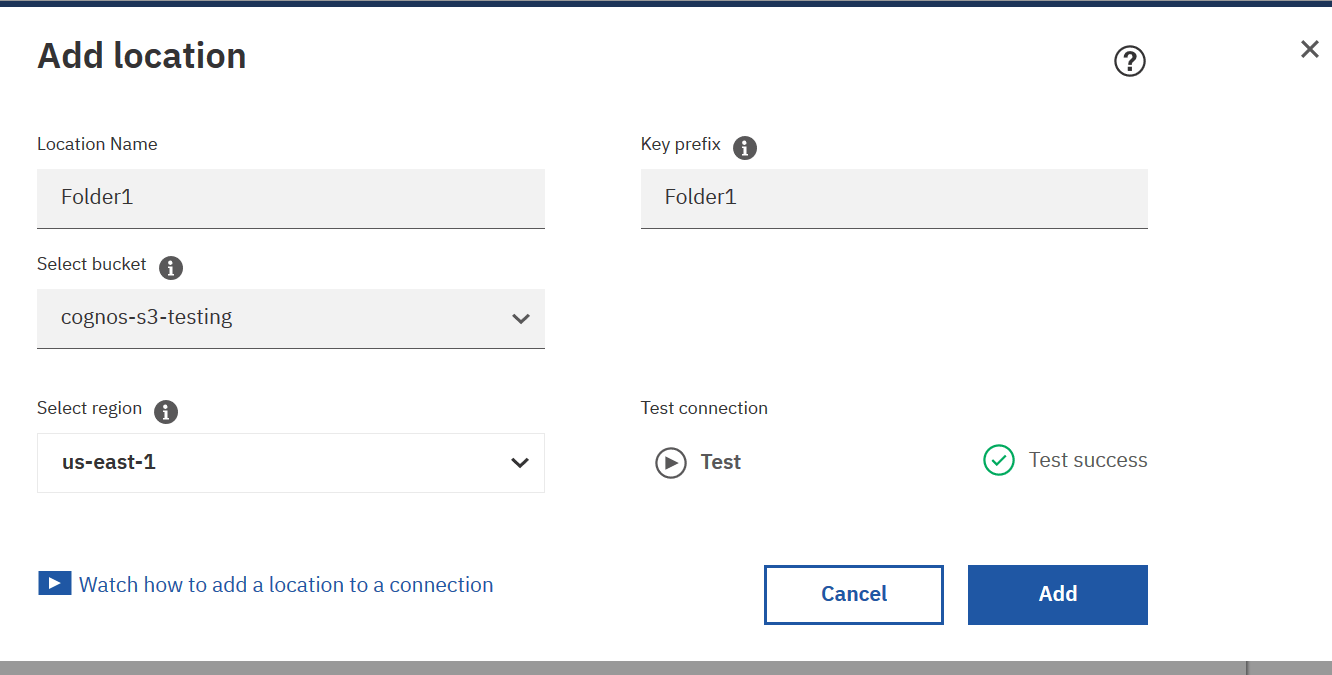
Now that our connection is created, we need to set our locations which would be the folders in the bucket. We will need to create at least one location otherwise Cognos will not know where to save the output in S3 since it is likely that you will need more than one bucket for different uses. Clicking on the connection you just created takes us into the location list. Click the Add location button to add a location.
Supply a location name, which can be different than the folder name, and select the bucket that we just added. Key prefix is used if you want to use the folders that we created earlier in S3 in our bucket. If you don’t supply a key prefix then the output is saved into the root folder (bucket). In this case, we will use Folder1 as our key prefix. Once you have successfully tested the connection click Add.
Setting up subfolders is similar to the way we did it using the file system. I created a subfolder in S3 called Subfolder1 under Folder1. I can reference that in the Key prefix when I add that location in Cognos. Obviously, you would want to use better location names so that you know the structure of your folders and to make it easier for your users to know where to look for their output. The syntax for the Key prefix is Folder1/Subfolder1. In this case, you don’t have to use a preceding / for the folder name.

Run the Reports
Of course, we will want to test our new functionality and you can do this a couple of different ways.
The first is to select the report properties, click the Schedule tab, and select New to create a schedule. Select the arrow next to Options > Delivery. Click the checkbox “Save report as an external file”.
- The name of the report gets automatically populated but you can change it if desired.
- Use the dropdown to select a location.
- Choose conflict resolution. The default is “Replace”. For multiple outputs, you can choose “Time stamp” or “Version number”.
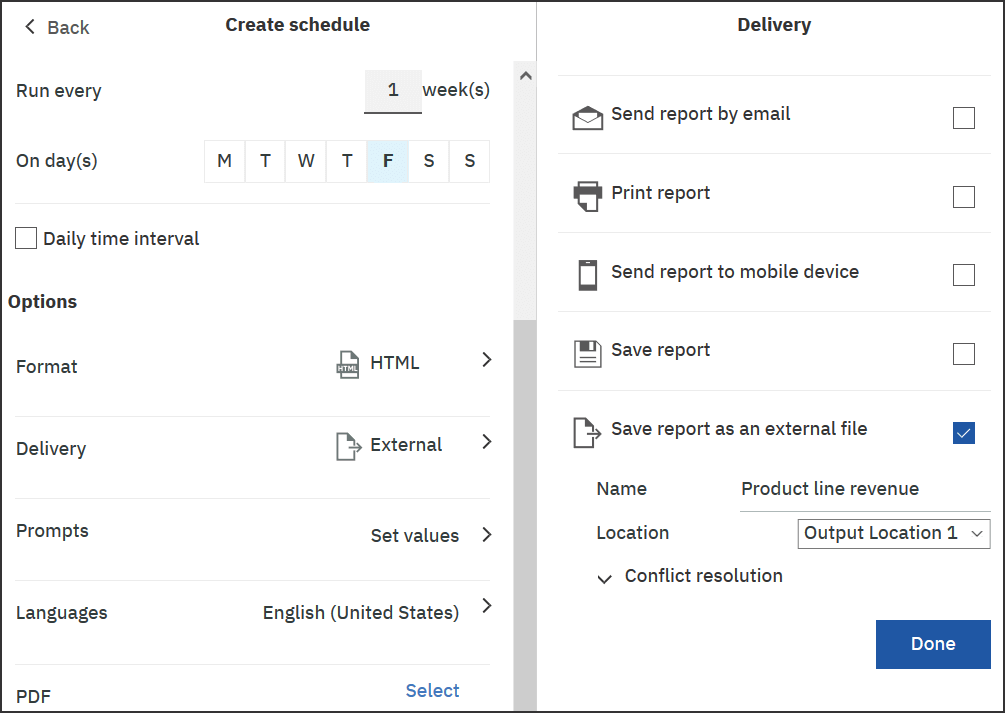
Finish creating the schedule and save it. After the report runs navigate to the output location and your report output will be in the correct folder.

The second way to do this is to click the ellipsis next to the report you want to run and select “Run as”. Check the button for “Run in the background” and then hit the drop-down arrow next to “Advanced”. Click the arrow next to “Delivery”, select “Save report as an external file” and the rest of the options are the same.
If you are using cloud storage, the options are the same as above except that when you click on Delivery you will now see a new checkbox for “Save to cloud”. Select that option and then you can change the report name if desired. Select the dropdown and choose your cloud connection. When you do, a second dropdown will appear where you can select your location.

Press Done and run the report. Navigate back to S3 and you can see your output in the correct folder.

Conclusion
Saving report outputs externally does involve some setup. Although saving to the file system is not difficult to set up, saving to the cloud requires additional access and setup that you may not have all of the permissions for. Be sure to think about your folder structure to make it as easy as possible for your users to find their data. And as always if you would like help setting up any of this let us know. We’d be happy to help!
Next Steps
We hope you found this article informative. Be sure to subscribe to our newsletter for data and analytics news, updates, and insights delivered directly to your inbox.
If you have any questions or would like PMsquare to provide guidance and support for your analytics solution, contact us today.